File Syntax
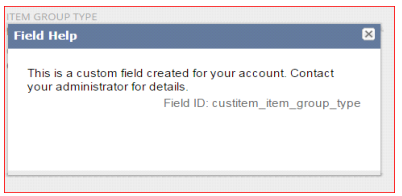
How to find the NS Field ID
The following table provides the File Syntax with examples:
Action | Syntax |
|---|---|
To add a new custom mapped field | Netsuite field name(field ID*)=SalesForce_Field_(API) Name For example: url=Website |
To add a reference field | netsuitefieldname=SalesForce_Reference_Field__r\:SalesForce_Reference_Key For example: Subsidiary=NSCRM__Subsidiary__r\:NSCRM__NS_Internal_Id__c If Subsidiary is 1984 in NetSuite, the resulting json would be: NSCRM__Subsidiary__r : { NSCRM_NS_Internal_Id_c : "1984" } |
To replace a field | If a field is already mapped by default for a given object and you want to replace that mapping, then place the new mapping in the sync file. The sync file will override the base mapping. |
To delete a field | If there is a base mapping that you do not want to be mapped, then you can remove that mapping by placing a minus sign - in front of the Salesforce field on its own line. For example: -NSCRM__Fax__c The above would remove any base mapping to the salesforce field NSCRM__Fax__c |
To add a comment line | If a line in the sync file starts with #, it will be viewed as a comment line and consequentially ignored. This helps you to document why and what are you doing in the sync file. For example: #Comment Line fax=Fax phone=Phone subsidiary=NSCRM__NS_Subsidiary_Id__r\:NSCRM__NS_Internal_Id__c |
To add a currency field | This is a special case. Salesforce needs Currencies as ISO codes. When we pull a currency field from NetSuite, it is an Id. Hence, if you want to custom map currency and need an ISO code, then begin the line with $ and it will do an ISO code lookup. For example: $currency=CurrencyIsoCode If you want the raw currency id to go over, then the $ is not required. For example: currency=CurrencyNSIdOnSF |
To create a customization file
1. In the search box, type File Cabinet.
The results are displayed based on the search criteria.
2. Select Page: File Cabinet.
The File cabinet page is displayed.
3. Click New Folder to create your own folder.
The Document Folder page is displayed.
4. In Folder Name, enter a name.
5. Depending on the requirement, you can specify a value in other fields or leave them blank.
6. (Optional) Choose an existing folder.
7. In NetSuite, go to Setup > Custom > Actian Configuration.
The Actian Configurations page is displayed.
8. From the Customization Folder list, select the folder that you have created.
9. Click Save.
The customization is saved.
Last modified date: 12/14/2021