Querying Audit Records : Audit Record Columns

Audit Record Columns
The following table lists all possible columns for an audit record. The Visible Columns setting determines which ones are displayed in the audit record grid. Column order can be rearranged in Visible Columns, or you can drag and drop columns with the mouse.
 
Note: MAC addresses are not available from remote clients in the current release.
Viewing Audit Record Details
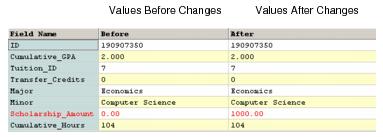
To examine the details of an audit record, click the record in the audit grid to display it in the lower part of the viewer window. If the audit record captures before-and-after changes to an application data record, the detail view shows both versions of the data record, as in the following Demodata example. The Before column shows the original record and the After column shows the change, which is highlighted in red.
Working with Archived Audit Records
Auditing can generate large numbers of audit records. To manage them, AuditMaster periodically empties the audit log to an archived file. The default archive file size is 75 MB. To reset the default size or choose archiving by date, see Automated Archiving.
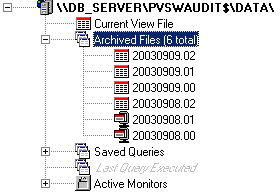
Archived files for each server appear in the data tree. The file name uses creation time in the format yyyymmdd.nn, where yyyy is the year, mm is the month, dd is the day, and nn is the number of the archive file created that day, starting with zero.
Compressing archived files saves as much as 90 percent disk space. AuditMaster encrypts compressed archived files to restrict access to users within the AuditMaster system. Moving an archived file out of its folder (i.e., \Arch or \Comp in the installation directory) grays out its entry in the data tree. Moving it back restores the entry and enables queries again. Permanently deleted files cannot be restored.
The data tree provides several archived file commands. As shown in the following table, right-clicking an archived file offers commands depending on whether the file is compressed. Queries may be run only on uncompressed files.
Query. Run a query against the file.
Execute Saved Query. Run a saved query.
Compress. Compress the file.
Decompress. Decompress the file.
Delete. Remove the file permanently.
Get File Information. Expand the data tree to show compression status, number of records, file size, last record in archive, and date range of included records.
AuditMaster provides two ways to create archived files:
n
n
Using the Data Tree to Archive Audit Records
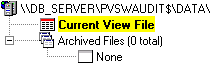
When you first install an AuditMaster event handler and its server appears in the data tree, no audit records have been archived. If you expand Archived Files, the number of archived files is zero.
After you begin logging, audit records may be archived. The system automatically creates an archived file when the audit log reaches a set limit by size or by date and time. You can also archive manually.
Note In the data tree, you may sometimes need to right-click the Archived Files icon and select Refresh All to update the list.
This section covers the following tasks:
n
n
To automate archiving, see Automated Archiving.
‰
You may want to archive manually for the following reasons:
n
n
n
In the data tree, select the current view file and do one of two things:
n
Select Server Archive Current View File, or right-click the file and select Archive.
n
Select Server Archive & Compress Current View File, or right-click the file and select Archive & Compress. Large numbers of records can take time, so you may want to use Admin View Status Log command to check for the “finished compressing” message.
You cannot run a query against a compressed archive file. You must first decompress it by right-clicking and selecting Decompress.
‰
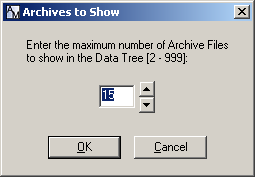
You can control the number of archived files listed in the data tree, which displays both uncompressed and compressed archived files.
The default setting for the number of archived files displayed in the list is 15. Displaying a shorter list does not delete archived files but only removes them from the display. They remain in the \Arch and \Comp folders in the AuditMaster root directory (e.g., default C:\<installation directory>\Audit). Raising the number in the setting displays them again.
1
Select View Set Archives to Show.
The Archives to Show dialog box appears.
2
Note In the data tree, you may need to right-click the Archived Files icon and select Refresh All to update the display.