Creating Report Frames
The next option on the Edit an Application frame's Create a Frame or Procedure pop-up is REPORT. Defining Report frames is similar to defining USER frames.
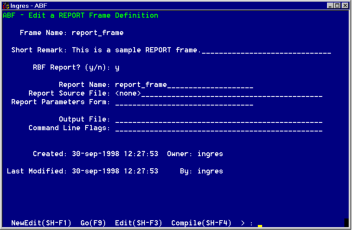
Select REPORT from the Create a Frame or Procedure frame. Specify the name in the Create a Report frame and select OK. The Edit a REPORT Frame Definition frame appears, as in the following figure.
In creating a report frame, you enter the Ingres Reports interface. To learn more about this interface, see the Using Character-based Querying and Reporting Tools.
The fields on this frame contain the information needed to produce reports from the Report interface.
Frame Name
Specifies the name of the report frame
Short Remark
Specifies a brief description of report frame
RBF Report? (y/n)
Determines whether the report is a Report-Writer or RBF report
Report Name
Specifies the name of an existing report you plan to use as is or edit for use in this frame. Or, if you are creating a new report, enter the name here. If you are using Report-Writer, this name appears in the Report-Writer specification file for the report.
Report Source File
Specifies the name of the report specification file for a Report-Writer report. File names specified here require an extension of .rw. RBF reports do not have a report specification file.
Report Parameters Form
Specifies the name of a form on which the user can enter values at run time for any variables used in the report. Variable values entered on this form are passed as parameters to the Report-Writer at run time.
To create or edit a form, specify the form name in this field, and choose the FormEdit operation.
When you create a parameter form, the names of the fields on the form must match the variable names in the report specification file. For example, if year is a variable used in the where clause of a query "...where pop. year = $year" then the variable form must include the field year.
The Report-Writer prompts the application user for needed values if they are not passed. It is strongly recommended that all variables used in a report be on the report frame's form. See Using Character-based Querying and Reporting Tools for more information on variables.
Output File
Specifies the report's output type: file, print, or display (the default).
• To store the report in a file, enter the filename to receive the report.
• To send the report to the printer, type printer.
• To display the report on your screen, type terminal. This is the default; if you leave this field blank, the report is directed to your terminal screen.
You can also save output in a file by using the .output command in your report specification file. However, any file name you enter on the Edit a REPORT Frame Definition frame overrides a file name given in the .output command.
Command Line Flags
Specifies the report parameters you want the application to use when running the report. Running a report from an application is like specifying the report command with the -r parameter at the operating system:
report dbname -r reportname
You can specify additional parameters for the report command in the Command Line Flags field. For example, specify -uusername to run the report as another user, or -lpagewidth to set the maximum page width. You cannot specify a parameter, such as -m or -i that conflicts with the -r parameter. For information on using parameters with the report command, see the Character-based Querying and Reporting Tools User Guide.
The following menu operations are similar to those in the Edit a USER frame:
NewEdit
Edits or creates a different frame or procedure. Prompts the user for the type of object to define.
Go
Runs the report frame
Edit
Runs the report editor you specified for the report in the RBF Report? (y/n): field.
• If you answered yes, RBF is the editor.
• If you answered no, you use the system editor.
Compile
Calls sreport to compile the source code for the Report-Writer report. This option is not necessary for RBF reports.
FormEdit
Runs VIFRED to create or edit a form for the current frame. Not active unless you specify a form.
LongRemark
Displays or edits more information about the selected frame on the LongRemark pop-up
Print
Prints a description for the frame
ListChoices, Cancel, Help, End
Perform standard operations
Create a Report
To create a REPORT frame for your application
1. From the Edit an Application frame, choose Create. This displays the Create a Frame or Procedure pop-up, as illustrated.
2. Select Frame. You see the pop-up menu for the type of frame.
3. Select REPORT to display the Create a REPORT Frame pop-up. This frame operates in the same way as the Create a USER frame pop-up.
4. In the Name field, type the name for the report frame, and select OK.
5. You see the Edit a REPORT Frame Definition frame, with the default frame and report names filled in, as illustrated in the example.
6. (Optional) Enter a brief remark in the Short Remark field.
7. In the RBF Report? Field, enter y (the default) to create an RBF report, or n to create a Report-Writer report.
8. In the Report Name field, either take the default name (the same name as the report frame) or enter the name of an existing or new report.
9. The next field is the Report Source File field.
• If you entered n in the RBF Report? Field, type the name of the report specification file in the Report Source File field. This filename requires an extension of .rw. Proceed to step 10.
• If you entered y in the RBF Report? Field, the Report Source File field now reads <none> as RBF reports do not require source code files. Proceed to step 11.
10. For Report-Writer reports only: When you are ready to create the report specification file, use the Edit operation to enter the system editor.
Type in the file and save it using system editor commands. Save the report specification file in the database by using the Compile operation. For a sample source code file, see the Sample Report-Writer Report File section.
Alternatively, you can create and save a Report-Writer report outside of ABF using the system editor and sreport.
11. For either the RBF or Report-Writer report, you can optionally create a form for the entry of values for variables used in the report at run time.
12. In the Report Parameters Form field, type the name of the form. For details, see the Creating Report Frames section.
When you use RBF to build reports, you can specify variables for reports in the Column Options frame of RBF. For details, see the sections on RBF in Character-based Querying and Reporting Tools user Guide.
13. Select the output type next. In the Output File field, enter a filename, type printer, or type terminal to display the report on your terminal screen (the default).
These output options are discussed in the Creating Report Frames section.
14. Use the Command Line Flags field to enter any parameters you want the report to use when running.
15. If you are creating a report with RBF, select Edit and use RBF in the normal manner. This procedure does not produce a stored report or report source file.
For additional information about creating reports, see the Character-based Querying and Reporting Tools User Guide.
Sample Report-Writer Report File
This sample report source file takes data from the Emp database table and formats it, showing the salaries of employees and the total salary for each department. In the report, empdetail.rw is the name of the report source file, while empdetail.out is the name of the report output file.
.name empdetail.rw
.output empdetail.out
.data emp
.sort dept : a,
name : a
.output empdetail.out
.data emp
.sort dept : a,
name : a
.header report
.newline 3
.center
.print "List of Employees"
.newline 3
.newline 3
.center
.print "List of Employees"
.newline 3
.header dept
.tformat dept (c12)
.footer dept
.right salary
.print "_________________"
.tab salary
.print sum(salary)
.newline 2
.tformat dept (c12)
.footer dept
.right salary
.print "_________________"
.tab salary
.print sum(salary)
.newline 2
.detail
.print dept (b12), name (c14)
.print date(birthdate)
(d"February | 3, 1901 ")
.println salary ("$$,$$$,$$$.nn")
.print dept (b12), name (c14)
.print date(birthdate)
(d"February | 3, 1901 ")
.println salary ("$$,$$$,$$$.nn")
Testing the Report Frame
The last step in creating a frame is testing. You can test a Report frame without compiling the application by choosing Go from the Report frame itself.
You can also test the entire application at any time during development by selecting Go from the Edit an Application frame. For more information, see Testing Incomplete Applications.
Last modified date: 02/05/2026