Creating a User-Specified Frame
A user-specified or USER frame has two basic components, although you can include others:
• A form created with the ABF FormEdit operation
• A 4GL source code file that you enter using the system editor
In addition, you can create procedures, variables, and constants that the source code file can call and manipulate. Creating procedures, variables, and constants is discussed below.
The Edit a USER Frame Definition frame is equivalent to the Edit an Application frame for applications. Define the basic details for the user frame here. From this frame, use the FormEdit operation to create the form. Use the Edit operation to call the system editor to create the source code file.
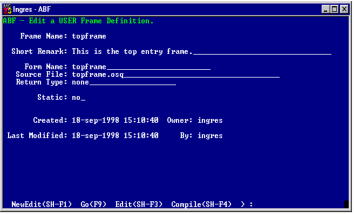
You can enter and edit the Short Remark field, Form Name, Source File, Return Type, and Static fields here.
Frame Name
(Read-only) Holds the name of the frame
Short Remark
Specifies an optional brief description of the frame
Form Name
Specifies the form associated with this frame. The default is the frame name, but you can change this. For more information on creating forms, see Forms in ABF Applications.
Source File
Specifies the name of the 4GL source code file associated with this frame. The default filename combines the suffix .osq with the frame name. The suffix .osl appears with QUEL files. For information on using QUEL, see Notes for Users of QUEL on page 385.
The file name must be unique to the frame—it cannot belong to another frame or procedure. ABF can truncate or change the default name if it is too long or conflicts with other source code file names. Use the Edit operation to create the file with the system editor. Do not include a directory path as part of the file name. All source code files must reside in the specified source code directory.
Return Type
Provides the data type of any values to be returned from this frame.
Legal return types are any Ingres type, "string," or "none." You cannot use record or array types. To see available Return Types, use the ListChoices menu operation.
A "string" or Ingres type can also be nullable. Use the Nullable field to specify this.
Static
Indicates yes or no (the default) to specify whether the data on the frame's form is saved and redisplayed the next time the frame is called.
• Typically, this field must be set to no. If you enter no, ABF clears the fields on the frame's form each time the application displays the frame.
• If you enter yes, ABF preserves the data entered on the frame's form, and redisplays the form with that data the next time the application calls the frame.
If a form is shared by more than one frame, do not use the Static feature. Data entered on the Static form in one frame appears in the other frame.
If the current application uses some non-compiled forms, another field appears that allows you to specify whether this frame uses a compiled form or fetches its form from the database at run time.
The remaining fields give information about the user who created the form (the Owner), and when the frame was created and its definition last modified.
These operations are available from the Edit a USER Frame Definition frame:
NewEdit
Selects or creates the definition of a different component from a submenu that appears on the menu line. Prompts for type and name of component.
Go
Runs the application starting at the current frame. You cannot run the application from an individual frame unless all the frames are error-free.
Edit
Uses the system editor to create or edit the file containing the 4GL specification for the current frame
Compile
Checks the 4GL syntax for current frame, display errors (if any), and add the compiled source code for the frame to the application if free of errors. If errors exist, ABF creates an error listing file in the object code directory. ABF asks if you want to display the errors.
FormEdit
Runs Visual Forms Editor (VIFRED) to create or edit a form for the current frame
LongRemark
Displays or enters more information about the selected frame on the LongRemark pop-up frame
Print
Prints the frame definition including the text file containing the 4GL specification
ListChoices
Displays a menu of legal values for the current field or a field description
Cancel, Help, End
Perform\ standard operations
Create a User-Specified Frame
These steps take you through the windows and pop-ups involved in creating a user-specified frame, referring you to the figure that shows each frame. Use the ListChoices menu operation to see a list of legal values from which you can choose or a field description for each of these fields.
To create a user-specified frame
1. Choose Create from the Edit an Application frame. You see the Create a Frame or Procedure pop-up, as illustrated.
2. Highlight Frame and press Return or choose Select from the menu. The Create a Frame options pop-up appears, as illustrated, listing the available types of frames.
3. Select USER. The Create a USER Frame pop-up appears with a blank Name field. The Owner, frame Type and Date of creation are filled in, as illustrated.
4. In the Name field, enter the name for the frame. The other fields are display only.
5. Choose OK. ABF creates the frame and displays the Edit a USER Frame definition frame, as shown in the example.
6. In the Form Name field, enter the name of the form to be associated with the frame. By default the form has the same name as the frame.
7. In the optional Short Remark field, enter a brief description of the frame if you like.
8. In the Source File field, enter the filename you are going to use when you enter the 4GL code or the name of an existing file. The default filename combines the suffix .osq with the frame name.
9. In the Return Type field, enter the data type for data this frame returns to a frame or procedure that calls it. The default value for the Return Type field is "none."
For the data types that you can use here, see the 4GL part of this guide.
10. Enter yes or no (the default) in the Static field. For details on using the Static field, see the Creating a User-Specified Frame section.
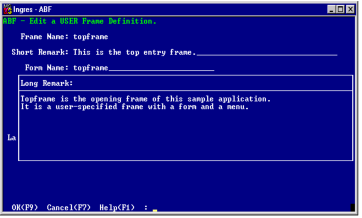
11. Select LongRemark to enter or view more detailed information about the application on the LongRemark pop-up, shown above. The other Edit a Frametype Frame Definition frames also have associated Long Remark pop‑ups.
This completes the creation of a user-specified frame. Now you can go on to create a form for this frame.
Create a Form
The following steps describe using the ABF FormEdit operation to create a form for a user-specified frame.
To create a form
1. Complete the fields in the Edit a USER Frame. Enter a form name, such as "topframe," in the Form Name field.
2. Choose the FormEdit operation to enter VIFRED. The following message appears:
Retrieving form 'topframe' . . .
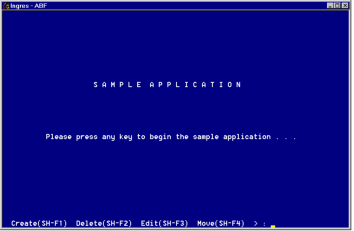
Because this form does not yet exist, the VIFRED Creating a Form frame appears, as shown below. The frame menu lists four default forms: Duplicate, Blank, Table, and JoinDef.

3. Choose a default form for the frame you are creating:
Duplicate
Copies an existing form
Blank
Starts with a blank form. This is useful for menu forms and forms which are not based on a single table. The following figure shows an example.
Table
Creates a form that displays all or most of the columns in a table. This option provides a default form that you can modify.
JoinDef
Creates a form that displays all or most of the columns in a JoinDef. This option provides a default form that you can modify.
4. Use VIFRED operations to design the form, creating the required fields.
Developers writing applications that are used with mouse support must keep in mind that the mouse user can click at random around the fields of a form. This affects the way you set up fields and their validations in VIFRED. For more information about form design in VIFRED, see the Using Character-based Querying and Reporting Tools Guide.
5. When you finish designing the form, choose Save to write the form to the database. You see the VIFRED Saving a Form frame. Choose Save and End to return to the Edit A USER Frame Definition frame.
The next step is to create the frame menu, in the form of a source code file.
Create the 4GL Source Code File for a User-Specified Frame
A unique feature of a user-specified frame is that you can create a 4GL source code file which provides the menu and operations for the frame. In other Ingres tools, such as RBF, the frame uses the default menu for the interface.
The 4GL code for a user frame is stored in a text file in the source code directory. The source file must be unique and cannot be shared between frames.
The 4GL part of this guide provides detailed information on writing 4GL specifications.
To create a source code file containing 4GL statements
1. Choose Edit from the Edit a USER Frame Definition frame. ABF runs the editor specified with ING_EDIT or the default system editor. (You can use the Edit operation later to edit existing source files.)
2. Your system editor's opening display appears. Follow the usual text-editing procedures to enter the 4GL code.
3. When you finish creating the file, save it before you exit the editor. You return to the Edit a USER Frame Definition frame.
4. Compile the frame. This places a compiled copy of the 4GL code in the database. Choose Compile to compile the code and check for syntax errors. You see a message telling you that the frame is being compiled.
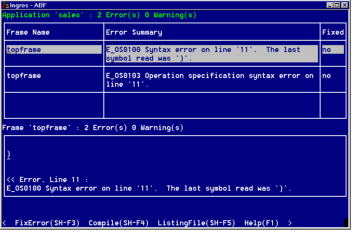
5. If there are compilation errors, ABF displays a frame which lists the errors and prompts you to correct them. Enter y (yes) to see the Error Listing frame, shown in the following figure.
This frame displays any error messages in a scrollable table field. Select FixError to open the file. Select MarkFixed to mark an error corrected. Select Compile again when finished.
6. You can print a copy of the 4GL specification on your printer by choosing Print from the Edit a USER Frame Definition frame.
7. When compilation is complete, choose End to return to the Edit an Application frame.
Adding a New Frame to an Application Menu Frame
If your application has a menu frame, you can add a new frame to the menu after it is complete by opening the Edit a USER Frame for the menu and following these steps:
• Add the 4GL code for the new frame to the code for the main menu. To do this, choose the Edit operation to open the source code file.
• Edit the main menu form to list the new frame. To do this, choose FormEdit to enter VIFRED and modify the form.
The new frame appears on the menu line when you run the frame next.
Testing the USER Frame
The last step in creating a frame is testing it.
1. To check to see that your USER frame is operating in the way you intend, use the Go operation from the Edit an Application frame. This compiles the application, and, if no errors prevent it from running, runs it.
2. If you are not satisfied with the way your frame is functioning, return to the frame and use Edit or FormEdit to correct the source code or the form.
3. Select Go to run the application again. For more information on Go, see the Testing Incomplete Applications section.
Last modified date: 02/05/2026