Defining Update Frames
Update frames let the user retrieve records from tables, then update the retrieved data. You also can define an Update frame to include any of these additional operations:
• Inserting new records into the Master and Detail tables
• Deleting records from the Master and Detail tables
• Qualification processing to let users retrieve specific records
• A Next menu item to let users retrieve all Master table records that meet the query specification
You also can specify for an Update frame:
• The column sort order for retrieved records
• Query restrictions that you specify in the visual query to retrieve specific records (in addition to or instead of letting users enter query qualifications)
The following figure illustrates the visual query window for an Update frame:
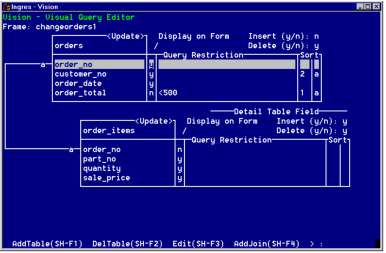
The specifications shown in the figure correspond to the examples used in the discussion below.
Add New Records
The user of an Update frame can add data to the Master or Detail table (or both) in either of these ways:
• By updating a record, then using the AddNew menu operation to save the updated record as a new record. The original record is unaffected.
• By adding an entirely new record, then saving it with the AppendMode menu operation.
Vision generates menu items for both these operations when you allow users to add records on an Update frame.
On the visual query window, adding new records is controlled by a simple field labeled "Insert (y/n)" for the Master table and a similar field for the Detail table. By default, Vision lets users add new records to the Detail table but not to the Master table.
You can specify insertions separately for each table. For example, you can let users of an Update frame add new items to existing orders, but not add new orders.
Note: Although you can use Update frames to add new records, you cannot use any of the special features available on Append frames, such as sequenced fields and default values. (See the "Using Vision's Advanced Features" chapter for escape code that you can write to get around this restriction.)
To change the specifications for allowing users to add new records
1. Move the cursor to the Insert field for the Master or Detail table whose setting you are changing.
2. Type n or y as appropriate to change the setting.
3. If desired, repeat for the other table in the visual query.
Delete Records
The process of updating records on an Update frame can involve deleting records, also. By default, Vision lets users delete records from the Master and Detail tables. The following table describes the visual query specifications that control the deletion of records on an Update frame:
Specification | Default |
|---|---|
Delete field for the Master table | Allow deletions in the Master table |
Delete field for the Detail table | Allow deletions in the Detail table |
Delete Cascades frame behavior | Delete all corresponding records in the Detail table when the user deletes a record in the Master table |
Specifying Frame Behaviors describes how to set the Delete Cascades frame behavior.
If an Update frame has only a Master table, you can control deletions by setting the value of the Delete field for the Master table, as described in the procedures at the end of this section.
For an Update frame with a Master table and a Detail table there are two considerations involved in allowing Detail table row deletions:
• Whether to allow users to delete individual Detail table rows
You control this specification through the Detail table Delete field on the visual query display, using the procedures described at the end of this section. When you allow Detail table row deletions, Vision generates a RowDelete menu item on the Update frame.
• When a user deletes a Master table record, whether to delete all corresponding Detail table rows
You control this specification through a combination of the Master table Delete field on the visual query window and the Delete Cascades frame behavior, as described in the following table:
Deletions Desired | Setting for "Master Table Delete" Field | Setting for "Delete Cascades" Frame Behavior |
|---|---|---|
None | N | N/A |
Detail table only | N | N/A |
Master table record and corresponding Detail table records | Y (default) | Cascaded (default) |
Master table deletion allowed only if no corresponding Detail table records | Y (default) | Restrict |
Master table only | Y | DBMS (The DBMS decides whether to delete corresponding Detail table rows, possibly resulting in "orphaned" rows in the Detail table.) |
In the previous table, "N/A" indicates that the value for this specification does not affect the user actions allowed. In these cases, you must accept the default value.
Using the order entry example, you could let users delete order items from the Detail table, but not delete entire orders from the Master table. In this case, you would specify Detail table deletes only.
You could have another Update frame that displays open orders. You could specify Master table deletions allowed and Restrict Cascades frame behavior. Users now can delete orders from the Master table only if there are no open items in the Detail table.
To change the specifications for deleting records
1. Move the cursor to the Delete field for the Master or Detail table whose setting you want to change.
2. Type n or y as appropriate to change the current setting.
3. If desired, repeat for the other table in the visual query.
If necessary, change the Delete Cascades frame behavior as described in Specifying Frame Behaviors.
Specify Query Restrictions
You can restrict the records that users can retrieve on an Update frame. You do this by specifying a query restriction in the visual query.
You can specify query restrictions on as many columns as you like in both the Master and Detail tables. These restrictions can be in addition to any query qualifications that the user enters when running the frame.
For example (see the preceding figure), you could specify that users only can retrieve orders whose total is less than $500. To do this, enter "<500" as a query restriction for the "order_total" column in the Orders table.
To specify a query restriction for a column
1. Move the cursor to the name of the column.
2. Tab to the Query Restriction field.
3. Enter a restriction for the column.
The value of the restriction must be consistent with the column's data type. The value can be in the form of an expression as described in Using Expressions in Frame Definitions.
4. If desired, repeat this procedure for additional columns.
Specify the Column Sort Order
By default, Vision retrieves records in whatever order they appear in the tables in the database. You can use the Visual Query Editor to indicate a specific order in which to sort retrieved records.
You can sort retrieved records:
• On any number of columns
• In a specified sequence of columns, regardless of the sequence of the columns in the table
• On both displayed and non-displayed columns
For example, you can display retrieved records in order by dollar amount first and then by customer number, even though a different column appears first in the table.
To specify the sort order of columns in the Master or Detail table
1. Move the cursor to the name of the Master or Detail table column.
2. Tab to the first column under the Sort label.
3. Type the number 1.
4. Press Tab again.
The cursor moves to the second column under the Sort label.
5. Specify ascending (smallest to largest or "a" to "z") or descending order:
• To sort the column in ascending order, press Tab. Vision enters an "a" as the default.
• To specify descending sort order, type d.
6. Repeat the above sequence for each column on which you want to sort, entering the appropriate number and ascending/descending indicator.
To change the sort sequence after you specify it, move the cursor to the row for the column you want to change and enter a new sequence number. Vision adjusts the sort number for each column that comes later in the sequence.
How You Can Control Window Clearing
By default, Update and Browse frames on which the qualification processing frame behavior is enabled (see Specifying Frame Behaviors) are cleared each time a user selects Go. You can prevent the window from being cleared by setting the internal 4GL variable "IIclear2" to "n" in escape code.
For example, put the following statement in a Form-Start escape:
IIclear2 = 'n';
For instructions on how to write escape code, see Using Vision Advanced Features.
How You Can Specify Unique Keys
The tables that you use with Update frames must have unique keys defined. Otherwise, when a user attempts to update or delete a record on the Update frame, Vision considers each column in the table to be part of a "unique key." This can lead to two types of problems:
• Performance is slower, because the query is constructed with all the columns as part of the where clause.
• A table with many columns can cause buffer overflow errors at run time, because of the size of the where clause.
To avoid these problems, use the SQL modify statement or create unique index statement to define a unique key on a table. (See the SQL Reference Guide for more information on these statements.) You then can use the Vision Reconcile utility so that the visual query reflects the table's new unique key. For more information on the Vision Reconcile utility, see Reconciling Tables and Frame Definitions.
How You Can Specify Nullable Keys
When defining a table to use as a Master or Detail table on an Update frame, avoid creating any of the key columns as nullable. Nullable key columns cause Vision to generate additional source code, including a more complicated where clause, additional hidden fields, and an if-endif block before the update or delete statement.
This additional code prevents the generated where clause from failing when a user enters a null value into a key column. However, the additional code also makes the source code file larger and more difficult to read, and decreases the efficiency of the frame.
Last modified date: 02/05/2026