How to Create the Application
The steps for creating an application are described in this section.
The Applications Catalog Window
The Applications Catalog window is the first window you see when you start Vision or ABF without specifying an application. Here is an example of an Applications Catalog window:
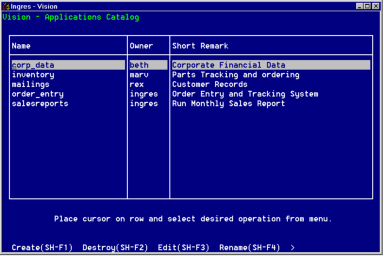
The Applications Catalog contains:
• The name of each application in the database (you identify the database when you start Vision or ABF)
• The user ID of the person creating the application—either the database administrator (DBA) or a specific user
• A description of the application
The Applications Catalog is a display-only window; that is, you cannot change any of the entries directly in the window.
You create and manage your applications through the menu operations at the bottom of the Applications Catalog window. For example, you can use the Rename operation to rename an application or the MoreInfo operation (described in The MoreInfo about an Application Window section) to change the description. For a list of the menu operations for all the windows in this chapter, see Menu Operations on page 3.
The Create an Application Window
To create a new application
1. Select Create from the menu operations at the bottom of the Applications Catalog window. The Create an Application window is displayed:
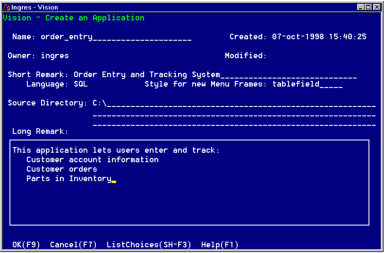
You use this window to provide basic information about the application.
2. Type the application name in the Name field. This name must not be the name of any other application that accesses this database and must follow the standard object naming conventions (see Naming Conventions).
3. Press Tab. The cursor skips the Created, Owner, and Modified fields, because this information is filled in automatically. The owner is the user ID of the person creating the application. The Modified date field remains blank until the application is changed.
4. Enter a one-line description of the application in the Short Remark field. This description is optional, but it appears on the Applications Catalog window so is useful in identifying the application.
5. Press Tab.
• If you are using Vision, the cursor skips the Language field, and the value SQL is entered to indicate that Vision uses the Structured Query Language to send queries to the database.
• If you are using ABF, enter the query language for the complete application: SQL or QUEL. (Do not attempt to include two query languages within one application.) SQL is the default, but you can change this if your installation supports only QUEL or if your installation supports both, but you prefer QUEL.
6. For Vision only, the cursor moves to the Style for New Menu Frames field. Take one of the following actions:
• Press Tab to accept the default that all menu frames in this application be displayed as table fields.
• Enter single-line (or use the ListChoices operation to select this item) to specify that all menu frames be created with single-line menus.
You can override the application-wide default for specific menu frames that you create. For more information, see Creating Frames on page 27.
7. The cursor is now positioned on the Source Directory field. This field displays the full pathname of the directory that holds the source code for your application. The default is the directory in which you started Vision or AFB, but you can change it here by typing over the current value. If you do specify a new source directory, be sure to include the full pathname.
8. Press Tab. The cursor moves to the Long Remark field. Use it to enter an optional description of up to eight lines about the application.
9. When you have finished entering your information, select OK from the menu. This displays the window you must use to define the frames in the application.
For more information on the menu items on this window, see Menu Operations on page 3.
The MoreInfo about an Application Window
After you create an application, you can use the MoreInfo About an Application Window to view the information you entered on the Create an Application window. Also, you can add a Short or Long Remark or edit the ones you entered.
To display the MoreInfo About an Application window:
1. Position the cursor on the name of an application on the Applications Catalog window.
2. Select MoreInfo.
The MoreInfo About an Application window is displayed:
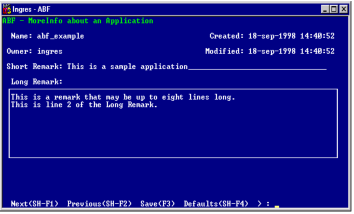
This window shows you the information you entered when you created the application (or that you previously entered in this window).
The Modified field now contains the last date on which you modified the MoreInfo About an Application window.
3. To add or change the Short or Long Remark:
a. Enter new text or type over the current text in the Short Remark field.
b. Tab to the Long Remark field.
c. Enter a new Long Remark or type over the current one.
d. Select Save to save any changes.
4. Select End to return to the Applications Catalog window.
The menu items on this window are described in Menu Operations on page 3.
Last modified date: 02/05/2026