Using Map Recommend
You can map the target fields with the source fields in the following key ways:
• Based on a combination of character algorithms and dictionary (Recommend)
• By name
• By position
Mapping Fields Using Recommend Option
You can map the fields based on a combination of character algorithms and dictionary (fuzzy match mode). You can configure the dictionaries by placing them in the MappingDictionary folder at the following location:
<user_home>/Actian/DataConnect/MappingDictionary
For example:
• Windows: C:\Users\testuser\Actian\DataConnect\MappingDictionary
• Linux: /home/testuser/Actian/DataConnect/MappingDictionary
By default, a default dictionary called default-dictionary.txt is available in the MappingDictionary folder. You can either delete this dictionary and add your own dictionary or extend the default dictionary. A file with a .txt file extension in the MappingDictionary folder is considered as dictionary file.
Note: If you do not want dictionary-based mapping, then make sure there are no dictionary files in the MappingDictionary folder. If the MappingDictionary folder is deleted, it will be recreated with a default dictionary file.
The dictionary file is composed of categories and the words relevant for a category.
• Category starts with [category_name].
• Words that are synonyms of each other or are interchangeable must be on the same line.
• Words that are within the same category are assigned a relevance match score if synonyms are not found.
• Line that starts with # is considered as a comment.
A sample dictionary file format is:
# location category
[location]
address, residence, street, current address, permanent address, location, invoice address, billing address
city, town, place
zip, pincode
[dob]
dob, date of birth, birth date
After establishing connection with the source and target connectors, do any of the following to map the fields using the Recommendoption:
• Click  and select Recommend.
• Right-click on the target connection section and select Auto Map - Recommend.
The fields are auto-mapped according to the match percent filter and based on the algorithm's calculation and the dictionary. The following message is displayed in after you select Recommend.
Please review the mapping and click Accept to apply.
The following image shows the view when the Recommend option is selected.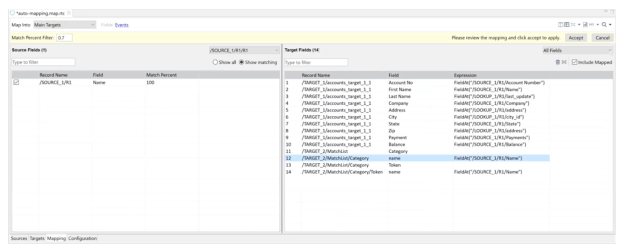
The Match Percent Filter text box displays the match percentage based on which the probable matches are filtered. If you change this value, then the fields are remapped based on the updated value. By default, it uses the value specified in the Auto-Mapping Match Percent Filter text box available in Options > Preferences > DataConnect > Map Designer.
If the mapping is correct, then click Accept. Else, click Cancel to exit the auto-mapping mode.
When mapping using the Recommend option, both the source and target grids display fewer columns and limited functionality (that is drag-and-drop and right-click context menu options are disabled).
Based on the field selected in the target grid, the matching fields are displayed in the source grid. In the target grid, the Expression column shows the expression for the mapped fields. If you want to unmap the field, then deselect the checkbox for the field in the source grid. The expression for the matching target is updated as blank and will not be considered. Similarly, if you want the target field to be mapped to another source field, you can select the checkbox for that source field in the source grid.
The following options are available in the Source grid:
• Show matching: If this option is selected, then the source grid displays only those fields that are a likely match for the selected target field. This option is selected by default.
• Show all: If this option is selected, it displays all the fields in the Source grid in relation to the selected field in the target grid. The Match Percent column indicates the percentage of the match for a source field against the selected target field. The value is non-zero.
The following options are available in the target grid:
• Clear icon: Click the  icon to clear the mapping.
• Remap icon: Click the  icon to re-map the fields.
• Include Mapped: Select this option to display the fields that were already mapped before using the Auto Map option.
If you move away from the Auto Map view without applying the mapping, then the following message is displayed:
Mapping has not been applied. Do you want to apply the changes before continuing?
Click Yes. The mapping is applied.
After applying the mapping, you can undo the complete mapping using any of the following options:
• Undo option in the main menu
• Press CTRL+Z
• Undo option in the right-click context menu
Mapping Fields By Name
You can map the target fields with the source by name. Matching always begins in the first target field. Mapping by Name looks for a field in the target that has the same name as the source (case insensitive) and maps the target field with the source if it finds the field.
To map fields by name, do any of the following:
• Click  and select Name.
• Right-click on the target connection section and select Auto Map - Name.
Note: You cannot undo these actions from Edit > Undo Match by Name or Edit > Undo Match by Position, respectively.
The Expression column populates the appropriate field name (matching with source name). The fields in the source and target are re-arranged based on the selected mapping option.
If you have already modified a field, it is not overwritten when the fields are automatically mapped.
Mapping Fields by Position
You can map the target fields with the source by position. Matching always begins in the first target field. Map by position uses the rows of target fields and maps the target field 1 to source field 1, target field 2 to source field 2, and so on.
To map fields by position, do any of the following:
• Click  and select Position.
• Right-click on the target connection section and select Auto Map - Position.
Note: You cannot undo these actions from Edit > Undo Match by Name or Edit > Undo Match by Position, respectively.
The Expression column populates the appropriate field name (matching with source name). The fields in the source and target are re-arranged based on the selected mapping option.
If you have already modified a field, it is not overwritten when the fields are automatically mapped.
Applying Default Values for Target Field Expressions
You can apply default values for the target expressions. If the schema specified in your map contains default values, then you can automatically assign the values as expressions to your target fields in case you have not defined an expression for the fields.
You can apply the default values when your map uses a schema that contains numerous default values and you do not have to manually type the values as expressions for each field in the target.
The following expressions are automatically generated for all the fields that have default values in the schema.
• If the field is linked to a source field
If FieldAt("/SOURCE/R1/SourceField") <> Null then
FieldAt("/SOURCE/R1/SourceField")
Else
"DefaultValue"
End If
• If the field is not linked to a source field
"DefaultValue"
To apply default values, do any of the following:
• Click  and select Apply Default Values.
• Right-click on the target connection section and select Apply Default Values.
You can undo or redo these actions using Edit > Undo Apply Default Values or Edit > Redo Apply Default Values, respectively.
The target field expressions are populated with the default values from the schema.
Before creating the map, you can set an option in the Preferences window to apply the default values automatically. For more information, see Setting Map Designer Preferences.
Other Ways to Map Target Fields
• Map a target field to a constant (that is, type ="3") in the target Expression column.
• Map a target field to a different target field by dragging a target field name and dropping it on a different target field's expression.
• Map a target field to the result of a complex expression or a function contained in a Script Library (click  and use expression builder).
• Map a target field to a global variable (type =globalvariablename in the Expression column OR use the expression builder).
Last modified date: 01/03/2025