Actian DataConnect Settings
Configure Actian DataConnect to match your workflow and preferences. This guide covers all available settings for customizing the application appearance, data quality defaults, execution behavior, user-defined connections, macros, and packaging and deployment.
Overview
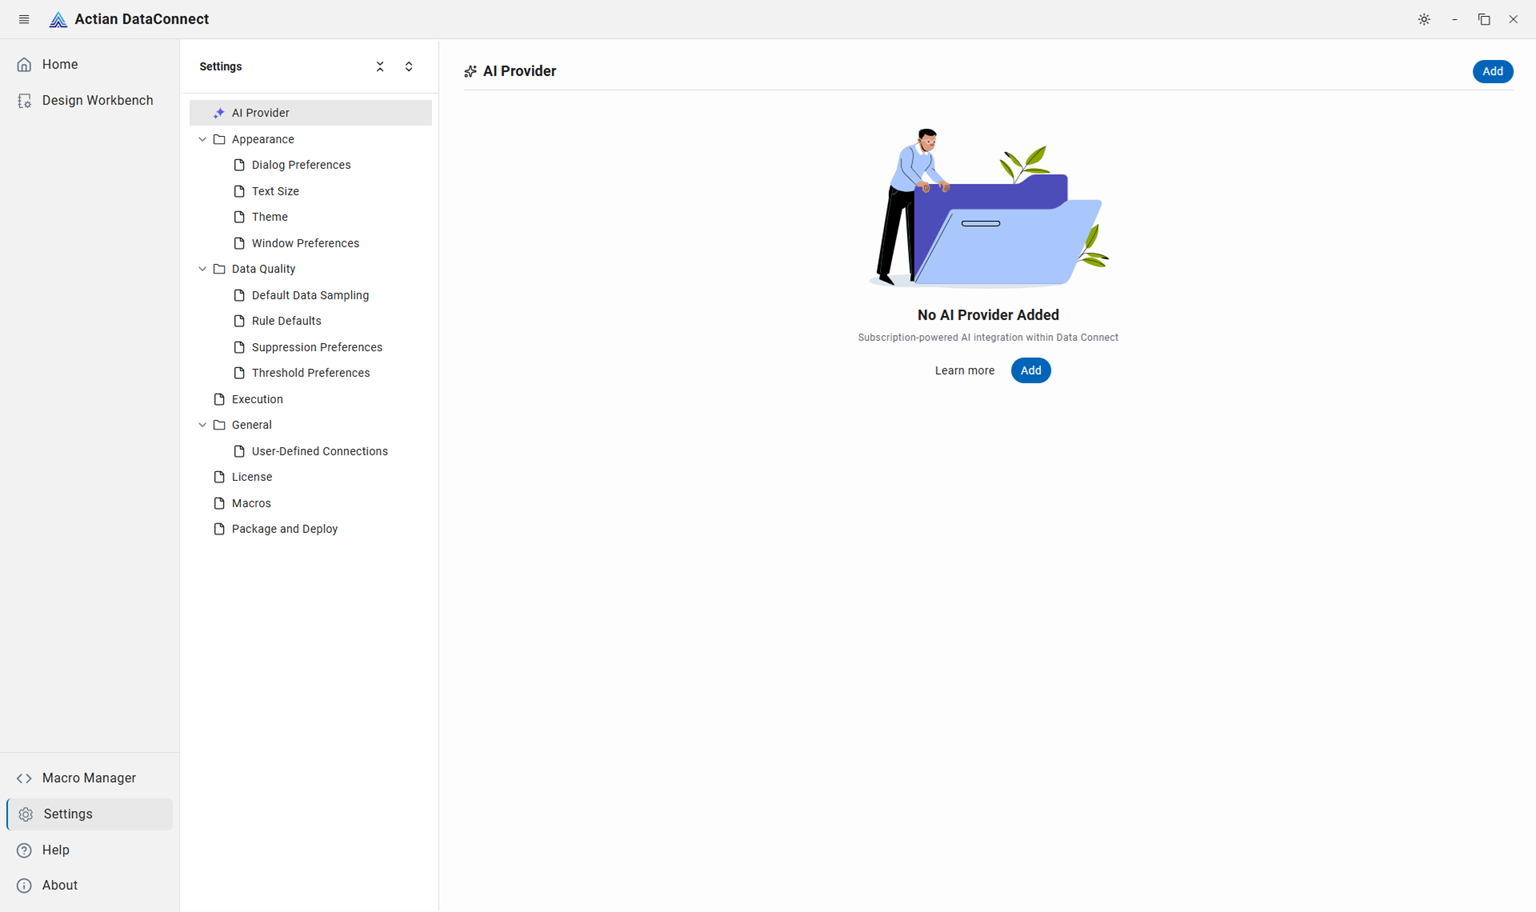 Actian DataConnect provides comprehensive settings to customize your DataConnect experience:
- AI Provider: Configure AI/LLM providers used by AI-assisted features
- Appearance: Dialog preferences, text size, theme, and window preferences
- Data Quality: Default data sampling, rule defaults, suppression preferences, and threshold preferences for data quality designs
- Execution: Logging preferences for maps, processes, and data quality designs
- General: User-defined connections folder location
- License: View and manage your DataConnect license
- Macros: Variable management for reusable configurations
- Package and Deploy: Packaging and deployment preferences
Navigating Settings
Settings open with a navigation tree on the left that groups options into categories. Some categories—such as Appearance, Data Quality, and General—expand to reveal subsections. Select any item to jump to that section in the content area on the right.
At the top of the navigation tree, use Expand all to open every category at once or Collapse all to close them. You can also drag the divider between the navigation tree and the content area to resize the panel.
AI Provider Settings
Configure the AI/LLM providers that power AI-assisted features in Actian DataConnect, such as Inspect Data and recommend rules, and the Ask AI assistant. DataConnect uses a bring-your-own-model approach — it does not host an LLM, so you add your own provider and model. When none is configured, the page shows a No AI provider added message ("Subscription-powered AI integration within Data Connect") with Add and Learn more options.
If no AI provider is configured
AI-assisted features are limited until you add a provider:
- The Ask AI assistant is unavailable — it requires a configured provider.
- Data scans still run and the AI suggested rules panel still proposes rules, but those suggestions come from DataConnect's built-in data inspection (data discovery and semantic-type detection) rather than being generated by an LLM.
Adding an AI Provider
To add an AI provider:
- Navigate to Settings > AI provider.
- Click Add (top-right, or the button in the empty state). The Add AI provider panel opens.
- From AI Provider, choose a provider: OpenAI, Anthropic, Microsoft Azure, Google Gemini, Google Vertex, Groq, AWS Bedrock, Ollama, or OpenAI Compatible.
- In Configuration Name, enter a name for this provider configuration (for example,
OpenAI). - (Optional) Enable Set as default to use this provider for AI features.
- Provide the provider's credentials and connection details. The common fields are:
- API Key: The provider's API key (stored securely). Required for most providers; optional for Ollama and OpenAI Compatible; not used by AWS Bedrock or Google Vertex (which use their own authentication).
- Model (required): After you enter a valid API key, the list loads the available models — or you can type a model name directly.
- Temperature (required): Sampling temperature for responses. Default: 0.2.
- Max Tokens (required): Maximum number of tokens per response. Default: 4096.
- Timeout (seconds) (required): Request timeout in seconds. Default: 120.
- Send sampled data to LLM (optional): Includes a small, masked sample of your data as few-shot examples in AI requests to improve suggestion accuracy. Enabled by default. See the note below.
- Model Capability Overrides (optional, advanced): Override the model's detected capabilities.
- Provide any provider-specific settings (see the table below).
- (Optional) Click Test Connection to verify the credentials and load the available models.
- Click Add Provider to save the provider.
Send sampled data to LLM
This option appears for every provider. When Send sampled data to LLM is enabled, DataConnect sends a small sample of your source data to the configured AI provider as few-shot examples, which improves the accuracy of AI-generated suggestions. Personally identifiable information (PII) is automatically masked before the sample is sent. If your data governance policy does not permit sending sample data to an external service, disable this option.
Provider-specific settings:
| Provider | Additional fields |
|---|---|
| OpenAI, Groq | None beyond the common fields (API key plus model settings) |
| Anthropic | Beta Headers (optional) — add custom Anthropic beta headers |
| Microsoft Azure | Endpoint URL (optional, for example, https://<resource>.openai.azure.com or an AI Foundry URL), Deployment Name (optional, for example, my-gpt4o-deployment), API Version (optional, for example, 2024-06-01) |
| Google Gemini | None beyond the common fields (API key plus model settings) |
| Google Vertex | Project ID (required, for example, my-gcp-project), Endpoint URL (optional — needed only if Project ID is not set; for example, https://<region>-aiplatform.googleapis.com), Location (optional, default us-central1), Credentials (optional, default Application Default Credentials (ADC)). No API key. |
| AWS Bedrock | AWS Region (optional, default us-east-1), Authentication (optional, default AWS Credential Chain). No API key. |
| Ollama | Endpoint URL (optional, default http://localhost:11434), API Key (optional), Context Size num_ctx (optional), GPU Layers num_gpu (optional), CPU Threads num_thread (optional) |
| OpenAI Compatible | Endpoint URL (required, for example, https://api.example.com/v1), API Key (optional), extra request headers (optional) |
Saved providers appear in a list where you can edit, delete, or change which provider is the default.
Note
The Learn more option appears in the interface but is not functional yet; it is planned for a future release.
Appearance Settings
Customize the visual appearance and theme of Actian DataConnect to suit your preferences and working environment.
Theme Customization (Light, Dark, System)
Choose from three theme options to match your personal preference or system settings:
- Light: A bright theme optimized for well-lit environments
- Dark: A dark theme that reduces eye strain in low-light conditions
- System: Automatically matches your operating system's theme setting
To change the theme:
- Navigate to Settings > Appearance
- Click on your preferred theme option (Light, Dark, or System)
- The theme will be applied immediately
- Click Restore Defaults to reset to the System theme
Tip
The System option will automatically switch between light and dark themes based on your operating system's appearance settings.
Text Size
Scale the interface independently from the code editors. Drag a slider or click a marker (Small, Medium, Large, Extra Large) to snap to a size; changes apply immediately. Both default to 100%.
- Interface: Scales chrome, panels, dialogs, navigation, and tables.
- Code Editors: Scales the Monaco editor surfaces (SQL, scripts, transformations, JSON).
Click Restore Defaults to reset both sliders to 100%.
Dialog Preferences
Dialog positions and sizes are saved automatically as you resize or move them, so dialogs reopen where you last left them.
- When nothing has been saved, the page shows No saved dialog positions yet.
- Once saved, each dialog (for example, Create Macro, Paste Macros, and New Artifact) appears as a card showing its saved X and Y position and width and height.
- Click Reset All Positions to clear all saved dialog positions.
Window Preferences
The application window size and position are saved automatically when you close the app.
- When nothing has been saved, the page shows No saved window preferences yet.
- Once saved, the Application Window card shows the saved X and Y position and width and height, with a Maximized or Custom Size badge.
Data Quality Settings
Configure default values applied when creating new data quality designs, so validation and cleansing behavior stays consistent across designs. The Data Quality category has four subsections: Default Data Sampling, Rule Defaults, Suppression Preferences, and Threshold Preferences.
Default Data Sampling
Controls how many records a new data quality design analyzes by default. Choose the scope to balance performance against coverage — a larger scope is more thorough but slower on large datasets.
- Select number of records: Choose how records are selected for analysis.
- Specific range: Analyze records within a defined range. Enter the From records and To records values (the default range is 1 to 10000). Useful for inspecting a specific data segment.
- All records: Analyze every record in source data order. Most thorough, but slower on large datasets.
- Inspect & Recommend Efficiency Percentage: A threshold percentage applied during data quality analysis. Default: 86.
- Retain Source Order: When enabled, preserves the source record order when writing to pass and fail targets. Enabled by default for new data quality designs.
To restore sampling defaults to their original values, click the Restore Defaults button.
Rule Defaults
Rule defaults define the initial configuration values used when applying data quality rules, including duplicate detection, date/time formatting, binning, and regional settings. These settings help ensure consistency across your data quality designs and analysis operations.
For complete definitions of all available data quality rules, see the Rule Reference. These default settings impact how rule parameters are preset and displayed when you configure rules in the Data Quality Designer.
Duplicate Value, min count: Specifies the minimum number of occurrences required for a value to be considered a duplicate. Default: 2
Equal range binning, range count: Defines the number of bins to use when performing equal range binning analysis on numeric data. This helps categorize continuous values into discrete ranges. Default: 10
Preferred date pattern: Select the date format pattern to use for date validation rules. Default:
yyyy-MM-dd(2024-03-06)yyyy-MM-dd(2024-03-06)MM/dd/yyyy(03/06/2024)dd/MM/yyyy(06/03/2024)dd-MMM-yyyy(06-Mar-2024)MMM dd, yyyy(Mar 06, 2024)
Preferred timestamp pattern: Select the timestamp format pattern to use for timestamp validation rules. Default:
yyyy-MM-dd HH:mm:ssyyyy-MM-dd HH:mm:ssyyyy-MM-dd'T'HH:mm:ss(ISO 8601)MM/dd/yyyy HH:mm:ssdd/MM/yyyy HH:mm:ssyyyy-MM-dd HH:mm:ss.SSS(with milliseconds)
Preferred time pattern: Select the time format pattern to use for time validation rules. Default:
HH:mm:ss(24-hour)HH:mm:ss(24-hour)hh:mm:ss a(12-hour with AM/PM)HH:mm(24-hour without seconds)hh:mm a(12-hour without seconds)HH:mm:ss.SSS(with milliseconds)
Most frequent values top how many: Specifies how many of the most frequently occurring values to display in analysis reports. Default: 25
Default region: Select the default region for locale-specific data validation rules. This affects how data is interpreted based on regional formats. Default: United States
- United States
- United Kingdom
- Canada
- Australia
- Germany
- France
- Spain
- Italy
- Japan
- China
To restore rule defaults to their original values, click the Restore Defaults button.
Suppression Preferences
Default suppression behavior for new data quality designs. These correspond to the Suppress options on a design's Execution configuration.
- Suppress Remediation Rules: Whether to skip applying remediation transformations to failing records by default. Default: False.
- Suppress Pass Target: Whether to skip writing passing records to the pass target by default. Default: True.
- Suppress Fail Target: Whether to skip writing failing records to the fail target by default. Default: True.
To restore these values to their defaults, click the Restore Defaults button.
Threshold Preferences
Default runtime and quality-dimension alert thresholds for new data quality designs.
- Execution Time (Minutes): Maximum execution time before a runtime alert is triggered. Default: 0.
- Dimension thresholds (Percent: 1-100): Alert threshold for each quality dimension — Accuracy, Completeness, Consistency, Timeliness, Uniqueness, and Validity. An alert triggers when a dimension's score falls below its threshold; a value of 0 (the default) disables the alert for that dimension.
To restore these values to their defaults, click the Restore Defaults button.
Execution Settings
Configure execution logging, message handling, and log file management for data integration maps, ETL processes, and data quality designs in Actian DataConnect. Control how errors, warnings, and debug information are captured during execution.
SMTP Configuration
SMTP settings for email notifications are defined in the application state but are not configurable through the Settings UI.
Maps and Processes
Map and process designers are not yet available. These designers will be available in a future release. However, the standalone Runtime Engine continues to support maps and processes from previous DataConnect versions via the command line interface.
Message and Logging Defaults
You can set default logging options that will be applied to every new map, process, and data quality design. These settings can be overridden for individual artifacts on their Configuration tab.
Clear messages after run: Specifies whether to clear message object content after executing a map, process, or data quality design when the Run button is clicked. Default: Not selected (unchecked)
- When selected: Message object content is cleared after execution, including messages in sub-processes
- When not selected: Message object content is retained. If you run the artifact a second time, the message objects will contain the same values they had after the previous execution
Clear log file before run: Specifies whether to retain the log file data before executing a map, process, or data quality design. Default: Not selected (unchecked)
- When selected: Log file content is cleared before execution
- When not selected: Log file content is retained, and new content is appended
Note
This setting applies to all newly created maps, processes, and data quality designs. Existing artifacts will maintain their current settings. If specified in the Configuration tab, this option overrides the preference setting.
Error types to log: Allows you to select the types of error messages to include in the log file. Messages are logged up to the selected log type including all previous log types in the order of precedence. Default: Errors
- Errors: Logs only errors that may cause a map or process execution to stop
- Warnings: Logs both errors and warnings (messages about data truncation, field name changes, loss of precision, or other issues)
- Informative messages: Logs errors, warnings, and informative messages (such as "Execution initialization", "Execution successful", number of records converted/deleted/updated/inserted, time to convert, and whether the transformation was stopped)
- Debug messages: Logs all message types including debug messages. All messages generated as a result of a TraceOn action are logged at this level, including record numbers, first five fields of each record, and all events
Log Level Selection
For production environments, select Errors or Warnings to minimize log file size. For troubleshooting, select Informative messages or Debug messages for more detailed information. Note that Debug messages can significantly increase log file size and may impact performance.
To restore execution settings to their original values, click the Restore Defaults button.
General Application Settings
Configure general application preferences. In v14, this category contains a single setting: User-Defined Connections.
User-Defined Connections
Configure the folder location for dataset files used as source and target connections. This setting allows you to centralize connection files for reuse across data quality designs.
- Folder Path: Specify or browse to the folder where user-defined connection files will be saved
- Enter a custom path directly in the text field
- Click the folder icon to browse and select a folder
- Leave blank or click Restore Defaults to use the default location
Default location: C:/Users/<username>/Actian/DataConnect/UDConnections
Connection Management
User-defined connections enable you to:
- Reuse saved connections across multiple data quality designs
- Share connection configurations with team members
- Centralize connection management in one location
- Maintain consistent connection settings across projects
To restore the user-defined connections path to the default location, click the Restore Defaults button.
License Settings
View your Actian DataConnect license details and point the application to a license file.
License Information
The License page displays the following read-only details for the active license:
| Field | Description |
|---|---|
| License File Name | Path to the active license (.slc) file |
| Product Name | Licensed product (for example, DataConnect Integration Platform Non-Production End-User v14) |
| License Type | License category (for example, Time-Limited) |
| Serial Number | License serial number |
| Expiration Date | Date the license expires |
| Subscription Ends | Date the subscription ends |
| Users | Number of licensed users |
| Name | License owner name |
| Company | Licensed organization |
To change the license file, click Browse... and select a .slc license file. The page then reloads the license details from the selected file.
Macro Management Settings
Manage macro definitions and variables for data integration maps, ETL processes, and data quality designs. Macros provide parameterization and reusable configuration values for connection strings, file paths, credentials, and environment-specific settings.
The Macros settings page provides a comprehensive interface for:
- Loading and managing macro definition files
- Creating and organizing macro sets (artifact-specific and global)
- Defining macro name-value pairs with optional encryption
- Importing and exporting macro configurations
- Adding descriptions to document macro usage
To configure and manage macros, including creating macro sets, defining macro values, and importing/exporting macro files, see Macro Manager.
Tip
Macros enable you to create flexible, reusable configurations by parameterizing connection strings, file paths, credentials, and other values that may change between environments (development, testing, production).
Package and Deploy Settings
Configure packaging and deployment preferences for Actian DataConnect projects.
Packaging Options
- Store package in workspace: When enabled, packages are stored in the workspace. Enabled by default.
- Package Directory: The folder where packages are written. Default location:
C:/Users/<username>/Actian/DataConnect/Packages. - Always create external RTC for package: When enabled, an external runtime configuration (
.rtc) file is created for each package. Enabled by default. - Always overwrite external RTC file: When enabled, an existing external
.rtcfile is overwritten. Enabled by default.
To restore these values to their defaults, click the Restore Defaults button.
See Also
Data Quality
- Data Quality Overview - Complete guide to data quality
- Rule Reference - Data quality rules reference guide
- Data Prep Rules - Data preparation and cleansing rules
Configuration and Management
- Macro Manager - Detailed macro configuration and management
- Interface Overview - Actian DataConnect user interface guide
- Getting Started Guide - Getting started with Actian DataConnect
Best Practices
- Best Practices - Actian DataConnect best practices and recommendations
- Design for Reuse - Building reusable integration components
- Architect the Solution - Solution architecture guidance
Frequently Asked Questions
How do I change the application theme?
Navigate to Settings > Appearance and select your preferred theme (Light, Dark, or System). The theme is applied immediately without requiring a restart.
What is the difference between random sampling and specific range sampling?
Random sampling analyzes a statistically representative subset of records for faster processing, while specific range sampling analyzes a defined range of records (e.g., records 1-10000) for inspecting specific data segments.
How do I configure macros for different environments?
Use the Macro Manager to create environment-specific macro sets (development, testing, production) with different values for connection strings, file paths, and credentials. See Macro Manager for detailed instructions.
What logging level should I use in production?
For production environments, use Errors or Warnings logging level to minimize log file size and performance impact. Use Informative or Debug levels only for troubleshooting specific issues.