Managing Workspaces
Workspaces serve as repositories for storing and managing Actian DataConnect projects and their associated content. Each workspace contains three different types of resources: projects, folders, and files. Projects can be created from Project Explorer and may contain folders, files, and design artifacts (such as data quality designs) created within Actian DataConnect.
You can define multiple workspaces, and create multiple projects within those workspaces, to help efficiently organize your collateral. In addition to having multiple projects, each project can be stored in a different location in a file system. You can also create multiple workspaces and easily switch between them. The flexibility provided with workspaces, projects, and folders enables you to organize your files according to your requirements.
Key capabilities:
- Create new workspaces from empty folders
- Import existing workspaces with artifacts
- Switch between multiple workspaces seamlessly
- Sync with file system changes in real-time
- Organize projects with hierarchical folder structures
Default Workspace
When you install Actian DataConnect for the first time, a default workspace is automatically created for you at C:\Users\<username>\Actian\DataConnect\workspace. All projects and their associated content (folders and DataConnect design artifacts) are stored in this workspace.
This default location is fixed, but the workspace path is otherwise user-defined: for any workspace you create or import, you choose the folder yourself (see Creating a New Workspace and Importing an Existing Workspace).
You can define multiple workspaces and create multiple projects within these workspaces. You can also set up collaborative workspaces for team environments where multiple users need to access shared artifacts.
Understanding the Project Explorer
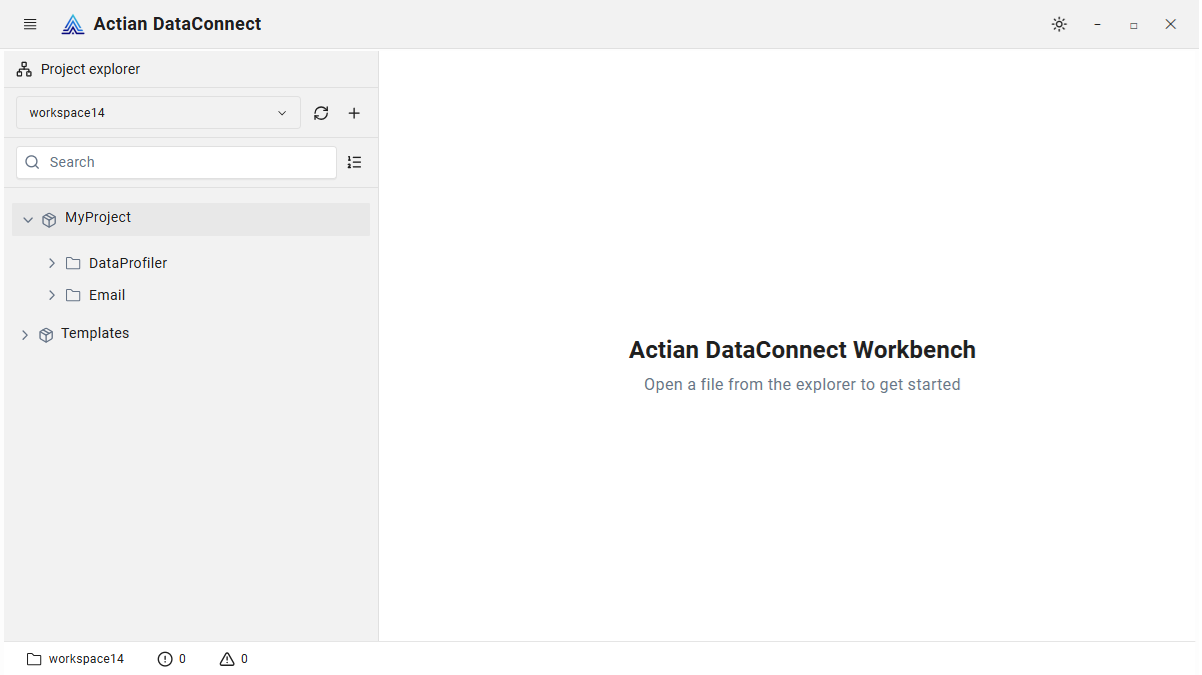
The Project Explorer is displayed on the left side of the editor and serves as the primary workspace management interface in Actian DataConnect. It displays folders, projects, and artifacts within the current workspace in a tree view and is used for navigation purposes.
You can collapse the Project Explorer with the Toggle Project Explorer icon  in the editor toolbar for a distraction-free editing view, and reopen it from the Activity Bar.
From Project Explorer, you can perform the following actions:
- Create, edit, delete, open, close, rename, import, or export projects
- Create artifacts in projects such as data quality designs and schemas
- Edit, delete, duplicate, import, or export artifacts in existing projects
- Organize artifacts using folders for better project structure
- Navigate through your workspace hierarchy efficiently
Project Explorer Components
The Project Explorer interface has three main areas: the Header Bar, the toolbar and navigation icons (workspace selector, sync, create, search, and sort), and the Project Tree.
Header Bar
Displays the "Project explorer" title with a Network icon at the top of the panel. This header identifies the workspace navigation area in the left sidebar.
Toolbar and Navigation Icons
The icons in and around the Project Explorer header let you select the active workspace, refresh the tree, create items, and search or sort the workspace contents.
Available icons:
| Icon | Description |
|---|---|
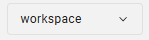 | Workspace selector: A dropdown showing the active workspace, with options to: • Switch workspaces — select another workspace from the list • Create New Workspace… — initialize a workspace in an empty folder • Import Workspace… — register an existing folder that contains DataConnect artifacts • Delete a workspace — non-destructive; removes only the DataConnect registration (via the trash icon that appears on hover), so your files remain on disk |
 | Sync with filesystem: Scans the workspace folder for file changes (new, modified, deleted) and updates the Project Explorer tree — use it after files change outside DataConnect (other IDEs, file managers, version control). A spinning animation appears during the sync. |
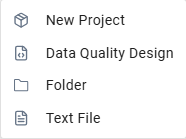
 | Create new item: Opens a creation menu with options — New Project, Data Quality Design, Folder, Text File (see Context Menu Actions). |
 | Search: Filters the tree by artifact name across all projects, folders, and files in the active workspace, with live filtering as you type. |
 | Sort: Sets the order of items in the tree (default is Alphabetical A-Z): • Alphabetical (A-Z) • Alphabetical (Z-A) • Sort by most recent • Sort by order added |
Project Tree
Structure: Hierarchical tree view displaying workspace contents.
Node types:
- Projects - Top-level containers for related artifacts (Package icon)
- Folders - Organizational containers within projects (standard folder icon)
- Files - Individual artifacts including:
- Data quality designs (
.dqfiles) - Schemas and other supported artifact types
- Data quality designs (
Composite artifact handling: DataConnect uses paired files for artifacts: a primary file (e.g., Accounts.dq) and a runtime configuration file (e.g., Accounts.dq.rtc). The Project Explorer automatically hides .rtc files when the primary file exists, presenting them as a single logical unit.
Note
File extensions like .dq indicate artifact types. Runtime configuration files (.rtc) are always paired with primary files but hidden in the UI for clarity.
Context Menu Actions
The Project Explorer provides two context menus:
- Plus (+) menu — the toolbar creation menu for adding new items (New Project, Data Quality Design, Folder, Text File)
- Item context menu — the actions for a selected project, folder, or file (open, new, rename, delete, move, copy path, and reveal in file explorer); opened from the three-dot (⋮) icon or by right-clicking
Plus (+) Menu - Creating New Items
Click the Plus (+) button in the Project Explorer toolbar to create new workspace items (artifacts, folders, and projects) without leaving the Project Explorer. The menu provides four options: New Project, Data Quality Design, Folder, and Text File.
New Project
Creates a top-level project container within the active workspace.
To create a new project:
- Click the Plus (+) button in the Project Explorer toolbar
- Select New Project from the dropdown menu
- In the Create Project dialog:
- Enter Project name (required field)
- Optionally add Description for documentation purposes
- Click Create
The new project folder is created at the workspace root level and appears immediately in the Project Explorer tree, ready to contain folders and artifacts.
Note
Projects are the organizational top level within workspaces and map to physical folders on the file system.
Data Quality Design
Creates a data quality (.dq) artifact for defining data quality analysis, validation, and remediation rules.
To create a new data quality design:
- Click the Plus (+) button in the Project Explorer toolbar
- Select Data Quality Design from the dropdown menu
- In the Create Data Quality Design dialog:
- Select the Parent folder from the dropdown (lists all projects and folders in the workspace)
- Enter the Data quality design name (required) - do not include the file extension
- Optionally add a Description for artifact metadata
- Click Create
The system creates two paired files in the selected folder: the primary file ([name].dq) and its runtime configuration ([name].dq.rtc). The design opens immediately in the Data Quality Designer.
Note
Data quality designs use a composite file pattern - always two files (*.dq + *.dq.rtc) treated as one logical artifact. Do not include file extensions when naming artifacts; the system adds them automatically.
Folder
Creates a subfolder within a project or another folder for organizing artifacts hierarchically.
To create a new folder:
- Click the Plus (+) button in the Project Explorer toolbar
- Select Folder from the dropdown menu
- In the Create Folder dialog:
- Select the Parent folder from the dropdown (a project or existing folder)
- Enter the Folder name (required field)
- Click Create
The new folder is created within the selected parent and appears immediately in the Project Explorer tree, available for organizing artifacts and nested subfolders.
Note
Folders provide hierarchical organization within workspaces and map directly to file system directories.
Text File
Creates a plain text file as a generic artifact within a project or folder—handy for notes, README files, or other supporting content kept alongside your designs.
To create a new text file:
- Click the Plus (+) button in the Project Explorer toolbar
- Select Text File from the dropdown menu
- In the Create Text File dialog:
- Select the Parent folder from the dropdown (a project or existing folder)
- Enter the File name (required), including the extension (for example,
notes.txt)
- Click Create
The new text file is created in the selected folder and opens immediately in the editor, ready for you to add content.
Note
Unlike data quality designs, text files are saved exactly as you name them—type the extension yourself (such as .txt or .md).
Item Context Menu
Open this menu by clicking the three-dot (⋮) icon on a hovered item, or by right-clicking the item — both open the same menu. The available actions adapt to the item type, as shown below for a project, a folder, and a file.
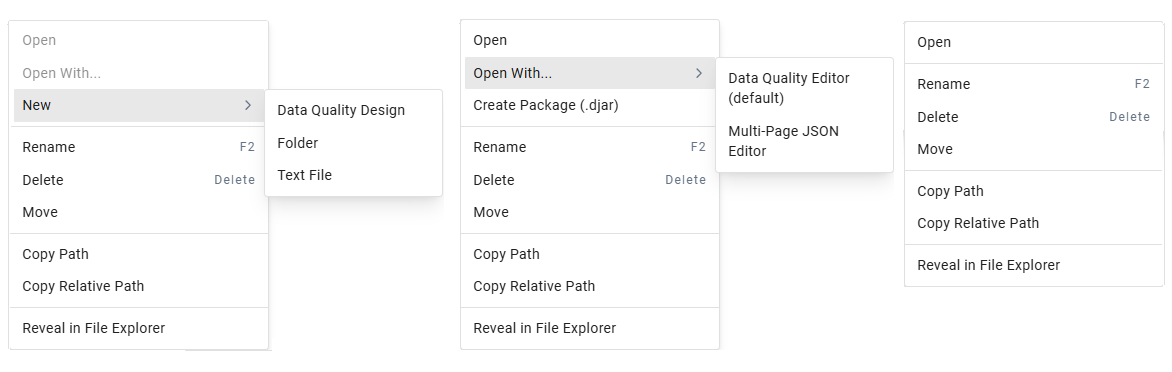
| Action | Shortcut | Available for | Function |
|---|---|---|---|
| Open | Files | Open the file in its default editor | |
| Open With... | Files | Choose which editor opens the file (submenu; the default editor is marked) | |
| Create Package (.djar) | Data quality (.dq) files | Package the artifact as a deployable .djar file | |
| New | Projects and folders | Submenu to create a Data Quality Design, Folder, or Text File | |
| Rename | F2 | All items | Rename the item |
| Delete | Delete | All items | Delete the item(s) |
| Move | All items | Move the item to another folder | |
| Copy Path | All items | Copy the absolute file-system path | |
| Copy Relative Path | All items | Copy the workspace-relative path | |
| Reveal in File Explorer | All items | Show the item in your operating system's file manager |
Note
Deleting an item is destructive and permanently removes files from disk (not just database entries). A confirmation dialog lists all affected files before proceeding.
Open with behavior:
- Default editor: Marked with "(default)" label - this editor opens when you double-click the file
- Alternative editors: May be available depending on the file type
- Selection: Your editor choice persists for future opens of that artifact
Delete behavior:
- Simple files: Single file removed from file system
- Composite artifacts: Both files deleted together (e.g.,
design.dq+design.dq.rtc) - Confirmation: Dialog shows all files to be removed
Rename behavior:
- Simple files: Single file renamed
- Composite artifacts: Both files renamed maintaining their pairing (e.g.,
old.dq→new.dqandold.dq.rtc→new.dq.rtc) - Validation: Ensures unique names within the folder and validates file extensions
Move behavior:
- Opens a Move dialog where you select the destination folder, then click Move
- Composite artifacts: Both files move together (e.g.,
design.dq+design.dq.rtc), and the artifact's log is relocated as well
Note
Operations on composite artifacts (delete/rename/move) automatically affect both the primary file and its paired .rtc file.
Keyboard Shortcuts and Mouse Interactions
Keyboard shortcuts:
| Key | Action | Context |
|---|---|---|
| Delete or Backspace | Delete selected artifact | When artifact selected and not editing text |
| Double-click | Open file in default editor | On any file in tree |
| Single-click | Expand/collapse | On folders and projects |
| Ctrl+click or Shift+click | Select multiple items | In the tree |
| Drag and drop | Move items into a folder or project | Drag selected items onto a folder or project |
Note
Delete/Backspace only work when not typing in input fields to prevent accidental deletions during text entry.
Creating a New Workspace
When to create a new workspace: Starting fresh projects, organizing new data quality designs, or establishing clean environments for development.
Critical requirement: New workspaces must point to an empty folder - folders containing any files or subdirectories will be rejected. Use import existing workspace instead.
Use case: Greenfield projects, new development environments, isolated testing workspaces.
Prerequisites for Creating Workspace
Required:
- Empty folder on your local file system
- Read/write permissions on the target folder location
- Valid file path - accessible from the DataConnect application
Note
The workspace must be on a locally accessible path. While folders synchronized by cloud storage services (OneDrive, Dropbox, etc.) or network drives may work if they appear as local paths, DataConnect does not officially support or test these configurations. For best performance and reliability, use a local file system path.
How to Create a Workspace
To create a new workspace:
In the Project Explorer panel, click the workspace dropdown (shows current workspace name or "Select workspace...").
The workspace dropdown menu opens, displaying available workspaces and management options.
Click Create New Workspace... from the dropdown menu.
The Create New Workspace dialog opens.
Fill in the required fields:
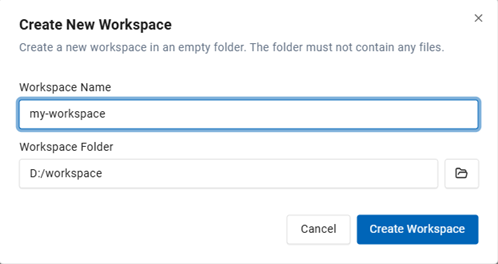
- Workspace Name (required): Enter a display name for UI identification. It cannot be empty or contain only whitespace; there are no length restrictions (reasonable name lengths recommended).
- Workspace Folder (required): Enter or browse to select an empty folder path on your local file system. You can type the path manually or use the browse button (folder icon).
Tip
If you browse to select a folder and the workspace name field is empty, DataConnect will automatically populate the workspace name with the folder name.
Review your entries (workspace name and folder path), then click the Create Workspace button.
DataConnect validates your entries against the rules listed in step 3. If validation fails, you'll see a specific error message indicating which rule was violated. Common validation errors:
Error Message Cause Solution "Please provide both name and path" Missing required field(s) Fill in both Workspace Name and Workspace Folder fields
Note
Workspace creation requires a completely empty folder. A common cause of failure is hidden or system files in the folder — ensure it is empty, including hidden items.
If validation passes, the system automatically:
- Validates the folder is empty (rejects if any files exist)
- Creates
.metadatametadata folder inside the workspace folder - Creates a default "Project_1" folder in the workspace
- Creates a default
MacroDef.jsonmacro file in the workspace (unless you have configured a custom macro file path) - Registers the workspace in DataConnect's database
- Activates the new workspace (becomes the current workspace)
- Updates Project Explorer to display the new workspace with Project_1
Your new workspace is now created, activated, and ready to use.
Note
The .metadata folder contains internal metadata and should not be manually edited. Workspace creation is atomic - either all steps succeed or the operation rolls back on error.
The new workspace becomes active in the Project Explorer, showing the default Project_1 folder and the default MacroDef.json macro file:
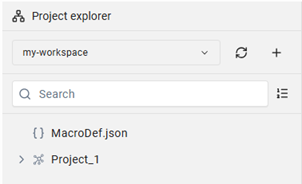
Available Actions after Workspace Creation
- Create projects - Add top-level project containers for organization
- Import existing workspaces - Register a folder that already contains DataConnect artifacts (such as
.dqfiles) - Create new artifacts - Build data quality designs and other artifacts
- Switch workspaces - Access other registered workspaces via workspace selector dropdown
Note
New workspaces start empty. All content must be created or imported by the user. The workspace is immediately available in the workspace selector dropdown.
Importing an Existing Workspace
When to import: Working with existing DataConnect artifacts from previous installations, shared repositories, version control, or team collaboration.
Key difference from creation: Import accepts folders that contain existing files - specifically designed for folders with DataConnect artifacts (.dq, .process, .map files).
Maps and Processes
Map and process designers are not yet available. These designers will be available in a future release. However, the standalone Runtime Engine continues to support maps and processes from previous DataConnect versions via the command line interface.
Use cases:
- Migrating from previous DataConnect installation
- Cloning projects from version control (Git, SVN)
- Accessing shared team workspaces
- Recovering backed-up artifacts
- Working with existing data quality designs and projects
Note
Import vs Create - Import allows non-empty folders, Create requires empty folders. Import scans existing files; Create initializes from scratch.
Prerequisites for Importing Workspace
Required:
- Existing folder containing DataConnect artifacts (such as
.dqfiles and schemas) - Read/write permissions on the folder and its contents
- Valid file path - accessible from DataConnect application
Note
Unlike workspace creation, import allows and expects non-empty folders. The folder can contain any mix of supported DataConnect artifacts and directory structures.
How to Import a Workspace
To import an existing workspace:
In the Project Explorer panel, click the workspace dropdown.
The workspace dropdown menu opens, displaying available workspaces and management options.
Click Import Workspace... from the dropdown menu.
The Import Existing Workspace dialog opens.
Fill in the required fields:
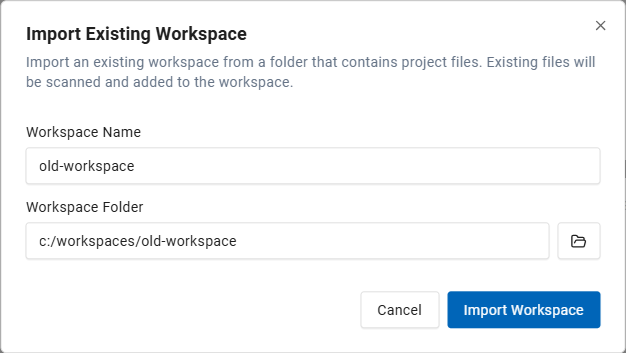
- Workspace Name (required): Enter a display name for UI identification. It does not need to match the folder name, cannot be empty or contain only whitespace, and has no length or special-character restrictions.
- Workspace Folder (required): Enter or browse to select a folder path that contains existing artifacts. Unlike workspace creation, this folder can contain files. You can type the path manually or use the browse button (folder icon).
Tip
If you browse to select a folder and the workspace name field is empty, DataConnect will automatically populate the workspace name with the folder name.
Review your entries (workspace name and folder path), then click the Import Workspace button.
DataConnect validates your entries against the rules listed in step 3. If validation fails, you'll see a specific error message indicating which rule was violated. Common validation errors:
Error Message Cause Solution "Please provide both name and path" Missing required field(s) Fill in both Workspace Name and Workspace Folder fields If validation passes, the system automatically:
- Scans the folder and all subdirectories for DataConnect artifacts
- Discovers supported file types (
.dq,.process,.map,.rtc) - Registers found artifacts in the workspace database
- Creates
.metadatametadata folder (if it doesn't exist) - Activates the imported workspace (becomes the current workspace)
- Populates Project Explorer with discovered hierarchy
Your imported workspace is now registered, activated, and ready to use.
Note
Import is non-destructive - no files are modified, only registered in the database. The scan can take time for large folder structures with many artifacts.
What Gets Imported - Artifact Discovery
| Artifact Type | File Extensions | Treatment |
|---|---|---|
| Data Quality designs | .dq + .dq.rtc | Paired as single logical artifact |
| Schemas | Various | Registered as design artifacts |
| Folders | Directories | Registered as organizational containers |
| Other supported types | Various | Context-dependent registration |
Composite artifact handling: When both a primary file (e.g., MyDesign.dq) and its runtime configuration (e.g., MyDesign.dq.rtc) are present, they are automatically paired and displayed as a single logical artifact in the Project Explorer.
Note
The import process ignores non-DataConnect files. Files without recognized extensions are not registered in the workspace database but remain on the file system untouched.
Available Actions after Workspace Import
- View artifacts - Browse imported projects, folders, and files in Project Explorer
- Edit artifacts - Open and modify existing data quality designs and other artifacts in respective editors
- Create new content - Add projects, folders, and artifacts to the imported workspace
- Sync with file system - Detect external changes using the Refresh button
- Switch workspaces - Access other registered workspaces via dropdown
- Continue team collaboration - Work with shared artifacts and commit changes
Note
Imported workspaces are fully functional immediately. All artifacts discovered during import are ready to view and edit. The workspace appears in the workspace selector dropdown and persists across DataConnect restarts.
Best Practices for Workspace Import
Recommended practices for successful imports:
| Practice | Benefit | Implementation |
|---|---|---|
| Backup before import | Protects critical artifacts from accidental corruption | Copy folder to safe location before import |
| Verify file permissions | Ensures DataConnect can read and modify artifacts | Check folder permissions, test write access |
| Use meaningful names | Improves workspace identification and organization | Name reflects purpose: "Production ETL", "Dev Environment" |
| Pre-organize structure | Better Project Explorer hierarchy and navigation | Create project folders before import, group related artifacts |
| Clean up artifacts | Faster import scan, cleaner UI | Remove obsolete files, old versions before import |
| Document workspace purpose | Team collaboration clarity | Add README or workspace description for shared folders |
Note
Import performance scales with folder size - large workspaces with thousands of files may take several seconds to scan. Pre-organizing into project subfolders improves both import speed and subsequent navigation.
Switching Between Workspaces
Actian DataConnect supports multiple registered workspaces with instant switching between them. This enables working on different projects, environments (dev/test/prod), or client workspaces within the same application instance.
Common use cases:
- Switching between client projects
- Moving between development, test, and production environments
- Comparing implementations across different workspaces
- Context switching for multitasking
How to Switch Workspaces
To switch to a different workspace:
In the Project Explorer panel, click the workspace dropdown (displays current workspace name).
The workspace dropdown menu opens, showing all registered workspaces with their names and paths.
Click the workspace you want to activate from the list.
Project Explorer reloads with the new workspace contents. Switching is instant for small workspaces, but may take several seconds for large workspaces with thousands of artifacts.
Note
Switching preserves state - unsaved changes in editors are retained, but the Project Explorer immediately reflects the new workspace's folder structure.
Workspace States
| State | Definition | Visibility | Persistence |
|---|---|---|---|
| Active Workspace | Currently displayed workspace | Shown in Project Explorer tree | Until switch or app close |
| Registered Workspaces | All created/imported workspaces | Listed in dropdown selector | Persists across app restarts |
| Unregistered Folders | Folders on disk not imported | Not visible in DataConnect | Exist on file system only |
Note
Only one workspace can be active at a time. Switching between workspaces does not affect the file system - it only changes which workspace DataConnect is viewing and managing.
Deleting a Workspace
Workspace deletion is non-destructive to artifact files. Only the database registration is removed. All artifact files (such as .dq files, .rtc files, and schemas) remain intact on the file system.
Common reasons to delete a workspace:
- Workspace no longer needed in DataConnect
- Cleaning up workspace list
- Removing duplicate registrations
- Decommissioning project references
Warning
Safety Guarantee: You cannot accidentally delete artifact files through workspace deletion. All project files remain on disk.
How to Delete a Workspace
To delete a workspace:
In the Project Explorer panel, click the workspace dropdown.
The workspace dropdown menu opens, showing all registered workspaces.
Hover over the workspace you want to delete in the dropdown list.
A trash icon (🗑️) appears on the right side of the workspace entry.
Click the trash/delete icon.
A deletion confirmation dialog opens displaying:
- Message: "Delete workspace \"[workspace-name]\"?"
- Warning: "This will remove the workspace from the database only. No files will be deleted."
- Options: OK/Confirm (proceed) or Cancel (abort)
Click OK or Confirm to proceed with deletion.
The system automatically:
- Removes the workspace entry from DataConnect database
- Removes the workspace from dropdown selector list
- Prompts for new workspace selection (if deleted workspace was active)
Note
Deletion is immediate and cannot be undone through the UI. However, all artifacts remain on disk and the workspace can be re-imported anytime.
What Gets Deleted vs. What Remains
Items deleted:
| Item | Location | Recoverability |
|---|---|---|
| Database entry | DataConnect database | Cannot recover - must re-import |
| Workspace registration | Dropdown selector list | Cannot recover - must re-import |
Items preserved:
| Item | Location | Status After Deletion |
|---|---|---|
| Artifact files | File system (.dq, .rtc, schemas, etc.) | Completely intact, unmodified |
| Folder structure | File system directories | Preserved exactly as before |
| Project organization | Subdirectories and file hierarchy | Unchanged |
| Configuration files | Non-DataConnect files in workspace | Untouched |
Note
Workspace deletion removes only the DataConnect registration. The folder and all its contents remain on disk exactly as before deletion. This makes deletion safe and reversible through re-import.
Re-Importing a Deleted Workspace
If you accidentally deleted a workspace, you can restore it using the Import Workspace feature:
- Click the workspace dropdown and select Import Workspace...
- Select the same folder path as the deleted workspace
- Enter a workspace name (can be the same or different from before)
- Click Import Workspace
The system re-scans the folder and re-registers all artifacts. Your workspace is fully restored with all artifacts and folder structure intact.
Time to recover: Seconds to minutes depending on workspace size.
Note
Re-import after deletion is identical to original import - no data loss occurs.
Synchronizing with the File System
The Project Explorer shows DataConnect's registered view of the workspace, which can drift from what's on disk when files change outside the app. Click the Sync with filesystem icon in the Project Explorer toolbar to reconcile the two.
When to sync — after files change outside DataConnect, for example:
- Edits, additions, or deletions made in another tool, a file manager, or the command line
- Version control operations (Git pull, merge, checkout)
- Changes to shared workspace files made by other team members
How to Sync
- In the Project Explorer toolbar, click the Sync with filesystem icon. It spins while DataConnect scans the workspace folder for files that were added or removed.
- When the scan finishes, the tree refreshes and a toast reports the result:
- Workspace synced — for example, "5 added, 2 deleted".
- Sync completed with errors — the number of errors that occurred.
Note
Sync is non-destructive: it updates only DataConnect's view of the workspace — no files on disk are changed. The Sync button is disabled while a sync is in progress, so only one sync runs at a time.
Out-of-sync files: A file marked out-of-sync was registered in DataConnect but is no longer found on disk. Restore it from backup, or remove it from the Project Explorer.
Workspace Folder Structure
Workspaces map directly to file system folders. The structure you create depends on your organization needs - you define the project folders and nested subfolders to organize your artifacts.
Sample workspace folder hierarchy:
The following shows a typical example structure. Your actual workspace structure will vary based on your projects and organization preferences.
my-workspace/                          # Workspace root folder
├── .metadata/                          # Internal folder (managed by DataConnect)
│   ├── logs/                          # Workspace-specific log files (dcim.log)
│   ├── drafts/                        # Unsaved draft content
│   └── conversations/                 # AI assistant chat history
│
├── CustomerArtifacts/               # Project folder (top-level container) - EXAMPLE
│   ├── Accounts.dq                    # Data quality design (primary file)
│   ├── Accounts.dq.rtc                # Runtime configuration (paired with .dq)
│   ├── Contacts.dq                    # Another data quality design
│   ├── Contacts.dq.rtc                # Paired runtime configuration
│   │
│   ├── Referenced_Files/              # Default location for DQ execution logs
│   │   ├── Accounts.log               # Run log for the Accounts design
│   │   └── Contacts.log               # Run log for the Contacts design
│   │
│   └── Schemas/                       # Nested subfolder
│       ├── CustomerSchema.xsd         # Schema definition file
│       └── ContactSchema.xsd          # Another schema file
│
└── SupplierArtifacts/               # Second project folder - EXAMPLE
    ├── Suppliers.dq                   # Data quality design
    ├── Suppliers.dq.rtc               # Paired runtime configuration
    │
    └── Validations/                   # Nested subfolder
        ├── SupplierValidation.dq      # Data quality design
        └── SupplierValidation.dq.rtc  # Paired runtime configuration
Note
The .metadata folder is automatically created by DataConnect. The project folders (CustomerArtifacts, SupplierArtifacts, etc.) and their contents are examples - you create your own folder structure based on your needs.
Folder Structure Concepts
Component definitions:
| Component | Purpose | Characteristics | User Interaction |
|---|---|---|---|
| Workspace root | Top-level container for entire workspace | One folder per workspace | User-defined location |
.metadata folder | Internal metadata storage | System-managed, hidden by default | Do not manually edit |
| Project folders | Logical groupings of related work | Top-level organizational units | Created by users |
| Nested folders | Hierarchical organization within projects | Any depth supported | Created by users |
| Artifact files | Primary files (such as .dq for data quality designs) | Contain design definitions | Created/edited by users |
.rtc files | Runtime configuration paired with primary | One per artifact, paired automatically | System-managed pairing |
Referenced_Files folder | Default location for files referenced by data quality designs, such as execution (run) logs named <design>.log | One per project | System-managed; created automatically when you create a new project |
.metadata Folder Details
Internal structure and contents:
| File/Folder | Purpose | When Modified |
|---|---|---|
logs/ | Workspace-specific operation logs (dcim.log) | Error events, diagnostic logging |
drafts/ | Unsaved draft content for open artifacts | While editing an artifact |
conversations/ | AI assistant chat history | AI assistant usage |
Critical warnings:
- Do not manually edit
.metadatafolder contents - can corrupt workspace - Do not delete
.metadatafolder while workspace is registered - causes sync errors - Do backup
.metadatafolder for disaster recovery
Note
The .metadata folder is analogous to .git in Git repositories - system-managed metadata that should not be manually modified. Deleting it breaks workspace registration but doesn't delete artifact files.
Composite Artifact File Pairing
Pairing mechanism: DataConnect automatically pairs primary artifact files with their runtime configuration files:
| Primary File | Runtime Config | Display in UI | Deletion Behavior | Rename Behavior |
|---|---|---|---|---|
Design.dq | Design.dq.rtc | Single "Design" item | Both files deleted | Both files renamed |
Pairing rules:
- Runtime config must have same base name as primary file
- Runtime config must have
.rtcextension appended - If
.rtcfile missing, primary file still appears but may have limited functionality - If primary file missing but
.rtcexists, artifact is invalid (out of sync)
Note
Composite artifact pairing is automatic and mandatory. Users cannot create unpaired .rtc files through the UI. External tools can create orphaned .rtc files which will be marked as out-of-sync during refresh.
Workspace Settings and Isolation
Isolation principle: Workspaces are completely independent - changes in one workspace do not affect others. Each workspace maintains separate artifact registries, settings, and states.
Workspace Independence
Isolation characteristics:
| Aspect | Isolation Level | Details |
|---|---|---|
| Artifact registry | Complete | DataConnect tracks each workspace's artifacts separately in its local database |
| Settings | Complete | Workspace-specific preferences stored independently |
| File system | Physical | Workspaces use different folders - no file overlap |
| Active state | Single instance | Only one workspace active at a time |
| Switch operation | Non-disruptive | Switching doesn't modify either workspace |
Implications:
- Creating artifacts in workspace A doesn't affect workspace B
- Deleting workspace A registration doesn't affect workspace B
- Settings changes in workspace A don't apply to workspace B
- Sync operations target only the active workspace
Note
Workspace isolation is both logical (database) and physical (file system). Two workspaces can point to folders on different drives, network locations, or cloud providers without conflict.
Workspace Logs
DataConnect creates workspace-specific log files for monitoring activity and troubleshooting:
- Log location:
<workspace-path>\.metadata\logs\dcim.log - Default workspace example:
C:\Users\<username>\Actian\DataConnect\workspace\.metadata\logs\dcim.log - Log rotation: When
dcim.logreaches 2MB, it rotates todcim.log.1,dcim.log.2, etc. - Maximum files: Up to 7 rotated log files (10MB total size limit)
- Log level: Defaults to
INFO. To capture more (or less) detail, set theDCIM_LOG_LEVELenvironment variable to the desired level (for example,debugortrace) before starting DataConnect.
Note
Log files are workspace-specific and stored in each workspace's .metadata\logs\ directory. Each workspace maintains its own separate log files.
Quick Reference
Key Characteristics
- Isolated (changes don't affect other workspaces)
- File-backed (direct folder mapping)
- Non-destructive deletion (files remain intact)
- Hierarchical (Projects → Folders → Artifacts)
When to Use Each Operation
- Create: New projects, clean environments
- Import: Existing artifacts, migrations, version control, backups
- Switch: Moving between client projects or dev/test/prod environments
- Delete: Removing a workspace registration (files remain on disk)
- Sync: After external edits, Git operations, team changes
Critical Warnings
- ⚠️ Never edit
.metadatafolder manually - ⚠️ Deleting workspace keeps files (only removes registration)
- ⚠️ Sync after external file operations
Best Practices
- Backup workspace folders regularly
- Use local storage for active development
- Organize with logical project hierarchies
- Sync before deployments/exports
Troubleshooting
| Issue | Likely cause | Fix |
|---|---|---|
| "No workspaces exist" | Fresh installation, all workspaces deleted, or a database issue | Create a new workspace or import existing artifacts. This is expected on first launch. |
| "Workspace folder must be empty" when creating a workspace | The selected folder contains files — including hidden ones such as .DS_Store, Thumbs.db, or desktop.ini | Choose a truly empty folder (check for hidden files), or use Import Workspace, which accepts non-empty folders. |
| Files don't appear in the Project Explorer | Out of sync with disk, an unsupported file type, or a permission issue | Click Sync with filesystem in the toolbar. Only recognized artifact types (such as .dq) are shown. |
| Deleted files still appear | Files were deleted outside DataConnect without syncing | Click Sync with filesystem; files no longer on disk are marked out-of-sync and removed from the tree. |
| "File not found" when opening an artifact | The file was deleted or moved outside DataConnect | Sync to clear the stale entry, restore the file from backup and sync, or return the file to its original location. |
| "Permission denied" | Insufficient permissions, or a system-protected folder was selected | Use a user-accessible location such as Documents/workspaces/; avoid system folders like C:\Windows or C:\Program Files. |
See Also
- Design Workbench — the full Design Workbench UI and how the Project Explorer fits into the overall interface.
- Settings — workspace-specific preferences, global settings, and customization options.
- Macro Manager — workspace-level macros, reusable configurations, and parameterized workflows.
By mastering workspace management, you gain full control over organizing, navigating, and maintaining your data quality designs and solutions in Actian DataConnect. Workspaces form the foundation for all other DataConnect operations - understanding them thoroughly enables efficient, scalable project management.