Integrating DataFlow with a Hadoop Cluster
DataFlow provides integration with several Hadoop versions. The integration supports:
• Multiple versions of Hadoop. More details below.
• Configuring access to the Hadoop Distributed File System (HDFS). Once access is configured, HDFS can be browsed for file access like any other file system.
• Creating execution profiles that enable running DataFlow jobs on a Hadoop cluster.
• Monitoring and profiling DataFlow jobs as they execute on a Hadoop cluster.
Configuring DataFlow for Hadoop
Ensure that the appropriate version of Hadoop is configured to match the cluster.
To configure the Hadoop version
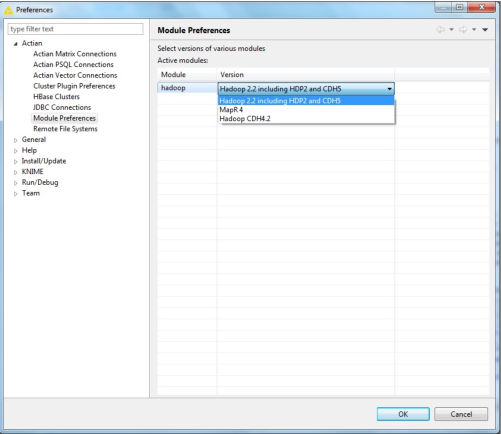
1. Go to File > Preferences > Actian > Module Preferences.
2. Select the appropriate version and click OK to save the preferences.
The following screen shot provides the Hadoop version which is set to Apache Hadoop 2.2 (default).
Configuring HDFS Access
When building workflows it is convenient to be able browse HDFS directly. This capability is supported in the DataFlow nodes that support file operations, such as the
Delimited Text Reader node. To enable this capability, the connectivity to an HDFS instance must first be configured.
To connect to an HDFS instance
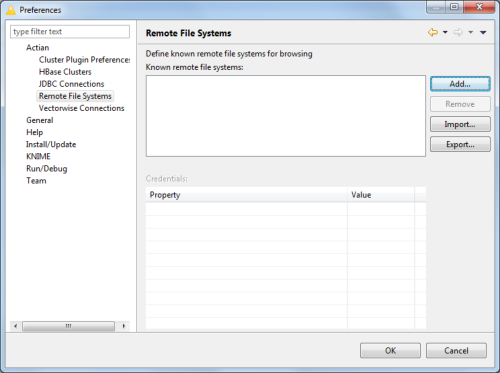
1. Go to File > Preferences > Actian > Remote File Systems.
The Preferences dialog is opened. Use the tree view on the left to view the Actian preferences.
2. Select the Remote File Systems section. You should see a dialog like the one below.
3. Click Add to add a new HDFS file system instance.
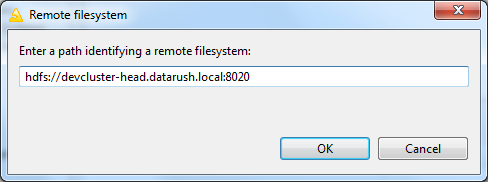
4. In the displayed dialog, enter the URL in hdfs:<server name>:<port number> format to the HDFS instance. The following dialog gives an example of a valid HDFS URL.
Note: 8020 is the default port for the HDFS name server. Contact your Hadoop system administrator to verify the correct server name and port number to use.
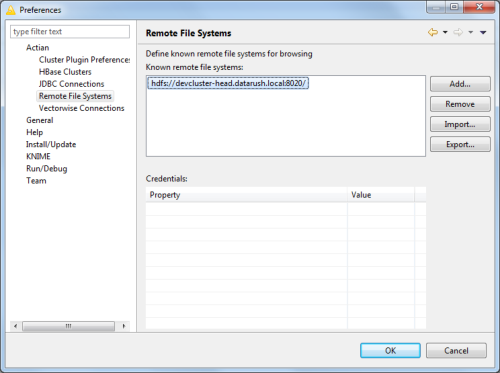
5. Click OK to display the HDFS instance URL in the Remote File Systems dialog.
6. Click OK in the Preferences dialog to save the HDFS instance URL.
You can add multiple HDFS instance URLs to support multiple Hadoop clusters. However, only one version of Hadoop is supported for each installation of DataFlow in KNIME.
You can use the node that requires the location of a file system.
Configuring Kerberos for Hadoop
When using a Hadoop cluster with Kerberos security enabled, typically no additional setup is required. As long as the KNIME user can be authenticated by the Kerberos system, then no additional setup should be required.
In some cases if the version of Java used by the Hadoop cluster does not match up with the version of Java used internally by KNIME, when executing jobs on the cluster an exception may be thrown such as "GSS initiate failed [Caused by GSSException: No valid credentials provided (Mechanism level: Failed to find any Kerberos tgt)]". If this occurs, there are multiple fixes you can implement, depending on the client system.
• If the client machine with KNIME has the same version of Java installed as the Hadoop cluster, then the following line can be added to the knime.ini file in the KNIME installation’s base directory:
-vm
/usr/jdk64/jdk1.7.0_67/bin/java
These lines must be added directly before the -vmargs and must be on two separate lines with no leading or trailing spaces. The location should point to the local Java installation that matches the version the Hadoop cluster uses.
• If the client machine with KNIME does not have a local version of Java installed then the following folder should be copied from the Hadoop cluster’s Java installation (${JAVA_HOME}/jre/lib/security) and should be used to replace the appropriate folder in the KNIME install (${KNIME_HOME}/jre/lib/security).
• Alternatively if neither of the above methods can be used, the only other option is to export the DataFlow project from KNIME and run it using the DR command line utility. As long as the Java version used by the client matches the one used by the Hadoop cluster, the job should authenticate without issue.
Authenticating Kerberos for the Client
There are different ways to set up Kerberos client on windows.
To set up Kerberos
1. At the command prompt, type the command where klist.
If C:\Windows\System32\klist.exe is displayed as the first value in the result, then set the PATH variable available in System Properties > Environment Variables > System Variables to %JAVA_HOME%/bin in the beginning.
2. If you are using JVM which is installed in the system, then copy krb5.conf file to <JAVA_HOME>/jre/lib/security folder. However, if you are using JRE available in KNIME, then copy krb5.conf file to <KNIME_HOME>/jre/lib/security folder.
Ensure that the hadoop.conf.dir environment variable is set and is referencing the Hadoop configuration directory (typically /etc/hadoop/conf).
The hadoop.conf.dir environment variable is used by the DataFlow Cluster Manager to ensure that the proper configuration is accessed and provided to DataFlow clients. Alternatively, edit the KNIME.ini file and include -Dhadoop.conf.dir=<path to configuration directory>.
3. To authenticate Kerberos credentials, at the command prompt type the command kinit –f <principalName> and enter the password when prompted. For example, Kinit –f actian@DATAFLOW.ACTIAN.COM.
Note: To confirm that the ticket is stored in the cache, at the command prompt, type the command klist.
4. From the same session, start KNIME or run RushScript to use the cached ticket that was authenticated.
For any issues encountered during client configuration, see
Known Issues of the Release Notes in the
Release Summary.
Creating Cluster-enabled Execution Profiles
Execution profiles persist execution options that are used when a DataFlow-enabled workflow is executed. Before executing a DataFlow workflow on Hadoop, distributed DataFlow must be installed on the Hadoop cluster. For more information, see
Installing and Configuring DataFlow on a YARN-enabled Hadoop Cluster.
To create a new execution profile that supports cluster execution
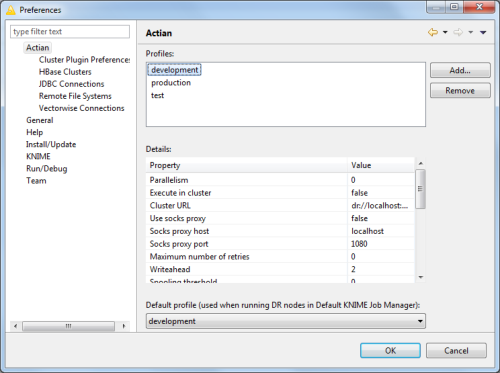
1. Go to File > Preferences.
2. Click Add and in the displayed dialog provide a name for the profile.
3. Click OK to create the profile. The profile is created with default values.
You can edit the configuration values for the new profile in the Preferences dialog.
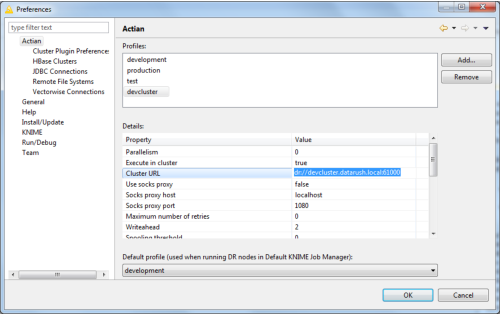
The following is a sample of the dialog with clustering enabled.
Clustering was enabled by changing two items in the execution profile definition:
• Enable execution in a cluster by setting the value of the Execute in cluster property to true. This value is false by default.
• Type in the URL to the DataFlow cluster manager. The URL takes the form: yarn://<server name>:<port number>. The server name and port number can be obtained from the system administrator that installed DataFlow in the Hadoop cluster.
Other configuration values can be changed as desired. Click OK to save the changes. This execution profile is now clustered enabled and is ready to be used.
The next sections discusses how to use these profiles to enable cluster execution of workflows.
Executing Workflows on Hadoop
To execute a workflow on Hadoop, the workflow must be configured to use the DataFlow Executor and must use an execution profile that is Hadoop cluster-enabled. Workflows can be created with this capability enabled or reconfigured to support cluster execution.
Creating a Workflow for Cluster Execution
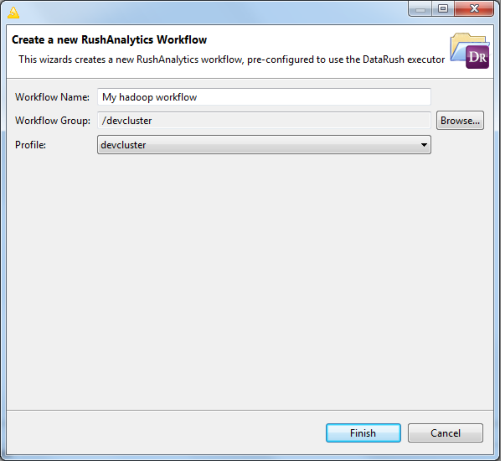
You can create a workflow that is cluster-enabled by using the New DataFlow Workflow menu item.
To create a cluster-enabled workflow
1. Right-click the context menu in the KNIME Explorer view and select Actian Dataflow Workflow.
• In the displayed dialog, enter a name in Workflow Name field.
• Select an execution profile that supports cluster execution from the Profile list.
2. Click Finish to create the workflow. The workflow is automatically available to edit.
You can build and execute the workflow.
Enabling Cluster Execution in an Existing Workflow
To enable Hadoop execution on an existing workflow
1. Open the workflow and select the workflow in the KNIME Explorer.
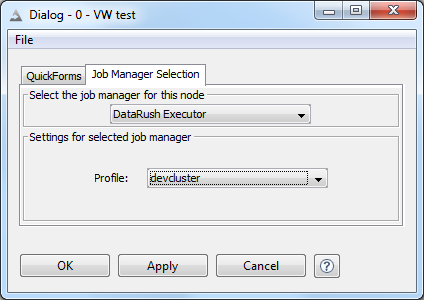
2. Right-click to display the workflow context menu and select Configure.
3. In the workflow configuration dialog that is displayed, select Job Manager Selection tab.
• In the Select the job manager for this node list, select DataFlow Executor for DataFlow to execute the workflow.
• In the Settings for selected job manager, select the execution profile that is cluster-enabled from the Profile list.
4. Click OK to save the changes to the workflow configuration.
The workflow is now ready for cluster execution.
Executing the Workflow
When the workflow is ready to execute, click on the Execute all executable nodes icon on the tool bar. The workflow will begin executing on the configured Hadoop cluster.
You can monitor and profile a Hadoop job. For more information, see the next section.
Monitoring and Profiling Hadoop Jobs
Two views are supported for monitoring and profiling workflows that are executing on a Hadoop cluster. They are DataFlow Cluster view and the Graph Execution Details view. These views typically appear in the bottom right section of the GUI. See the screen shot in the previous section of the overall KNIME GUI.
Note the tabs in the lower right section with the purple DR icon. Click on the tabs to display the view desired.
DataFlow Cluster View
The DataFlow Cluster view is enabled when you use DataFlow in a pre-YARN cluster. When this view is first opened, it is not configured and will appear with a single entry titled <No profile selected>. Right-click on empty space in the view and select a profile that supports clustering. For example, the devcluster profile created in an earlier example can be used.
After a profile with clustering support is enabled, the view will display the cluster nodes in a tree view. The name used for the profile will be used as the first entry. An entry for each worker in the cluster will be displayed underneath.
When a workflow is executed on the cluster, this view can be used to ensure the job is running and to gather high level information about its execution. The following screen shot shows a workflow named malstone executing on the cluster named devcluster. Note that each node in the cluster has a child entry that contains run time information. When the job completes, these child entries will disappear. Note that the cluster view will also display jobs executed by other users.
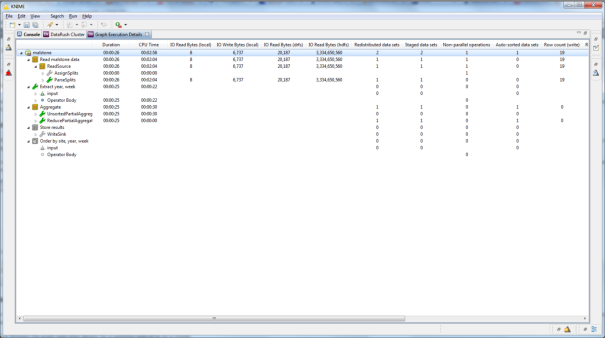
Graph Execution Details View
The Graph Execution Details view provides low level information about the executing workflow. The information is organized by the nodes (operators) contained in the workflow. The information can be used to profile the workflow and determine key places where data is not optimally partitioned or an operator is using an unusual amount of resources.
The following screen shot displays the graph execution details for a workflow executing on a cluster. Note that opening a view in full screen mode is accomplished by double-clicking on the view tab (where the view name is). Close full screen mode by double-clicking on the tab name again.