Establish and Test a Remote Connection Using Netutil
You use netutil to establish and maintain access to remote instances. Defining a virtual node name is the first step in the process of establishing a connection.
To define a virtual node (vnode) and use it to test a connection to a remote instance
1. Enter the following command at the operating system prompt:
netutil
The netutil startup screen appears.
2. Make sure that the cursor is in the Virtual Node Name table; then choose Create from the menu.
A pop-up window appears, displaying the following prompt:
Enter new virtual node name.
3. Enter a virtual node name of your choosing and select OK from the menu.
A pop-up window appears, displaying the following prompt:
Choose type of login to be created
Global--Any user on [local node]
Private--User [user name] only
4. Use the arrow keys to highlight Global or Private; then choose Select from the menu.
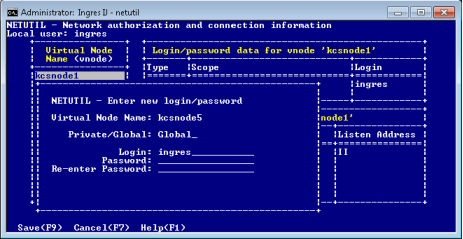
The Enter new login/password pop-up appears.
5. Enter the appropriate user name (login) and the password, depending on the type of authentication method used to access the remote instance:
• OS authentication: Enter the user name and password of the account that is used on the remote node.
• DBMS authentication: Enter the user name and DBMS password as defined for the Ingres user on the remote instance.
• Installation Password: Enter an asterisk (*) in the Login field, and then enter the remote instance’s Installation Password.
6. Re-enter the password as prompted, and then choose Save from the menu.
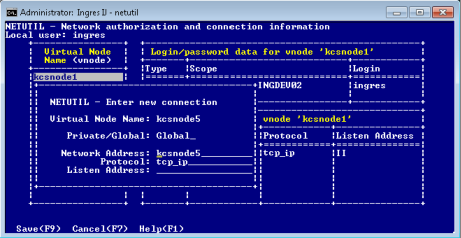
The Enter new connection pop-up appears.
7. Enter the connection data (type over the default values, if necessary), and then choose Save from the menu.
Netutil returns to the startup screen. The data you entered in this and previous steps is displayed in the Vnode, Login/password data, and Connection data tables.
8. Choose Test from the menu.
A submenu appears with Connection and Login test options.
9. Choose one of the following from the submenu:
• Connection–Tests only the connection data against the target server. (Against a pre-Ingres 10.2 server, it also authenticates the user and password.)
• Login–Prompts for a database name and tests a full connection to the target database, authenticating the user and password. The DBMS does the authentication if the new DBMS Authentication feature is turned on; otherwise OS or installation password authentication is done.
A message is displayed in a pop-up indicating whether the test is successful.
If the connection is not successful, the error message indicates the nature of the error or where to look for further information.
10. Press Return.
You are returned to the startup screen.