How You Specify User-Defined Defaults
You can specify a user‑defined default entry for a data column, using the EditDefaults menu option on the Create a Table frame. A value is then entered in the specified data column if an end user does not enter a value for that column. You can specify a user‑defined default value for a column even if none of the other columns for the row have been filled in on the Create a Table frame.
To specify a user‑defined default value
1. In the Create a Table frame, place the cursor in the Defaults field for the row in the column specifications table field for which you want to define a default value.
2. Type the word, value.
3. Tab out of the field or choose the End operation.
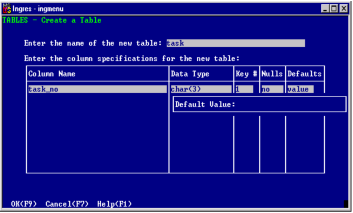
The EditDefaults pop‑up window displays:
The pop‑up contains a scrollable default value window that is initially 23 characters wide and scrollable to 1500 characters. The DBMS limit for default values is 1000 characters; however, the extra space in the default window allows for dereferencing characters.
4. Type the default value for the data column. The value can be any valid entry that is compatible with the data type of the column, including today or now for a date column.
You can remove or change the user‑defined default value at any time. To remove a user‑defined default entirely, change the Defaults field entry to yes, no, user, or null, as appropriate. To change the user‑defined default, place the cursor in the Defaults field and choose the EditDefaults menu operation; then enter the new default value in the pop‑up frame.
The previous user‑defined default value is saved temporarily. To restore it, type value in the Defaults field.