Create a New Frame
To create a new frame
1. Select a frame as the current frame.
Vision always positions a new frame in relation to the current frame. If the current frame is the only frame, Vision automatically inserts a new frame below it. Otherwise, you must specify the position of the new frame. See step 2 to determine which frame to choose as the current frame.
2. Choose Create from the menu.
Vision displays a list of locations:
3. Position the cursor on a location and choose Select.
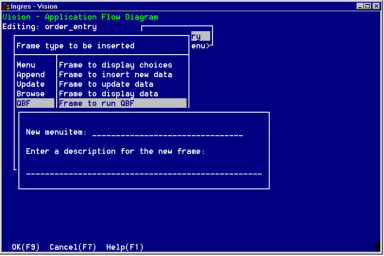
Vision displays a list of the available frame types.
4. Position the cursor on a frame type and choose Select.
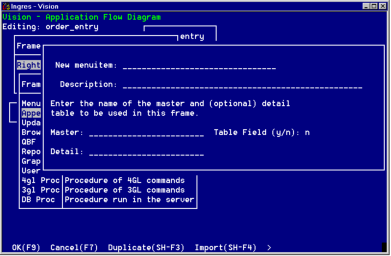
Vision displays a pop-up window in which you enter basic information about the frame. The following figure illustrates this window for Append, Browse, and Update frames:
The following figure illustrates this window for frame types that do not have visual queries—Menu frames and frames for which Vision does not generate the code:
5. Enter the text of the menu item that calls this new frame.
6. Press Tab to move the cursor to the description field.
7. Enter a description of up to 60 characters for the frame.
Use care in specifying this description; it appears:
• On any Menu frames that call this frame
• As the title that Vision places at the top of the frame's form
• In various help files associated with this frame
8. Proceed as follows depending on the type of frame you are creating:
• For Menu frames, select OK.
This is all you must do to create a Menu frame. If you want the menu items to be displayed in a style other than the application-wide default, see
Specifyfing Menu Frame Display Styles.
• For Append, Browse, and Update frames, complete the steps below to specify the tables for the frame's visual query.
9. Press Tab to move the cursor to the Master field.
10. Specify the Master table in one of these ways:
• Enter the name of a table that exists in the database.
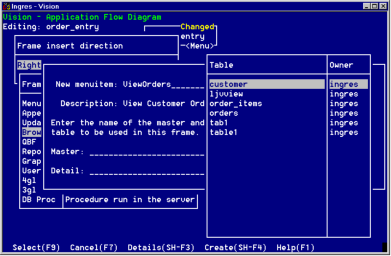
• Select ListChoices to see a list of the tables in your database that you have permission to use. This figure shows an example of such a selection list:
To choose a table listed, position the cursor on the name of the table and choose Select. Vision places the table name into the Master Table field.
To display information about any of the tables listed, choose Details. This displays the Examine a Table window, which is described in
Examining Tables.
• Create a new table to use with this frame by selecting ListChoices as above, then selecting Create from the submenu.
Vision displays the Create a Table window in which you can create the new table. This window is identical to the table creation window in the Tables Utility. See the Character-based Querying and Reporting Tools User Guide for details.
After you create the table, select Save to save your new table definition. Then select End to return to Vision.
• Use the Duplicate or Import menu operation.
11. Press Tab to move to the Table Field (y/n) field.
12. Indicate whether you want to display the Master table on the form as simple fields or a table field. The default is simple fields.
• To display the Master table as simple fields, go to the next step.
• To display the Master table as a table field, type y. Then go to step 14. You cannot enter a Detail table name if the Master table is displayed as a table field.
13. To enter a Detail table, press Tab to move the cursor to the Detail table field. Enter the name of a table using any of the methods described in step 10.
If you do not need a Detail table, go to the next step.
14. Select OK to save your responses.
Vision verifies that you have permission to use the tables you designated. (When you select a table with the ListChoices operation, Vision only shows you the names of tables that it has already verified.)