Create an Image of an Application
When your application is ready to use, you can create an executable image of the application. An image is a version of the application that the user can run directly, without going through Vision.
Although building the image can take a considerable amount of time, it makes the application easier to use. Users do not need to know how to access Vision. Instead, they can call the application directly by the name of the image file.
Also, the image file serves as a "snapshot" of the application at the time the image is created. Thus, you can save a version of the application while you continue to build it in Vision.
Windows: You must have embedded SQL for C available to image an application. 
To create the image of an application
1. In the Applications Catalog window, move the cursor to the name of the application and select Utilities from the menu.
Alternatively, if you currently are working with the application you want to image, you can select Utilities from the Application Flow Diagram Editor menu.
2. If you want to change the global constants file, do so now. For more information, see the Using Alternate Sets of Global Constants section in Using Vision Utilities.
3. Select Image from the submenu.
Vision displays a pop-up, shown in the following figure, that displays the name of the default image file. This name is the same as the application, unless you specify a different file as described in the Specifying a Default Image File section. For Microsoft Windows and VMS, Vision gives this file the extension .exe.
By default, Vision places the image file in the directory in which you currently are working. To accept the default file specification, proceed to Step 5.
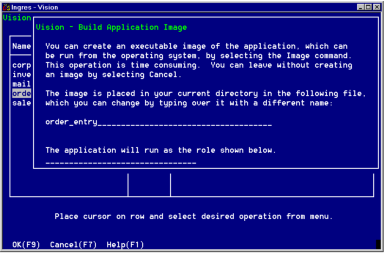
4. To change the default file name and/or directory, type in a new specification.
If you are changing the directory, be sure to enter the full directory path.
Specify a role identifier, which associates specific permissions with the application.
See the SQL Reference Guide for more information about roles.
5. Select OK from the menu.
Vision generates the necessary code, constructs the image file, and places it in the specified directory.
Last modified date: 01/30/2023