Run the Reconcile Utility
To reconcile tables and frame definitions for an application
1. Select Utilities in either of these ways:
• With the cursor in the name of the application on the Applications Catalog window
• From the Application Flow Diagram Editor for the application
2. Select Reconcile.
Vision displays a pop-up window, shown in the following figure, that lists all the frames in your application. You use this list to specify the frames to be reconciled.
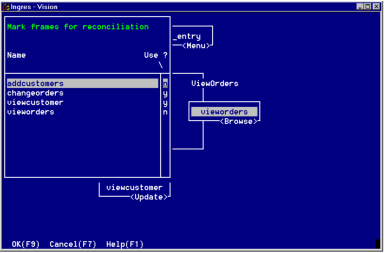
By default, Vision marks all frames as "y," indicating that they must be reconciled.
3. Specify any frames that you do not want to reconcile by typing n in the Use? field next to the name of each frame.
4. After you specify the frames you want to reconcile, select OK.
Vision displays the reconciliation report for the frames you specify. The following figure shows a portion of a sample reconciliation report window.
For each frame that can be changed, Vision asks you to accept or reject the changes. Before responding, you can use the OldVQ operation to view the old visual query or the NewVQ operation to see the proposed new visual query.
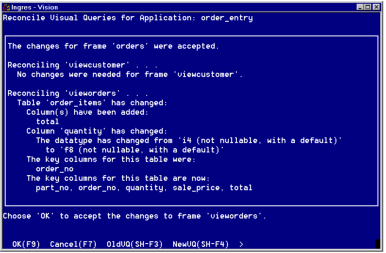
5. Accept or reject the changes as follows:
• Select OK to accept the changes.
Vision makes the changes. You must accept all changes for the frame.
• Select Cancel to reject the changes.
Vision continues to run the report.
6. After the report is finished, you can write it to a file as follows:
c. Select WriteFile from the menu.
Vision prompts you for the name of a file.
d. Enter the file name and press Return.
If the file you specify is not in the current directory, be sure to include the full directory path.
7. Select End to return to the window from which you called the Reconcile utility.
If you have not written the report to a file, do so before you exit the Reconcile utility.
Last modified date: 01/30/2023