Insert Lookup Tables
To include a Lookup table in a visual query
1. Position the cursor anywhere on the visual query display of the Master or Detail table to which you are joining the Lookup table.
2. Select AddTable from the menu.
Vision displays a pop-up window that asks for the name of the Lookup table.
3. Provide the Lookup table name in either of these ways:
• Enter the name of the table on the pop-up window.
• Use the ListChoices operation to select a table.
Vision enters the name of the table that you select onto the pop-up window.
4. Select OK.
Vision inserts the Lookup table on the visual query window just below the table to which it is joined. Vision also draws a line indicating the first natural join (columns with the same name, data type and length) shared by the two tables.
This is the column that activates the Lookup table. If you want to activate on a different column, you must change the join.
If Vision cannot find a natural join, it adds the Lookup table, but displays a warning message. You must create a join before you run the frame.
Adding and deleting joins are discussed elsewhere in this chapter.
Display Lookup Table Columns as Fields on the Form
Unlike Master and Detail tables used in queries, the default for Lookup tables is that a column not be displayed as a field on the form. If necessary, you can change this default to display Lookup table columns as fields on the form.
When the user selects an item from the selection list, Vision enters its values into the fields on the form that correspond to the specified columns of the Lookup table.
Note: Any data from the Lookup table that you include on the form is display-only; the user cannot manipulate their values.
You cannot display the join column of the Lookup table.
When the user selects Go on a frame with Lookup table columns displayed as form fields, Vision generates a select statement that retrieves data from the Lookup table and the Master or Detail table to which it is joined.
If a Lookup table column has the same name as the column in the Master table or Detail table to which it is joined, Vision:
• Adds a sequence number to the name of the Lookup table column in the visual query display
• Marks the column with the symbol "@"
• Does not change the field's title on the form, but does change the field's internal name to include the sequence number
For example, if a Master table has a column called Name and you display a column in its Lookup table called Name, the Name column in the Lookup table appears as Name1 in the visual query. If you edit the form, this field appears as Name, but with an internal name of Name1.
Also, Vision generates duplicate fields on the form for Lookup table and Master or Detail table columns with the same name. You can handle this situation in either of two ways:
• If the columns have the same name and contain the same data—for example, an Address column with customer addresses—leave the Lookup table column non-displayed. In this way, the customer addresses are displayed once only on the form.
• If the columns have the same name but contain different data—a Name column in the Parts table with part names and a Name table in the Customer table with customer names, for example—then edit the form to change the title of the form field for one of the columns.
You can tell which field relates to the Lookup table column because its internal name contains a sequence number, as described previously.
To display a column of a Lookup table as a form field
1. Position the cursor on the name of the column in the visual query display for the Lookup table.
2. Tab to the Display on Form field.
3. Type y.
Display Lookup Table Columns in the Selection List
By default, Vision displays the join column of the Lookup table on the selection list that the user sees after selecting ListChoices (except as described in How Using a Lookup Table Without Displaying a Selection List Works, in this topic). To include other columns in addition to or instead of the join column, you must tell Vision explicitly:
• Which columns of the Lookup table to display
Except as noted below, your selection list must contain at least one column.
• The order in which to display the columns
Vision uses the column display order as the order in which to sort the records that are retrieved from the Lookup table, also.
By default, Vision displays the title of a column on the selection list as it appears on the visual query display, but with the first letter changed to uppercase. For example, the "balance" column is displayed as "Balance."
You can display the column with a different title. In the visual query in the preceding figure, for example, the "street" column is displayed to the user with the caption "Address."
When you specify the display order with the procedures below, notice that Vision designates the join column (or first column, if there is no join column) as the first displayed column. To add other columns, begin your numbering with "2," rather than "1" as indicated.
To make a different column the first column, ignore the default and begin with "1" for the column you want to display first. You then can change the number for the join column or type a blank over it to remove it completely.
To specify the columns to display in the selection list
1. Position the cursor on the name of the column you want as the first displayed column in the selection list.
2. Press Tab.
3. Enter the number 1 in the Order in Pop-up field.
4. To accept the default column title, proceed to Step 5.
To change the column title:
c. Press Tab to move to the Column title field.
d. Enter a new title.
5. To display additional columns, move the cursor to the row for the next column and repeat the above procedure. Enter the appropriate number (and column title, if desired) for each column.
If you change the display order for a column, Vision repositions all the subsequent columns.
To remove a column from the display, type a blank space in the Order in Pop-up field for that column. To change the column title, enter a new title over the current text.
How Using a Lookup Table Without Displaying a Selection List Works
You can define a Browse or Update frame so that users cannot enter query qualifications when the frame is displayed. (See Specifying Frame Behaviors for details.)
If you display columns of the Lookup table as fields on the form, Vision fills in the form based on the values from the first item in the Lookup table (or the first item that meets any query restrictions that you specify in the visual query).
Because the data already is entered into the form fields when the frame is displayed, there is no selection list from which users can choose. Also, Vision does not generate the ListChoices menu item for the frame.
Specify User Lookup Qualifications
You can let users enter qualifications so that only certain records of the Lookup table are retrieved. When a user selects ListChoices, Vision displays a pop-up window on which the user can enter a value for any of the columns in the selection list. If you allow user retrieval qualifications, they are permitted on all columns of the selection list.
For example, if the user enters ">150" into the Balance field, the selection list only displays those customers whose account balance is greater than $150. The following figure shows the pop-up window on which the user can enter a qualification:
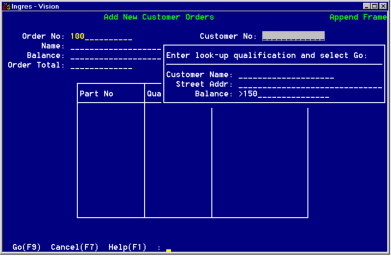
Using a qualification lets a user find a specific item quickly, especially if the Lookup table contains a large number of records. It also conserves memory on your system, because Vision only loads into the selection list the rows of the Lookup table that meet the user's qualifications.
The default is not to allow user qualifications. You must explicitly tell Vision to allow them.
To allow user qualifications
1. Tab to the Qualify Lookup field on the Lookup table visual query display.
2. Type y.
To change the specification back to the default, type n in the Qualify Lookup field.
Specify Joins for the Lookup Table
By default, Vision joins the Lookup table to the Master or Detail table by the first natural join that they share. This is the column that activates the Lookup table.
If Vision does not find a join, you must create one before you can run the frame. To activate the Lookup table on a different column, join the Lookup table to the Master or Detail table on that column. You must remove the current join and then create a new one.
Creating and removing joins are described elsewhere in this chapter.
If you change the field on which the Lookup is activated, Vision highlights the new field and removes the highlight from the original field.
Last modified date: 02/09/2026