Define a Report Frame
Your Vision applications can include frames that call reports from the database. You can create these reports with either RBF or the Report-Writer report specification language. The report can already exist, or you can create it when you create the Report frame.
See Character-based Querying and Reporting Tools User Guide for more information about creating and running reports.
To define a Report frame
1. Follow Steps 1 through 8 in Create a New Frame. Specify "Report" as the frame type.
Vision redisplays the Application Flow Diagram with the new frame inserted.
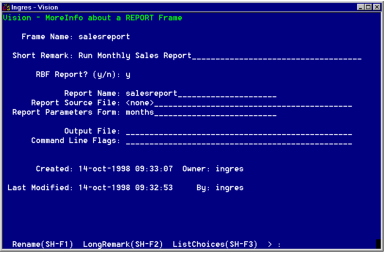
2. Select MoreInfo to display the MoreInfo About a Report Frame Window, as shown in the following figure. The window displays the frame name and description you just entered and when and by whom the frame was created.
3. Specify the report type in the RBF Report? field:
• Press Tab to accept the default of a report created in RBF.
• For Report-Writer reports, type n.
The cursor moves to the Report Name field. Vision assumes that the report name is the same as the frame name.
4. Press Tab to accept this default report name or enter a new name and press Tab.
The report need not exist yet in the database. Before you run the frame, you can create the report as described in the Creating and Editing a Report Definition section. However, it is more efficient to create the report outside of Vision before you create the Report frame.

5. If you have specified a report created with the Report-Writer, enter the name of the file containing the report specifications, then press Tab.
If you specified RBF as the report type, the Report Source File name appears as "none."
6. Enter in the Report Parameters Form field the name of a form on which the user can specify runtime parameters for the report (see Specifying Runtime Report Parameters).
7. If you want to print the report to a file, enter the file name in the Output File field.
Leave the field blank to print the report to your window.
For a Report-Writer report, a file you specify here overrides any file specified in an .output statement. Be sure to include the complete directory path if you do not want the file you specify to be written to the current directory.
8. Specify in the Command Line Flags field any parameters of the report command to use when this frame is called.
9. Edit the descriptive Short Remark that you entered when you created the frame.
10. When you are done, select End to return to the Application Flow Diagram.
Last modified date: 02/26/2025