The meter Field Template
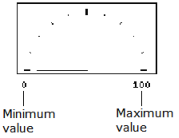
The meter field template is used to create a semicircular meter that resembles an automobile speedometer. A meter field can be used to monitor resource levels or other numeric data in your application. A meter field can be used to monitor resource levels or other numeric data in your application.
Create a Meter Field
You can create a meter field using the meter field template in the Frame Editor. When you create the meter, you can specify its size, orientation, divisions, minimum and maximum values, and the direction in which the indicator should move.
To create a meter field
1. On the Develop tab, in the Components portlet, open the frame in which you want to create the field from the field template.
2. Click Insert, Field From Field Template.
The Select a Field Template dialog appears.
3. Select the core application and the meter template, and then click OK.
4. Position the field on the frame.
The Meter Assistant appears.
5. Complete the dialog using the following information:
Minimum
Specifies the lowest value in the meter field
Initial
Specifies the initial value in the meter field
Maximum
Specifies the highest value in the meter field
Number of Divisions
Specifies the number of divisions on the dial in the meter field. You can choose between eight or ten.
Default: Ten
Auto Range
Specifies that the endpoints of the meter will be adjusted automatically if the values exceed the specified minimum or maximum values
Clockwise/Counterclockwise
Specifies the direction of rotation (minimum to maximum value) of the meter
Orientation of Meter
Specifies the direction to which the midpoint of the meter points
High
Causes a high mark to be drawn on the meter, indicating the highest value received since the frame began running
Low
Causes a low mark to be drawn on the meter, indicating the lowest value received since the frame began running
Alarms
Specifies that messages are sent to the user if the meter values meet preset conditions. A control appears in the Assistant window that lets you set the conditions, test values, and messages.
6. Click Generate.
The field is created and displayed on the form.
How You Can Customize a Meter Field
At runtime, the value of the meter is initialized to its initial value. To update the current value of the meter as your frame executes, call the UpdateGaugeValue method for the field. For example:
declare
PercentComplete = float;
enddeclare
{
PercentComplete = RowsProcessed / TotalRows;
MyGauge.UpdateGaugeValue(value = PercentComplete);
}
How a Meter Field Works
The value of the meter is typically set and updated at runtime. An example of a meter field that uses the default parameters in the Meter Assistant dialog appears as follows:
The actual processing for the meter field is handled by the Indicator_Manager user class, which in turn relies on additional private user classes to assist in gauge layout and drawing. For more information about the Indicator_Manager class, see the appendix "Generated User Classes" in the Language Reference Guide.

