Create a Frame and Add Fields and Controls to It
In this procedure, you will create a user frame in the ProjectApp1 application that will interact with the project table in your database. First, you create the user frame. Then you add the fields from the project table. Finally, you add the controls to the frame that will enable your application to update the project information in the database table.
To create a user frame
1. Click to select the ProjectApp1 application in the Applications portlet of the Develop tab.
2. Click File, New, User Frame.
The Create User Frame dialog opens.
3. Enter the name ProjectFrame, select dialog_box from the list of templates, and click Create.
4. ProjectFrame is displayed, with the Field Palette and Property Inspector.
To create fields on the frame
1. Click Insert, Fields from Database Table on the floating menu bar.
The Select a Database Table dialog appears.
2. Click List Tables.
The Table Selection dialog opens for the connected database.
3. Select project and click OK.
4. Click OK on the Select a Database Table dialog.
The cursor changes to crosshairs.
5. Position the cursor near the upper left corner and click.
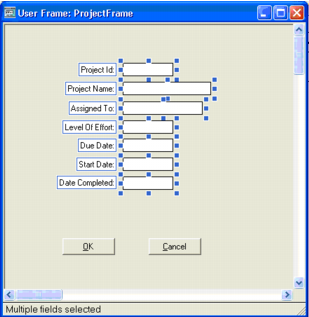
All the fields from the project table are placed in the frame.
Your user frame should look something like this:
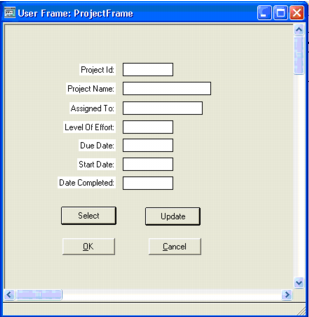
You can now add Select and Update buttons to the frame.
To add controls to the frame
1. Click the ButtonField icon in field palette. Then drag the mouse to size the button in the area between the fields and the OK and Cancel buttons in the frame.
Leave the new button selected.
2. In the Property Inspector, click the property Name. Enter selectbutton and press Enter.
The name of the button field is changed to selectbutton.
3. Scroll down in the Property Inspector and click the TextLabel entry.
The Edit Text String dialog opens.
4. Replace the text "Button" with Select and then click OK.
The button's label is changed to "Select."
5. While the Select button is still selected, click Edit, Copy.
6. Click Edit, Paste. Then position the crosshairs and click to place the copied button next to the Select button.
7. Change the name of the currently selected field to updatebutton.
8. Change the TextLabel to Update.
Note: You also could add Delete and Insert functions to the form later, if desired.
9. Click File, Save to save the form.
ProjectFrame should now look something like this:
Leave the frame open. You are now ready to add scripts to your frame so that it can interact with the database.