Complete Development Environment with Visual Tools
The development environment is intuitive, even if you are a new user, giving you a quick and productive start. Yet OpenROAD Workbench is sophisticated enough to provide the powerful features that advanced developers require.
For example, the Frame Editor lets you quickly and easily paint the user interface for an application and handle much of the programming logic behind the interface using event-driven, object-oriented code written in the OpenROAD 4GL language.
Advanced programmers can take advantage of additional features, such as:
• Using 4GL to its full extent to create applications capable of dynamically generating frames at runtime
• Exploiting the eClient and OpenROAD Server technologies
OpenROAD Workbench includes visual editors that enable you to design the frames, menus, and other user interface components for your applications using point-and-click, drag-and-drop techniques. For immediate feedback on your design as it progresses, you can start a simulation with a few mouse clicks.
OpenROAD Workbench
The OpenROAD Workbench is a task-based GUI tailored to follow the steps in the software development life cycle. The interface perspective changes based on the task at hand, rather than merely supplying a view of your code.
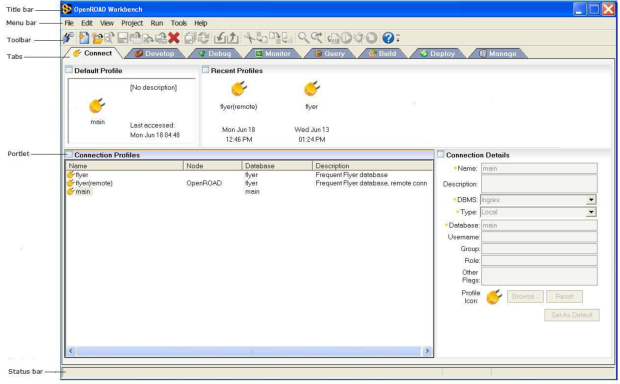
This interface consists of a title bar, menu bar, toolbar, tab bar, portlets, and a status bar. Descriptions of each of these elements follow the illustration.
The Workbench window consists of the following controls and components:
Title bar
Displays “OpenROAD Workbench,” the current version, and the name of the active connection profile
Menu bar
Displays menus applicable to the currently selected tab and portlet
Toolbar
Displays icons that are shortcuts for menu selections. The icons displayed as active depend on the currently selected tab and portlet.
Tab Bar
Displays the following tabs, which follow the process from application development to deployment:
Connect
This tab is the default tab of the OpenROAD Workbench, displayed every time you start the interface. It lists all of the database connection profiles you have defined, with the default profile displayed in the Default Profile portlet. A database connection profile is a collection of settings used to establish a connection with a local or remote database. To use any of the other tabs, you must be connected to a database.
After you select a profile from the list and click any of the other tabs, the Workbench establishes the database connection. For more information, see “Connect to a Database Through a Connection Profile” in the User Guide.
Develop
This tab is where developers write code and create software components used to build applications.
Debug
This tab is where you test and debug the applications you have created on the Develop tab. The Debug tab provides an easy way to set a variety of breakpoints so that you can step through code you have written, line by line.
Monitor
This tab lets you observe an application as it runs. It displays a schematic of the components in your application while it is running, enabling you to test and improve your application.
Query
This tab lets you run SQL statements against a target database to examine data in it.
Build
After creating, testing, and correcting an application, you use this tab to build it into an executable image file. An image file is a compiled, executable version of an OpenROAD application. File names end with the extension .img.
You use the Build tab to create profiles for the MakeImage utility and other OpenROAD utilities. For more information about these utilities, see “How You Can Access the OpenROAD Utilities” in the Workbench User Guide.
Deploy
This tab lets you package a built application and deploy it to the Web as an OpenROAD eClient application.
Note: The Deploy tab is unavailable in the UNIX and Linux versions of OpenROAD Workbench.
Manage
This tab lets you administer the OpenROAD Server using the same functionality as the OpenROAD Server Administrator application. This tab lets you build and deploy OpenROAD 4GL business logic to the OpenROAD Server so that it can be accessed by a thin client.
Note: The Manage tab is available only if you have installed the OpenROAD Server.
For more information about these tabs, see the User Guide.
Portlets
Display defined areas for particular functions on a tab. Selecting a portlet often changes the available menu items and toolbar buttons.
Status bar
Displays informational messages about the development environment, the user name of the connected user, and the name of the database to which you are connected
Editors
Workbench toolbars and menu items provide quick access to the following OpenROAD component editors:
• Frame Editor
• Frame Template Editor
• Field Template Editor
• Class Editor
• External Class Library Editor
• 4GL Procedure Editor
• 3GL Procedure Editor
• Database Procedure Editor
• Global Variable Editor
• Constant Editor
• Include Script Editor
• Script Editor
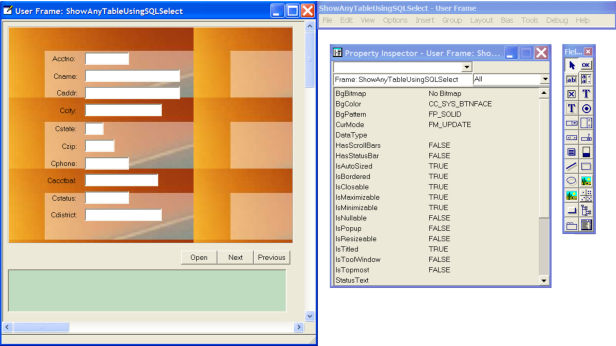
Some are visual editors, like the Frame and Frame Template Editors, which have their own tool palettes and menu bars. These editors also display an accompanying Property Inspector that lets you quickly and easily specify the properties for each component and each field or control in the component. (For more information about the Property Inspector, see the Workbench User Guide.) You can optionally display a field tree that visually depicts the entire field hierarchy for a component.
The following illustration is an example of the Frame Editor with its accompanying Property Inspector, Field Palette, and menu bar:
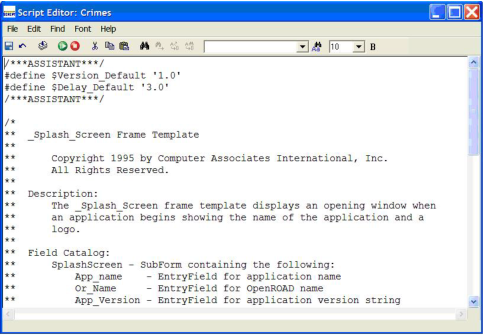
In addition to the visual editors, OpenROAD provides editors specifically tailored to deal with different aspects of your application. These range from simple dialogs for declaring global variables and constants to a Script Editor for writing your code.
The following illustration is an example of the Script Editor: