How You Can Create a Simple Client/Server Application
You can create a simple client/server application that selects and updates information from a database. Creating such an application follows these basic steps:
1. Create a table in a database.
2. Create an application and connect it to the database.
3. Create or edit a user frame and add fields and controls to it.
4. Write the frame scripts.
5. Compile and run the frame.
Each step is detailed in the following sections.
Create a Table in the Database
To create a table in a database, you must first have created a database (or use an existing database) and must have created a database connection profile.
In this procedure, you will create and populate a project table with two records of data. But first you must connect to a database in which you can create a new table for the purposes of this demonstration procedure.
To create a table in the database
1. Click the Query tab.
OpenROAD connects to the selected database profile.
2. Open the Connection Profiles folder in the Database Connections portlet.
Database connection profiles are listed.
3. Open the connection profile folder for the database in which you want to create a table.
4. Right-click on the database name and select Connect.
The Database Query portlet becomes active and displays the connection information.
5. Click in the Database Query portlet to make it active.
6. Enter the following code to create the project table:
create table project(
project_id integer not null,
project_name varchar(40) not null,
assigned_to varchar(15) not null,
level_of_effort date not null default ' ',
due_date date not null default ' ',
start_date date not null default ' ',
date_completed date not null default ' ')
7. Click the Run icon on the toolbar to execute the SQL statement.
Results are displayed in the Query Results portlet. (The table with three columns is created.)
8. Clear the contents of the Database Query portlet and then enter the following code:
insert into project (project_id,project_name,assigned_to) values (1,'Requirements Definition','Mary');
commit;
insert into project (project_id,project_name,assigned_to) values (2,'System Design','Larry');
commit;
Click the Run icon on the toolbar.
Results are displayed in the Query Results portlet. (Two records were added to the table.)
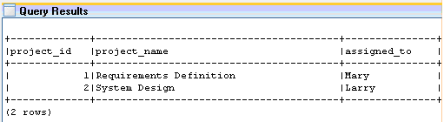
9. Enter following statement in the Database Query portlet:
select * from project
Click the Run icon.
The contents of the table are displayed in the Query Results portlet. For example:
10. Enter the following final command in the Query Results portlet, and run it:
commit;
11. Disconnect the database session: Right-click on the database session in the Database Connections portlet and select Stop.
You are now ready to create an application and connect it to the database you created.
Create an Application
In this procedure, you will create the ProjectApp1 application.
To create an application
1. Click the Develop tab.
2. Click in the Applications portlet to make it active.
3. Click File, New, Application.
The Create Application dialog opens.
4. Enter a name for the application: ProjectApp1
Enter the remark: A simple client/server application
5. Click Create.
The ProjectApp1 application is created and added to the Applications portlet.
You are now ready to create a user frame in the application.
Create a Frame and Add Fields and Controls to It
In this procedure, you will create a user frame in the ProjectApp1 application that will interact with the project table in your database. First, you create the user frame. Then you add the fields from the project table. Finally, you add the controls to the frame that will enable your application to update the project information in the database table.
To create a user frame
1. Click to select the ProjectApp1 application in the Applications portlet of the Develop tab.
2. Click File, New, User Frame.
The Create User Frame dialog opens.
3. Enter the name ProjectFrame, select dialog_box from the list of templates, and click Create.
4. ProjectFrame is displayed, along with the Field Palette, Property Inspector, and floating menu bar.
To create fields on the frame
1. Click Insert, Fields from Database Table on the floating menu bar.
The Select a Database Table dialog appears.
2. Click List Tables.
The Table Selection dialog opens for the connected database.
3. Select project and click OK.
4. Click OK on the Select a Database Table dialog.
The cursor changes to crosshairs.
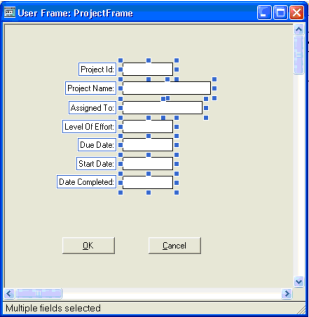
5. Position the cursor near the upper left corner and click.
All the fields from the project table are placed in the frame.
Your user frame should look something like this:
You can now add Select and Update buttons to the frame.
To add controls to the frame
1. Click the ButtonField icon in the Field Palette. Then drag the mouse to size the button in the area between the fields and the OK and Cancel buttons in the frame.
Leave the new button selected.
2. In the Property Inspector, click the property Name. Enter selectbutton and press Enter.
The name of the button field is changed to selectbutton.
3. Scroll down in the Property Inspector and click the TextLabel entry.
The Edit Text String dialog opens.
4. Replace the text “Button” with Select and then click OK.
The button’s label is changed to “Select.”
5. While the Select button is still selected, click Edit, Copy from the floating menu bar.
6. Click Edit, Paste. Then position the crosshairs and click to place the copied button next to the Select button.
7. Change the name of the currently selected field to updatebutton.
8. Change the TextLabel to Update.
Note: You also could add Delete and Insert functions to the form later, if desired.
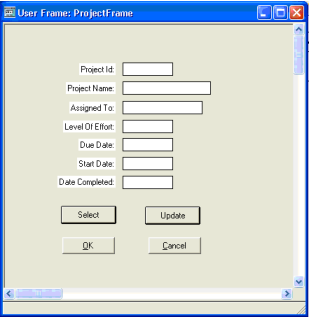
9. Click File, Save to save the form.
ProjectFrame should now look something like this:
Leave the frame open. You are now ready to add scripts to your frame so that it can interact with the database.
Write the Frame Scripts
In this procedure, you will create two scripts for the ProjectFrame user frame. One will select records from the project table and update them. Another will provide functionality for the OK and Cancel buttons.
To create a script for the Select and Update buttons
1. Click Tools, Script on the floating menu bar.
The Script Editor opens with the beginning of a frame script displayed.
2. Click at the end of the script and press Enter twice. Then enter the following code:
on click selectbutton =
{
select :project_name = project_name,
:assigned_to = assigned_to,
:level_of_effort = level_of_effort,
:due_date = due_date,
:start_date = start_date,
:date_completed = date_completed
from project
where project_id = :project_id;
}
This code selects the project name and assignee from the project table where the project_id matches what you have entered in the Project ID field on the user frame.
Note: :project_name (with a preceding colon) refers to the field on the frame; project_name refers to the column in the database.
3. Press Enter again and enter the following code:
on click updatebutton =
{
update project
set project_name = :project_name,
assigned_to = :assigned_to,
level_of_effort = :level_of_effort,
due_date = :due_date,
start_date = :start_date,
date_completed = :date_completed
where project_id = :project_id;
}
This code updates the selected project record in the database with the changes entered on the user frame.
4. Click File, Save from the Script Editor menu bar to save the script and then close the Script Editor.
To create a script for the OK button
1. Select the OK button on the frame.
2. Click Edit, Field Script on the floating menu bar.
The Script Editor opens with the beginning of a field script displayed.
3. Add the following line between the BEGIN and return; lines:
commit;
Your script should look like the following:
ON CLICK =
BEGIN
commit;
return;
END
This script assigns the commit SQL statement to the OK button, which also closes the frame.
4. Click File, Save to save the script, and then close the Script Editor.
To create a script for the Cancel button
1. Select the Cancel button on the frame.
2. Click Edit, Field Script.
The Script Editor opens with the beginning of a field script displayed.
3. Add the following line between the BEGIN and return; lines:
rollback;
Your script should look like the following:
ON CLICK =
BEGIN
rollback;
return;
END
This script assigns the rollback SQL statement to the Cancel button, which also closes the frame without making any changes to the records in the database.
4. Click File, Save to save the script, and then close the Script Editor.
5. Click File, Save to save the user frame.
You can now compile the frame and run it to test your application.
Compile and Run the Frame
After you have added scripts to the ProjectFrame frame and its controls, you can compile it and test it with the Debugger.
To compile the frame and its scripts
With ProjectFrame open, click Tools, Compile to compile the application.
Note: If compilation errors are displayed, double-check the steps in the previous procedures to ensure that you have entered the code correctly, and then try again.
To run and test the frame
1. Click Debug, Go on the floating menu bar.
The frame runs.
2. In the Project Id field, enter 1 and click Select.
The first record in the project table is displayed in the frame.
3. In the Assigned To field, change Mary to Marian.
4. Click Update.
5. Click OK to close the frame.
6. Click Debug, Go again.
The frame runs.
7. In the Project Id field, enter 1 and click Select.
The first record is displayed in the frame with the Assigned To field as Marian.
Congratulations, you have successfully created an application that selects and updates data in a database!