How You Can Build a Tree
Example 1—Treeview:
This example illustrates how you can build a fixed tree when you do the following:
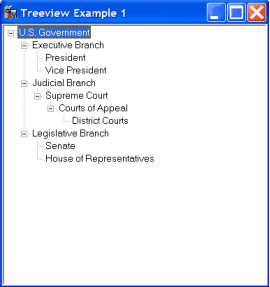
1. Select Treeview Example 1 on the Run the Examples dialog.
2. Expand the first node of U.S. Government by clicking the first box that contains a plus sign.
3. Continue to expand each of the U.S. Government nodes.
The following displays:
If you look at the script for the frame tree_example_1, you can see how the build_simple_tree procedure uses the AddNode method to build the tree. Fixed trees are not often needed in applications, however. In most cases, the contents of the tree depend on the data available at runtime, and you must build the tree dynamically.
Example 2—Tree\view:
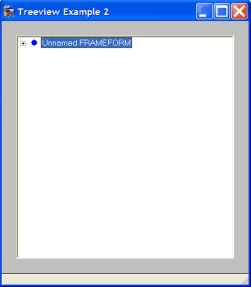
This example shows how you can build a tree dynamically. To use this example, do the following:
1. Select Treeview Example 2 on the Run the Examples frame.
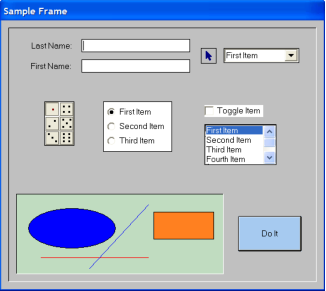
Two windows are displayed. The first is the Sample Frame:
The second window is the Treeview Example 2:
2. Expand as many nodes as you want to display on Treeview Example 2.
If you expand all the nodes, it displays a tree showing the hierarchy of fields in the first frame:
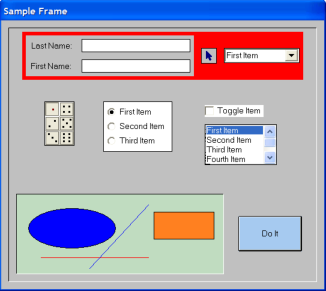
3. Select a field in the tree. For example, stk1(stackfield).
The background of the corresponding stack field in the first frame changes to a different color:
The next time you select the item in the tree, the background of the corresponding field reverts to its original color. You can continue to select items in the tree, or click the standard close button (X) to exit the example.
In this example the tree is based on the hierarchical relationship of the fields in the frame sample_frame. The tree_example_2 is called with a FrameExec as a parameter. The tree is built with the recursive procedure, add_a_node. Given a field, add_a_node adds a node corresponding to the given field, and then calls itself to add nodes for any of the field's children.