Create a Ghost Frame
You can create a ghost frame in the Ghost Frame Editor.
To create a ghost frame
1. In the Applications portlet of the Develop tab, select the application in which you want to create, edit, or delete a component, and then select the header bar of the Components portlet to make it active.
2. Click File, New, Ghost Frame.
The Create Ghost Frame dialog appears.
3. Enter a name for the ghost frame in the Name field (for example, My_Ghost_Frame).
4. (Optional) Enter a comment for the component in the Remark field.
5. Click Create.
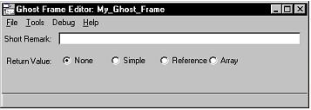
The Script Editor (or your system editor) appears. The Ghost Frame Editor is also opened:
By default, Workbench creates your ghost frame with no return value. To accept this default, proceed to Step 7.
6. Specify the properties for the ghost frame.
7. Write the 4GL code for the ghost frame in the Script Editor (or your system editor).
8. Save the ghost frame by selecting the appropriate command on the File menu.
For more information about using ghost frames in an application, see the
Programming Guide. For more information about writing frame scripts, see
Adding Other Components to Your Application.