Using DataExchange Manager
A Tour of DataExchange Manager Utility
This utility is covered in the following topics:
DataExchange Manager Concepts
DataExchange Manager provides a standard interface to administer your activated databases. You may perform the following functionality with the utility:
To use DataExchange Manager, you must log on to the utility and connect to a database. By default, the logon user name is ADMIN and the password is password. Both are case-sensitive.
DataExchange Manager writes entries to da.log in C:\ProgramData\Actian\PSQL\Replication\LogFiles. You may customize logging features as explained in DataExchange Manager Tasks.
Managing Replication Schedules
The replication of data to and from sites can be automated by schedules. You may also initiate replication manually. With DataExchange Manager, you may view, change, add, and delete replication schedules.
A schedule becomes effective immediately if you create one for the First Site machine on which you are running the DataExchange Manager. If you create a schedule for a site not local to machine on which the DataExchange Manager is running, the schedule becomes effective after the next successful replication between those sites. For example, suppose you are running the DataExchange Manager on machine A and you create a schedule for machine B. The schedule takes effect the next time site A replicates with site B.
Caution Typically when using Real-Time Backup, data is replicated from the First Site to the Partner Site. When using Real-Time Backup, do not set schedules from the Partner Site or with the Partner Site selected. Doing so will result in changes from the Partner Site being replicated to other sites in the network and may also cause other schedules to operate incorrectly.
Site Schedule Tab
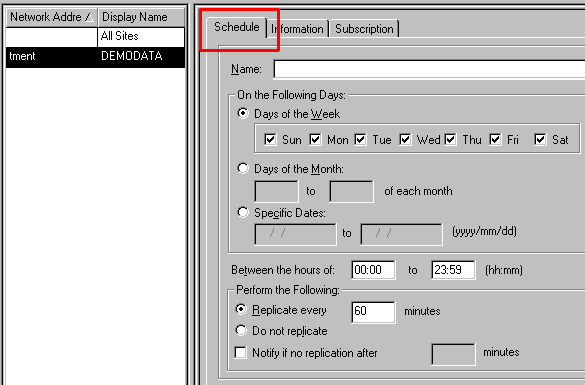
The site Schedule tab allows you to view, create, delete, or edit replication schedules for a site. You can also schedule periods when replication is not to occur. You access the site Schedule tab by clicking Database > Sites.
Figure 5 Site Schedule Tab
A schedule for the First Site applies to all sites that are subscribed to the First Site. You can create as many schedules as you need for each site.
Managing Site Information
DataExchange Manager allows you to manage information about any site in your replication network from a single site (assuming that you have the correct authorization). By default, a user defined in DataExchange Manager as a system administrator can view all sites, and users other than system administrators can view only their own site.
Managing a remote site is done the same way as managing your own site. However, because any changes you make to a remote site are initially stored in your local copy of the replication system database, the changes do not take effect until your site replicates with the managed site. To manage a remote site, your site must subscribe to that remote site.
Site List
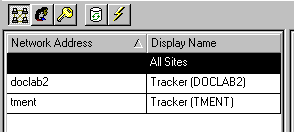
The site list contains a list of all the sites to which you have administrative access in the replication network. You can display the site list by selecting Database > Sites. The first entry in the site list is always All Sites. The other sites are listed under All Sites.
Figure 6 Site List
Site Information Tab
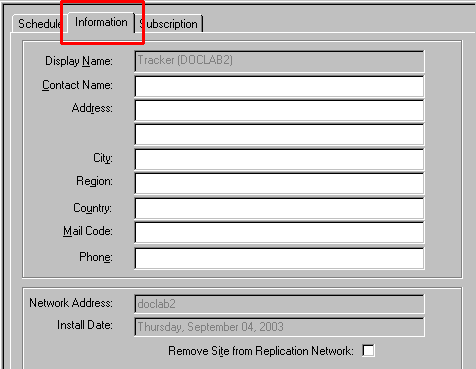
The site Information tab allows you to view or change the information about a site, such as contact information for a person responsible for the site. You access the site Information tab by clicking Database > Sites.
Figure 7 Site Information Tab
Remove Site from Replication Network
The Information tab contains an option Remove Site from Replication Network. This options acts as a toggle to remove a site from a replication network, or to restore a site that has been previously removed. This option does not delete any database files. The option marks the site as no longer belonging to the replication network.
This option is typically used to exclude a database from replication over a long period. See Using the Replication Progress and Log Viewers.
The other sites on your replication network do not know that a site has been removed until you perform a replication. Until you replicate, only the site for which you are logged on to DataExchange Manager knows that a site has been removed. An example helps clarify this.
The DataExchange Manager requires that you connect to a specific database when you log on. Assume that you select MyDataBase when you log on to DataExchange Manager. Once logged on, you remove site Partner_Site_2. At this point, only the replication tables for MyDataBase contain the removal information. The information has not been replicated to the rest of your replication network.
If you were to open the Initiate Replication dialog and select MyDataBase as the source database, Partner_Site_2 would not be included in the list of sites to replicate with. However, if you were to select a different site on the same replication network—for example Partner_Site_1—then Partner_Site_2 would still be listed in the sites to replicate with because you have not yet replicated. After you replicate, then Partner_Site_2 is no longer listed in the sites to replicate with.
Note that the first replication after removing (or restoring) a site from the replication network will fail for that site. After the first replication, this error no longer occurs because all sites on the replication network are aware of the site’s status (removed or restored).
Managing Users
DataExchange Manager is supplied with two groups of users: System Administrators and Everyone. With DataExchange Manager, you may view, change, add, and delete user information and membership groups.
Each group contains certain permissions within DataExchange Manager and within your replication project.
By default, the System Administrator user for DataExchange Manager is named ADMIN. The ADMIN user’s password, by default, is “password.” Both are case-sensitive. When you add a user, he or she is automatically added to the Everyone permission group.
The following table compares the default permissions of System Administrators (abbreviated System Admins) and Everyone.
Tabbed Dialogs and User List
Two tabbed dialogs allow you to specify user information and group membership, respectively. You access the tabbed dialogs by clicking Database > Users.
A user list appears to the left of the tabbed dialogs and contains a list of the users who can access DataExchange Manager. By default, nonadministrative users have permission to see only themselves in the list.
Figure 8 Location of User List and User Tabbed Dialogs
By default, new users added to your database project are automatically made members of the Everyone group. To change a user’s membership from the Everyone group, you must change the user’s group membership. See To change a user’s group membership.
User Information Tab
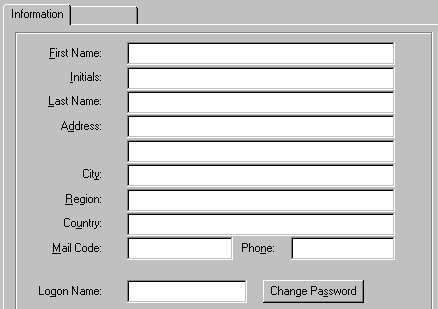
This tab allows you to specify information about a user such as name, address, login name, and password.
Figure 9 User Information Tab
User Membership Tab
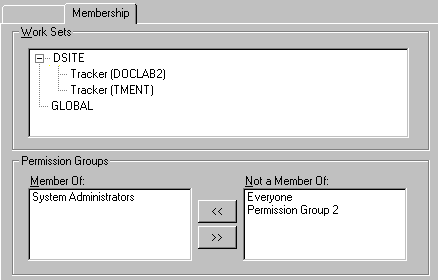
This tab controls a user’s membership in the defined permission groups.
Figure 10 User Membership Tab
Your ability to perform many administrative and data access functions is controlled by the permission group to which you belong.
Managing Permissions
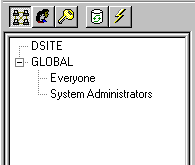
With DataExchange Manager, you may only view the permission groups available with DataExchange Manager. The DataExchange permission groups are System Administrators and Everyone. You access the permissions group list by clicking Database > Permission Groups.
Figure 11 Permissions Group List
A user’s permissions are determined based on the permission groups to which they belong. As you add new users, you must decide the appropriate permission group to which that user should belong. By default, new users added to your replication project are automatically made members of a permission group Everyone.
DataExchange Manager GUI Visual Reference
This topic details the objects on the DataExchange Manager graphical user interface (GUI).
Main Window
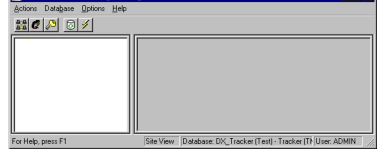
The following screen shot shows the main window of the GUI. The following table describes the parts of the window.
Figure 12 DataExchange Manager Main Window
 
DataExchange Manager Tasks
This topic explains the tasks that you perform with DataExchange Manager:
General Tasks
General tasks apply to the overall use of the tool:
1
2
Select DataExchange > Manager.
1
Open a command prompt, enter da then press Enter.
The DataExchange Manager executable is da.exe. The executable also supports command-line options. At a command prompt, enter da /h to display the help text and view the available options.
You must log on to DataExchange Manager before you can use the utility. A logon dialog appears when you start the utility.
1
From the Database selection list, select the activated database to which you want to connect.
2
For Logon Name, enter a valid user’s name. The default logon name is ADMIN (all capital letters).
3
For Password, enter a valid password. The default password is password (all lowercase).
4
Note DataExchange Manager terminates after three unsuccessful attempts to connect to a database.
These steps require that you already be logged on to DataExchange Manager.
1
Click Actions > Reconnect or click .
Clicking Cancel returns you to DataExchange Manager. However, if an unsuccessful logon attempt has been made, clicking Cancel exits DataExchange Manager.
Permission Group Requirement: You must be a member of the System Administrator Permission Group to perform this task.
1
Click Database > Users or click .
2
3
Click the Information tab.
4
Click Change Password.
5
Enter a new password in the New Password and Confirm Password entry fields.
Note The password is stripped of leading and trailing blanks.
6
Click OK to return to the Information tab.
7
Click Apply to save your changes.
1
2
The following image shows the Options dialog. Click an item in the dialog to jump to more information in the following table.
 
Caution: Avoid using the Trace option for long periods (over 30 minutes), particularly if you are performing numerous tasks with DataExchange Manager. Trace outputs every function call to the log file. Your log file can grow enormously in a very short period. Generally, use Trace only when requested by a technical support representative.
Note: Some of the programs listed in verbose mode may not exist as a separate file on physical storage. Verbose mode shows the programs that are part of a compiled executable or dynamic link library.
When you make changes to a database from another running copy of DataExchange Manager, such as adding a user or changing a schedule, the changes may not be immediately visible to your current instance of the Manager.
For example, suppose that you made changes to a specific user in a second instance of the Manager. To see the changes, you would need to switch to the user Information tab in the first Manager and refresh the view.
1
In the menu bar, click Options, or press F5 or click .
1
Click Help, then the type of help you want:
Help Topics – Lists the documentation topics for DataExchange Manager.
About – Displays the name and version of DataExchange Manager and the DataExchange copyright information.
You may also press F1 to access the list of help topics.
Schedule Tasks
Schedule tasks apply to automating replication:
Permission Group Requirement: You must be a member of the System Administrator Permission Group to perform this task.
1
Click Database > Sites or click .
2
You cannot set up a schedule for All Sites.
3
Click the Schedule tab.
4
Click Add on the tab.
5
6
7
The range is 00:00 to 23:59.
8
See dxagent for a discussion of the notification agent and how this option applies to the agent.
9
Click Apply to save the changes.
10
Click OK to acknowledge that a replication is required for the changes to take effect.
Permission Group Requirement: You must be a member of the System Administrator Permission Group to perform this task.
1
Click Database > Sites or click .
2
You cannot set up a schedule for All Sites.
3
Click the Schedule tab.
4
In the Name list, click the schedule that you want to change.
5
Permission Group Requirement: You must be a member of the System Administrator Permission Group to perform this task.
1
Click Database > Sites or click .
2
3
Click the Schedule tab.
4
Click Delete on the tab.
5
Click Yes to confirm the deletion.
Site Information Tasks
Site information tasks apply to contact information about a site or removing a site from a replication network:
Permission Group Requirement: You must be a member of the System Administrator Permission Group to perform this task.
1
Click Database > Sites or click .
2
3
Click the Information tab.
4
To remove a site from a replication network, or to restore a site that has been previously removed, see the following task.
5
Click Apply to save the changes.
1
Click Database > Sites or click .
2
3
Click the Information tab.
4
To remove a site, select Remove Site from Replication Network.
To restore a site already removed, clear Remove Site from Replication Network.
Note The option Remove Site from Replication Network does not require you to apply the action. Selecting or clearing the option is sufficient. For the removal or restoration to take effect, however, you must perform a replication session.
User Tasks
User tasks apply to adding or deleting users and membership groups and changing user information:
Permission Group Requirement: You must be a member of the System Administrator Permission Group to perform this task.
1
Click Database > Users or click .
2
Click the Information tab.
3
Click Add on the Information tab.
4
Enter the desired user information in the entry fields. The First Name, Last Name, Logon Name, and Password are mandatory.
Note that the Logon name is automatically converted to uppercase and stripped of leading and trailing blanks.
5
Click Set Password.
6
For New Password, enter the desired password. Reenter this same password for Confirm Password.
7
Note that the password is stripped of leading and trailing blanks.
8
Click Apply to save your changes.
Permission Group Requirement: To edit a user’s information (other than your own), you must be a member of the System Administrator Permission Group. All users can change their own information.
1
Click Database > Users or click .
2
3
Click the Information tab.
4
See To change a logon password if you want to change a password.
5
Click Apply to save your changes.
Permission Group Requirement: You must be a member of the System Administrator Permission Group to perform this task.
1
Click Database > Users or click .
2
3
Click the Information tab.
4
Click Delete.
You cannot delete the default administrator user ADMIN.
Permission Group Requirement: You must be a member of the System Administrator Permission Group to perform this task.
1
Click Database > Users or click .
2
3
Click the Membership tab.
4
.
Permission groups for a selected work set are sorted into two lists: Not a Member Of and Member Of. The selected user is a member of all those groups in the Member Of list.
5
For example, in the following image, if you wanted to add a user to the System Administrators group, click System Administrators in the Not a Member Of list, then click .
6
Click Apply to save your changes.