Creating an Application with the ActiveX Access Method
This section explains how to accomplish the major tasks involved in creating an application using the ActiveX access method. The tasks are as follows:
Adding the ActiveX Access Method to a Project
1
Select Components from the Project menu (or right-click in the Toolbox and select Components).
2
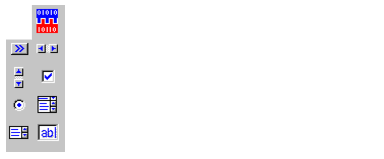
Scroll through the Controls list and select the PSQL ActiveX Data Source and PSQL Bound Controls check boxes.
3
Click OK.
The blue PSQL ActiveX icons appear in the Toolbox.
 
Using a VAccess Control
The VAccess control is the master control which points to your data and to which all other PSQL controls are bound. It handles all communication with PSQL.
1
2
3
You also may notice the PSQL splash screen indicating that the PSQL workstation engine has been started.
4
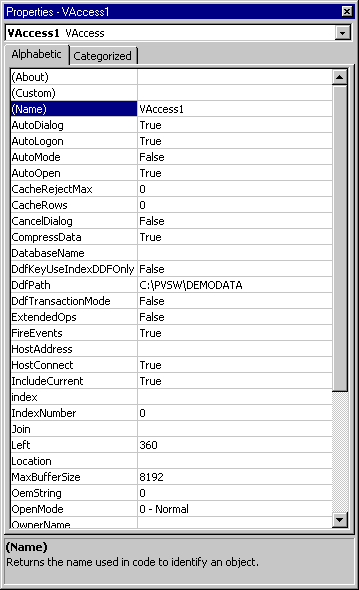
By default, the first VAccess control you place on a form is named VAccess1. You can change this name if you want by entering a new name in the Name property.
Now you must set this VAccess control’s properties. Read the sections Accessing Properties, Setting Properties, and Connecting to a PSQL File.
Accessing Properties
The properties of a control can be set in three places:
Property Pages
When you right-click on a control and choose Properties from the pop-up menu, the Property Pages appear. This is a tabbed dialog box that lets you set PSQL ActiveX properties for the control. For more information, see Figure 2.
Figure 2 Property Pages Dialog Box
Visual Basic Properties Window
The Visual Basic Properties window displays the complete set of properties for the selected object, including properties specific to Visual Basic. See Figure 3.
Figure 3 Properties Window Displaying VAccess Properties
Visual Basic Code Editor
When you double-click on a form or a control, the Visual Basic Code Editor opens. Refer to Visual Basic documentation for information on using the Code Editor. Refer to this manual for syntax and other details about each property.
Setting Properties
1
2
3
*Note: Some properties can be set at either design time or run time, while others can be set only at design time or only at run time.
Connecting to a PSQL File
There are three important properties of the VAccess control that connect it to a PSQL data file: DdfPath, TableName, and Location. The easiest way to access these properties is through the Property Pages, available when you right-click on the control and choose Properties from the pop-up menu. You can also access them through the Properties window.
Figure 4 Setting Properties to Connect to Your Data
The three important properties that connect to your data are the following:
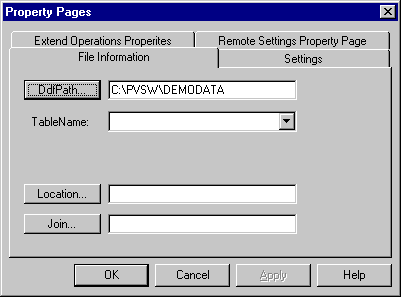
DdfPath—This property determines the location of the DDFs (Data Dictionary Files) to be used by the VAccess control. The property must contain a valid drive and path where DDFs are located.
TableName—This property determines which table (data file) of the DDFs is to be used by the VAccess control. The property must be set to a valid table name contained in the DDFs specified in the DdfPath. You can select the table name from the drop down menu.
Location—This property determines which PSQL table is to be used by the VAccess control. It corresponds to the Table Location contained in FILE.DDF. The default for this property is the Table Location for the table specified in the TableName property, but you can give an alternate path to the table if you wish.
1
2
Set the DdfPath of the VAccess1 control.
3
Select a table name from the TableName property’s drop-down menu. The menu contains the table names available in the DDFs you pointed to in Step 2.
All bound controls that you bind to this VAccess control will now refer to this table.
4
When you selected a table name in Step 3, the Location property changed to the .MKD file containing that table.
To complete the connection to your data, set the IndexNumber property to select the index you wish to access.
*Note: If you set these properties from code at run time, the same order applies.
Selecting an Index
The IndexNumber property of the VAccess control determines the index used by the VAccess control when record retrieval methods are invoked. It can be set in the Properties window of the VAccess control at design time or in code at run time.
You can set the IndexNumber property in the Properties window by selecting it from the drop-down list.
You can also set IndexNumber from the Property Pages as follows:
1
2
3
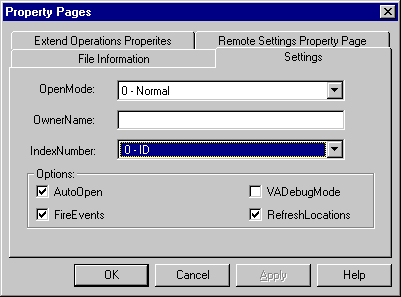
Click on the Settings tab of the VAccess1 Property Pages dialog box and click on the IndexNumber field. This displays the list of indexes that have been defined for the selected table.
4
Choose index 0 - ID and click OK. The settings are shown in Figure 5.
Figure 5 Setting the IndexNumber Property
There are two ways to set the index number at run time—with code and with the VAComboBox control.
1
2
VAccess1.IndexNumber = 0 'select the first index
1
2
Set the VAccessName property to the name of the VAccess control and the VAFieldName property to [Index List]. The VAComboBox automatically fills with a list of indexes from the file, and any selections from this list will set the index used by the VAccess control.
Setting Automatic vs. Manual File Opening
The VAccess control opens a PSQL data file in one of two ways based on how you set its AutoOpen property. (AutoOpen is a design time-only property.)
If AutoOpen is set to True, the control automatically opens the file when it is loaded at run time based upon the settings of the DdfPath, TableName, and Location properties in the VAccess control. It automatically closes the file when it is unloaded.
If AutoOpen is set to False, the control does not open the file until the Open method is invoked. In addition to being set in the Properties window, the DdfPath, TableName, and Location properties can be set in code prior to the Open. Thus, you can open different files at different times with the same VAccess control or accept user input to choose a file. The Close method closes an open data file.
See also the Example.
You can set the AutoOpen property in the Properties window by selecting True or False from the drop-down list.
You can also set AutoOpen from the Property Pages as follows:
1
2
Click on the Settings tab.
3
Select or deselect the AutoOpen check box. When the check box is selected, AutoOpen is set to True; when deselected, AutoOpen is set to False.
Example
This example shows how to close a file and open another one when AutoOpen is set to False.
'Close the currently opened file
VAccess1.Close
'Set the Data Dictionary information
VAccess1.DdfPath = "file_path\PSQL\Demodata\"
VAccess1.TableName = "Student"
'Open the file
VAccess1.Open
Linking Bound Controls to a Data Source
After you have added a VAccess control to a form and set the control’s properties, you can add any bound controls you want and bind them to the VAccess control. This links them to the data to which the VAccess control points. For information about the specific bound controls, see ActiveX Control Reference.
1
2
Retrieving Records
You can retrieve records in three ways:
1
2
Set its VAccessName property to the VAccess control you want to use.
1
2
Set its VAccessName property to the name of the VAccess control you want to use, and set its VAOperation property to the desired retrieval operation.
See VAOperation for a list of available PSQL operations.
Use one of the methods in Table 3. The Get methods use the index specified in the IndexNumber property. The Step methods do not use an index.
 
Example
 
'Display names of persons
'Set the Data Dictionary information
'VAccess1.DdfPath = "file_path\PSQL\Demodata\"
'VAccess1.TableName = "Person"
'VAccess1.IndexNumber = 1 (Last_Name + 'First_Name)
Stat = VAccess1.GetFirst
While Stat = 0
List1.AddItem VAccess1.FieldValue("Last_Name") _
& " " & VAccess1.FieldValue("First_Name")
Stat = VAccess1.GetNext
Wend
Searching for a Specific Record
You can search for a specific record in two ways:
1
2
Set the VATextBox’s VASearch property to True. This causes the VAccess control to perform a GetGreaterOrEqual method to retrieve matching records as text is entered into the text box.
1
2
3
Use the FieldValue method to populate the index field with the value you want to search. For indexes which use more than one field, be sure to assign a value to each of the fields.
4
Then perform one of the methods in Table 4 to retrieve the desired record.
 
5
Make sure the IndexNumber property is set to the index that corresponds to the field or fields by which the search is done.
Example
 
'enter the search values into the key fields
VAccess1.FieldValue("last_name") = "Reich"
VAccess1.FieldValue("first_name") = "Steve"
'Set the correct index number and get the record
  VAccess1.IndexNumber = 1
  stat = VAccess1.GetEqual
If stat = 0 Then
      MsgBox "Found the record."
Else
      MsgBox "No such record on file."
End If
Adding, Updating, and Deleting Records
There are two ways to add, update, or delete records:
1
2
3
Set its VAOperation property to the desired operation. Refer to the VAOperation property in the Property Reference of this manual for a list of possible operations.
Use one of the custom methods from the following table for the VAccess control to write to the database in code.
 
Example
'change the major of a given student
VAccess1.TableName = "Student"
VAccess1.IndexNumber = 1
    FieldValue (ID) = 2001100
  stat = GetEqual
, s If stat = 0
    VAccess1.FieldValue ("Major") = "Music"
    VAccess1.Update
  End If
Locking Records
PSQL provides two kinds of locks which are supported by the ActiveX access method: single record no-wait locks and multiple record no-wait locks.
To apply these locks using the ActiveX access method, use one of the following approaches:
Use the Unlock method to unlock records.
In PSQL Programmer's Guide, see Data Integrity for a complete discussion of record locking and concurrency controls.
Example
'Lock a record, change the student name, and update the record
Const SINGLE_NOWAIT_LOCK = 200
Const MULTIPLE_NOWAIT_LOCK = 400
VAccess1.FieldValue("ID") = "<valid #>"
'retrieving the record with a lock bias locks the record
stat = VAccess1.GetEqual SINGLE_NOWAIT_LOCK
'change the student name and update the record
'updating the record releases its lock
If stat = 0
  VAccess1.FieldValue("Major") = "Astronomy"
  VAccess1.Update
End If
Joining Files
The Join property of the VAccess control allows you to specify that two files are to be linked by a key value, so that any changes in the record positioning of the first file will also affect the records retrieved from the second. The Join property provides a simple mechanism for browsing a relational database.
The joined fields in the “self-control must be index fields and must contain the same raw data as their corresponding fields in the master control. The fields in the master control do not have to be indexes. The IndexNumber property of the slave control must remain set to the index involved in the join or the join will be broken.
One-to-one, many-to-one, one-to-many, and many-to-many joins are all supported. The data can be displayed in a VAListBox in record list mode by setting its VAccessName property to the name of the slave control and its VAFieldName property to the fields to be displayed.
1
2
In the Properties window, click the Join button to open the Join Controls dialog box. The left side of the dialog box shows the table of the slave control from which you are joining and the selected index of that table. The right side shows the master control to which you are joining, and the fields available in that control.
3
Enabling Extended Operations
Extended operations allow you to push the processing of requests for multiple records to the MicroKernel Engine. On network server-based PSQL systems, extended operations can dramatically reduce network traffic and speed up data retrieval.
Extended operations are most useful when you are reading a number of records at a time. For example: scanning a file to collect and tabulate statistical data; requesting a number of records at once to populate a list, report, or grid; or performing an ad-hoc search of a database which does not have an appropriate index to collate the records you need.
Extended operations do not replace indexed record retrieval for accessing individual records, but they provide a powerful tool for retrieving sets of data quickly.
1
2
If using the Properties window, set the ExtendedOps property to True. If using the Property Pages, click on the Extended Operations tab, select the ExtendedOps check box, and click OK.
The ActiveX access method supports the following extended fetch methods:
Get Next Extended retrieves subsequent records in the current key path order according to the filter conditions specified.
Get Previous Extended retrieves previous records in the current key path order which match the specified filter conditions.
Step Next Extended retrieves subsequent records in the physical order they occur in the file according to the filter conditions specified.
Step Previous Extended retrieves previous records in the physical order they occur in the file according to the specified filter conditions.
Using the Init Method
Use the Init method after any changes to the SelectedFields or SelectedRecords properties, or between re-establishing current cursor positioning in the file with a single-record fetch method and invoking an extended fetch method.
Building a Data “Snapshot” with the AutoMode Property
With AutoMode enabled, the VAccess data source caches all of the rows which meet the selection criteria in memory as they are retrieved, allowing you to build a “snapshot” of the data. You can use the Row property to traverse the returned record set, or the RowColumnValue method to retrieve the value at any row and column in the set.
1
Set the VAccess control’s ExtendedOps and AutoMode properties to True to enable extended operations and switch the control into automode.
2
Set the control’s SelectedFields and SelectedRecords properties to specify the record set you wish to retrieve.
3
Set the CacheRows property to the maximum number of records you wish to get per retrieval operation.
4
Set the CancelDialog property to True if you wish to enable the user to cancel the scan before it is finished.
AutoMode makes extended operations easier to use in some circumstances, but it is limited by available memory. You can disable AutoMode (default) and use the explicit extended fetch methods GetNextExtended, GetPreviousExtended, StepNextExtended, or StepPreviousExtended, to return data sets in discreet blocks.
Using Extended Fetch Methods
The extended fetch methods GetNextExtended, GetPreviousExtended, StepNextExtended, and StepPreviousExtended begin at the current cursor position in a file and return a set of rows (records) and columns (fields) which meet a specified selection criterion. The Get methods use the current index to return records in index order. The Step methods return records ordered by physical position. Step methods are generally faster and should be used if the order of the records returned is not important.
Several properties are involved in setting the maximum number of records returned by a given extended fetch operation.
The total amount of data returned by a single extended fetch operation is limited by the size of the data communications buffer used, which is specified in the MaxBufferSize property. This buffer is limited to 64 KB, but this maximum may be lower, depending upon your particular PSQL MicroKernel Database Engine configuration. Specifying too large a value for this property results in Status Code 97, “The data buffer is too small.”
The SelectedFields property determines the size of an individual row of data, which is equal to the sum of the storage lengths of the selected fields plus 6 bytes.
The CacheRows parameter dictates the maximum number of rows to retrieve at a time. The extended fetch methods will use either the value of CacheRows, or a calculated value based on the row size and the MaxBufferSize, whichever is less. If CacheRows is zero, the calculated value will be used.
The SelectedRecords property allows you to retrieve only those records which meet certain criteria. It works in conjunction with the CacheRejectMax property, skipping records which do not meet the search criteria. If you do not specify a value for the CacheRejectMax property, PSQL will use a system-defined value. The record set is returned when one of two conditions are met: the number of rows which matches the selection criteria equals the value of the CacheRows property, or the number of records scanned since the last match exceeds the value of the CacheRejectMax property. The Status property indicates which condition was met.
The Rows property indicates the number of rows returned by the extended fetch operation. Always check the value of this property after an extended fetch, as it is possible for the operation to return a non-zero status (such as end of file), and also return valid data.
The Columns property corresponds to the number of fields specified in the SelectedFields property, or to the number of fields defined for the file if no record selection criteria was specified.
The RowColumnValue method retrieves the field value at a specified row and column position in the extended fetch record set.
Current cursor positioning after an extended fetch operation corresponds to the last record scanned by the operation. This cursor positioning is indeterminate to the application if record selection criteria have been specified, as it may be beyond the last row actually retrieved.
The IncludeCurrent property setting determines whether the next extended fetch operation will scan the record at the current cursor position, or start with the subsequent record. In most circumstances you will not need to set this property. It is automatically set True by the Init method, False after an extended fetch. To include the record at the current cursor position in subsequent extended fetch operations, set this property to True immediately prior to the operation.
Using ExtendedOps with Joined Files
The ExtendedOps property can speed up and simplify joining VAccess data controls in a one-to-many relationship, such as the classic “order header record to order line items” example. Enabling extended operations on the joined data source, in this example the “order lines” control, will automatically build the appropriate query and cause the control to perform the join using extended operations, returning all of the records from the joined file which meet the join criteria as an extended fetch record set.
Optimizing Extended Fetches
To use extended fetch operations most efficiently, first position the cursor at or as close as you can to the first record which will match your search criteria. Often you'll be able to use the GetEqual or GetGreaterOrEqual method with an index to establish initial positioning and limit the range of records PSQL will have to scan to return the ones you need, and then use GetNextExtended to retrieve the subsequent records.
The CacheRejectMax property is useful if your SelectedRecords criterion limits records on the current index. You can use it to tell the PSQL server process to stop when it encounters the first record that does not match your criteria, for example, setting the CacheRejectMax property value to 1.
If you have to scan an entire file, but the order of the records is not important, you can save some time by using the StepFirst method to position the cursor at the beginning of the file and the StepNextExtended method to scan it. The step methods are generally faster since they do not have to collate records along an index path.
You can also save time and resources by specifying only the fields you’re interested in for the SelectedFields property. The limiting factor in extended fetch operations is the size of the data buffer, and the less memory you need for each row, the more rows you can return at a time.
Remember that because extended operations are executed by another task, typically a PSQL server process, your application relinquishes control of the process as soon as it executes the extended query, and the other process takes over until the query conditions are satisfied. Therefore planning and optimizing extended queries can make a big difference in the performance of your application.
Example
'Print a list of all Student ID's given a scholarship
Q = Chr$(34)
'Student ID is an index, so we could use it to sort records, but
'our selection criteria has no index. Therefore, we must scan
'the entire database. To be efficient we will use Extended Ops
VAccess1.ExtendedOps = True
'We can get PSQL filter the records at the server by
'specifying the record selection criteria.
VAccess1.SelectedRecords = "Scholarship_Amount > " & Q & "0" & Q
'Since all we need are the amounts and the Student ID's we can
'retrieve more records at once, by only returning this information.
VAccess1.SelectedFields = "ID,Scholarship_Amount"
'Since we don't need to order the data, we should use step operations.
'Step operations are based on physical positions and will go through
'the database fastest.
VAccess1.StepFirst
VAccess1.Init
Do
  Stat = VAccess1.StepNextExtended
  'Note: extended fetch may return a status value, such as End of
  'File (9), yet still return valid data.
For R = 1 to VAccess1.Rows
List1.AddItem VAccess1.RowColumnValue(R, 1) & Chr$(9) & _
Format(VAccess1.RowColumnValue(R, 2), "Currency")
Next R
Loop While Stat = 0