|
d.
|
If the installation does not start automatically, run the autorun executable from the operating system: drive:\autorun\autorun where drive is the drive letter of your CD-ROM device.
|
|
2
|
Click Client, which will install the components appropriate for your 32- or 64-bit Windows system.
|
|
4
|
|
5
|
|
6
|
|
7
|
|
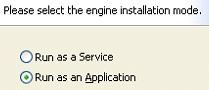
•
|
|
•
|
If you choose Custom, continue with the following steps.
|
|
8
|
To specify different installation locations, click Change for any of the folders listed, click Change for any of the folders listed, then enter or browse for a different folder. Click OK to accept the location.
|
|
9
|
Click Next to continue.
|
|
10
|
Select the components and associated subfeatures you want to exclude from the installation and click Next. All of the PSQL components and subfeatures are selected for installation by default.
|
|
•
|
|
•
|
|
•
|
|
•
|
|
11
|
Click Next to continue.
|
|
12
|
Click Install to begin installation.
|
|
13
|