|
d.
|
If the installation does not start automatically, run the autorun executable from the operating system: drive:\autorun\autorun where drive is the drive letter of your CD-ROM device.
|
|
2
|
Click Workgroup installation.
|
|
4
|
|
5
|
|
6
|
|
•
|
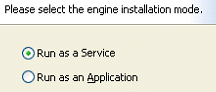
You want to avoid User Access Control conflicts from the operating system. Running the database Engine as a service requires the Log On as Service privilege. If you run the Engine as a service under a user account other than the default Local System account, ensure that you modify the Log On Properties for the Service using the Windows Control Panel.
|
|
7
|
|
•
|
|
•
|
|
8
|
To specify different installation locations, click Change for any of the folders listed, then enter or browse for a different folder. Click OK to accept the location.
|
|
9
|
Click Next to continue.
|
|
10
|
Select the components and associated subfeatures you want to exclude from the installation and click Next. All of the PSQL components and subfeatures are selected for installation by default.
|
|
•
|
|
•
|
|
•
|
|
•
|
|
11
|
Click Next to continue.
|
|
12
|
Click Install to begin installation.
|
|
•
|
If you choose to continue and authorize the product, an Internet connection is required. Click Next and continue with step 14. (If you have no Internet connection, click Next then click Finish. See Alternative Authorization Tasks in PSQL User's Guide.)
|
|
•
|
If you choose to end the installation at this point, click Next then click Finish. (You may run the License Administrator utility at a later time to authorize a key. See License Administration in PSQL User's Guide.) See also Authorization of Workgroup Key on Windows with UAC.
|
|
•
|
If the authorization status message is “key is authorized,” click OK, then click Finish to complete the installation.
|
|
•
|
If the authorization status message reports an error or warning, click OK, and repeat step 14, ensuring that you enter a valid license key.
|
|
•
|
The Workgroup database engine is running without administrative privileges. Note that, by default, applications run with privileges of a standard user unless the privileges are elevated. That is, even if you are a member of the administrator’s group and you start the Workgroup database engine without using Run as Administrator to elevate privileges, the engine runs with privileges of a standard user.
|
|
•
|
A permanent key for PSQL Workgroup was not supplied during the installation process. That is, you chose to authorize the permanent key after installation by using a licensing utility.
|
|
3
|
Right-click w3dbsmgr.exe then click Run as Administrator. You must have administrative rights or know the password and name of a user with administrative rights. You need to elevate the privileges of the database engine before authorizing a key with a licensing utility.
|
|
4
|
Start License Administrator from operating system Start menu or Apps screen (or use the command line interface licensing utility if you prefer).
|
|
5
|
Type, or paste, the permanent key for PSQL Workgroup in the Key field, then click the button to authorize the key.
|