SQL Editor Tasks
This section explains the tasks that you perform with SQL Editor. The tasks are divided into the following categories:
*Note: If you use SQL Editor to change the structure of table with SQL statements, refresh the PSQL Explorer to see the change. Right-click the Tables node in PSQL Explorer then click Refresh.
General Tasks
General tasks orient you to the overall use of SQL Editor.
Execution Tasks
Execution tasks apply to the running of SQL statements.
Grid Tasks
Grid tasks apply to working with the Grid window.
Text View Tasks
Text view tasks apply to working with the Text window.
Outline View Tasks
Outline view tasks apply to working with the Outline window.
Common SQL Object Tasks
Common SQL Object tasks apply to working with triggers, stored procedures, user-defined functions, and views.
General Tasks
1
2
Click File > New > SQL Document or click .
The Select Database dialog box appears.
3
Click the database in the list for which you want the SQL document to apply, or ensure that the option None is check marked if the SQL document does not apply to a specific database.
*Note: The option None is selected by default if an object other than a database, or any of the nodes subordinate to a database, is selected in PSQL Explorer.

Note that the commands to execute SQL statements are disabled if None is specified as the context. See To set database context for an SQL query.

Select the Set selected database as default for this session option to use the selected database whenever you open a new SQL Editor tab. If you leave this option unselected, you will be prompted to select a database each time you open a new SQL Editor tab.
4
SQL Editor appears as a new window view in PCC. By default, PCC names the new document SQLDocn, where n is an integer that starts with 1 and increments by 1. The document name appears in the tab for SQL Editor.
5
1
2
Expand the Engines and Databases nodes in PSQL Explorer.
3
4
By default, PCC open SQL Editor and executes a SELECT * FROM statement for the table. Note that the SELECT statement can fail depending on user and column-level permissions.
The commands to execute SQL statements are disabled until a database is specified as the context to which the SQL statement applies.
1
2
For a new SQL statement, click File > New > SQL Document or click .
The Select Database dialog appears. Click the database in the list for which you want the SQL document to apply and click OK.
If SQL Editor already contains SQL statements not associated with a database, click .
The
Select Database dialog appears. Click the database in the list for which you want the SQL document to apply.
3
*Note: Select the Set selected database as default for this session option to use the selected database whenever you open a new SQL Editor tab. If you leave this option unselected, you will be prompted to select a database each time you open a new SQL Editor tab.

To unselect the default database:
Access the Select Database dialog by clicking , and unselect the Set selected database as default for this session option.
or
Click Windows > Preferences then click the General node. Unselect Do not prompt for new database each time a SQL document is opened.

The selected database is not maintained across PCC sessions. If you close and reopen PCC, you will have to select a new default database context.
1
2
 
 
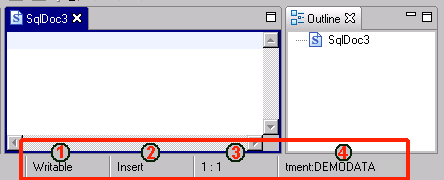
Indicates whether the editor is in insert mode or overwrite mode for character input. The Insert key toggles the mode. Note that the cursor changes shape for each mode.
Note: If None is specified as the database context, then the text “No Database Selected” appears instead of the name of the computer and database. The commands to execute SQL statements are disabled if None is specified. See To set database context for an SQL query.
By default, when you start SQL Editor, you may type in SQL statements. A script is one or more SQL statements saved as a text file.
1
2
Separate SQL statements with a delimiter. You can use the pound sign (#) or the semicolon (;).
3
Optionally, click File > Save As to save the SQL statements as a text file.
A script is one or more SQL statements saved as a text file. You can execute the statements in SQL Editor after you open a script in the editor.
1
Click File > Open.
2
By default, the Open dialog looks for files in the PVSW\bin directory with a file name extension of “SQL.”
3
1
On the PCC Window menu, click Preferences. Expand the PSQL node if it is not already expanded.
2
Click SQL Editor.
3
Select the desired choices for SQL Statement Separator.
Note Based on the separator option you select, PCC looks for the selected character(s) and identifies each as the end of a statement. It sends each identified statement to the database engine and displays results of that statement before sending the next statement.
If you use # as a separator in a script but do not select the # (Pound) option, you will receive an error message when you run the script.
If you do not select ; (Semicolon) as a separator, but use a semicolon as a separator in a script anyway, you will not receive an error message if the statements are properly parsed. This is because the database engine recognizes semicolons as separators. However, PCC will not display the results for all the statements. It will only display results for one statement (probably the first statement). As far as PCC is concerned, if you don’t select a semicolon as a separator, statements separated by a semicolon are a single statement.
Single-line comments are indicated by double dashes (--) or double slashes (//). Each comment must be on a separate new line or after the statement separator on an existing line.
SQL Editor also supports the use of a start/end comment block that can span multiple lines (/* */).
1
2
The following example shows valid comments.
SELECT * FROM t1#
-- This is a valid comment
// and so is this
SELECT * FROM t2# -- This is valid after the # sign
The following example shows multi-line comments.
SELECT * FROM t1# -- single line comment
/* This is a comment block that spans two lines.
Statements inside this block are ignored */
SELECT * FROM t2#
1
Click Edit > Undo (or press Ctrl+Z) to cancel typing actions.
Click Edit > Redo (or press Ctrl+Y) to restore typing actions.
1
Click Edit > Find/Replace (or press Ctrl+F).
A dialog appears on which you specify a text string to find or replace.
1
Click Edit > Select All to select all of the contents of SQL Editor.
1
Click Edit then click the function you want: cut, copy, paste, and so forth.
Statement Execution Tasks
1
1
2
Click SQL > Execute in Grid or SQL > Execute in Text.
*Note: SQL Editor automatically uses the Text window view for the results of SQL statements that are not SELECT statements. Only SELECT statements use the Grid window view.
1
You may select one or more statements.
2
Click SQL > Execute in Text or SQL > Execute All SQL Statements.
*Note: SQL Editor automatically uses the Text window view for the results of SQL statements that are not SELECT statements. Only SELECT statements use the Grid window view.
1
Click SQL > Execute All SQL Statements, press F10, or click .
Ensure that either no statements are selected or that all statements are selected. If you select a portion of the statements in SQL Editor, only the selected portion executes.
1
To execute all statements in Outline view, right-click the root node then click Execute All Statements.
To execute one or more statements, click the desired statements.
Note that you can select multiple statements by using Ctrl+click. The statements do not have to be contiguous.
2
If multiple statements are selected, right-click one of the selected statements, then click Execute Selected Statements.
3
If a single statement is selected, perform one of the following actions:
Right-click the statement, then click Execute in Grid or Execute in Text.
*Note: SQL Editor automatically uses the Text view for the results of SQL statements that are not SELECT statements. Only SELECT statements use the Grid.
Grid Tasks
1
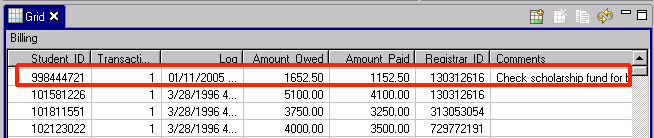
Click the Grid cell that contains the value you want to change.
*Tip: By default, the entire contents becomes selected when you click the cell. Press Delete or Backspace to delete the entire contents of the cell.
2
3
*Caution: Moving the cursor from the cell automatically saves the data changes to physical storage. You cannot explicitly save the changes made to the cell.
1
The Add Rows dialog appears. For example, the following image shows the dialog for the “Billing” table that is part of the sample database DEMODATA.
2
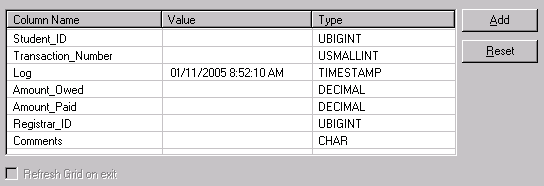
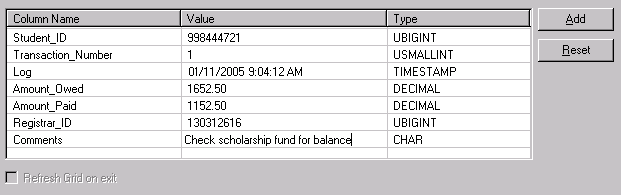
Click in the Value cell for each Column Name and type the desired value.
The value must be a data type valid for that column.
*Tip: You can copy data from Grid cells and paste it into the Value cells. Click a Grid cell then right-click. Click Copy. Click a Value cell on the Add Rows dialog then right-click. Click Paste. Also note that Ctrl+C and Ctrl+V provide the copy and paste actions, respectively.
3
Click Add.
The record is added to the table. Also note that the option Refresh Grid on Exit becomes enabled.
If you want to add multiple records, you can change values for specific value cells then click Add. If you want to clear all of the value cells, click Reset.
4
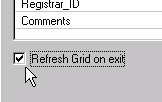
Optionally, click Refresh Grid on Exit if you want the table data refreshed .
When you close the Add Rows dialog, a refresh re-executes the statement last executed in SQL Editor.
5
Click Close.
If Refresh Grid on Exit is enabled, the Grid displays the record(s) that you just added (assuming that the last statement executed in SQL Editor was SELECT * FROM Billing).
*Caution: Deleting a row from the Grid removes that record from physical storage. No undo feature is available to reclaim the deleted record.
1
You may also select and delete multiple rows. To select multiple rows, press and hold down the Shift or Ctrl key, then click a cell in each desired row.
2
Click Edit > Delete or click .
3
Click OK to confirm the deletion.
1
Scalar Function1 As Typed in Grid Cell
See also NOW ( ) and CURDATE ( ), both in SQL Engine Reference.
See also NOW ( ) and CURTIME ( ) in SQL Engine Reference.
See also NOW ( ) in SQL Engine Reference.
1 The names are case insensitive. NOW() and now() are equivalent. The parentheses are required. That is, NOW is invalid but NOW() is valid.
*Note: You can also omit the seconds for a time data type provided that you include “AM” or “PM.” For example, 10:30 AM is a valid entry. Time defaults to “AM” if you omit “AM” or “PM.” For example, 10:30:00 is entered as 10:30:00 AM.
1
A refresh re-executes the statement last executed in SQL Editor and sends the results to the Grid.
1
By default, the entire content of the cell is selected.
You may also select multiple rows. To select multiple rows, press and hold down the Shift or Ctrl key, then click a cell in each desired row.
*Note: When you copy an entire row or multiple rows, the rows are pasted in the same layout as they appear in the Text window view. You can specify the number of characters between the pasted columns. Click Window then expand the PSQL node in the Preferences tree. Click Text Output in the tree and set the desired value for Number of spaces between columns.
Text Window Tasks
1
Click on the Text view.
1
Right-click within the Text view then click Select All.
2
Outline View Tasks
See also To run SQL statements in Outline view.
1
 
Common SQL Objects Tasks
Common SQL objects include triggers, stored procedures, user-defined functions, and views.
1
In PCC PSQL Explorer, expand the Engines node and the registered server nodes to display the available databases.
2
3
Click New then one of the following depending on the object that you want to create:
A new SQL Editor is opened that contains a default name for the object on a tab. The name is in the form object_n, where object is the name of the object and n is an integer that starts with one and increments by one. For example, if you create a new view, a new SQL Editor contains a tab named “View_1.” After you save the object with a name of your choice, the tab reflects the saved name.
4
*Tip: Hover the mouse cursor on the statement to obtain a tool tip on the syntax, which also includes an example.
5
Click File > Save or .
1
2
3
A new SQL Editor is opened that contains a tab. The tab name reflects the name by which you saved the object.
1
2
3
Press Delete.
Note that you can select multiple objects for deletion by using Ctrl+click or Shift+click.