Setting Up Database Access with PCC
You must know the name of the server where the database is located. If the database already has a DBNAME, PCC uses it. If you wish to create a new database but use existing data files, you must know the location of the data files on the server.
To create up a DSN on a remote machine, you must possess administrator rights on the remote machine that houses the database you wish to access. You must have operating system rights to create a System DSN on the local machine.
Setting Up Database Access on Windows
1
Existing databases with a DBNAME on the registered server can then be accessed from PCC.
2
The new database can then be accessed from PCC.
1
Existing databases with a DBNAME and a DSN on the registered server can then be accessed from PCC.
2
Optionally, follow the steps listed in To create a new database and ensure that the Create 32-bit Engine DSN option is selected.
By default, PCC creates a 32-bit system DSN with the same name as the database name. The new database has a DSN associated with it and can be accessed through ODBC.
Note that the ODBC Interface GUIs for 32-bit and 64-bit Windows operating systems are different. The one for 32-bit DSNs allows you to specify an Engine DSN. The 64-bit interface driver supports only named databases. The 64-bit Client Interface can connect to a local named database, thus replacing the function of the Engine DSN, or to a remote named database. Connection to an Engine DSN is not supported.
*Note: Because 32-bit Engine DSNs have been deprecated, Actian Corporation recommends that new or revised 32-bit applications connect to a named database through a Client DSN or use a DSN-less connection by specifying “Pervasive ODBC Client Interface.” See To set up a Client DSN using ODBC Administrator.
1
In PCC, click Tools then ODBC Administrator.
2
Click the System DSN tab, then Add.
3
In the list, click Pervasive ODBC Engine Interface.
4
Click Finish.
The Pervasive ODBC Engine Interface dialog displays.
5
Type a Data Source Name.
6
For Database Name, select in the list for which you want to create the Engine DSN.
7
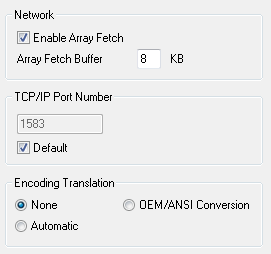
Click Advanced if you want to specify advanced connection attributes.
See Advanced Connection Attributes in ODBC Guide.
8
9
Setting Up Database Access on a Linux or OS X Server
Database names are created in Linux and OS X by using the dbmaint utility at the server. For a complete description of dbmaint, see dbmaint or read the dbmaint man page.
*Note: This utility can be run only by user accounts belonging to group pvsw. See PSQL Account Management on Linux and OS X in Getting Started with PSQL.
1
dbmaint a | d | l [-b] [-i] [-e] -nDbname [-ldictpath] [-ddatapath]
The list of commands for dbmaint include:
a – add database name
d – delete database name
l – list all database names
Options include:
-b – create Bound database
-i – create database with Relational Integrity enforced
-e – do not create dictionary files for database
-n
DBName – specify database name
-lDictpath – specify dictionary path
-dDatapath – specify data path
-a – show full data in the DBNames list
For example, to create DBName TEST with relational integrity, type:
dbmaint a -i -nTEST
*Note: Unless datapath is specified, the new database is created in the default location, $PVSW_ROOT/data. Likewise, if dictpath is not specified, the dictionary is created in the default location.
dbmaint d -nDbname
For example, to delete the newly created database TEST, enter:
dbmaint d -nTEST
dbmaint l [-a]
2
Setting Up Client Access from a Windows Client
1
Access Control Center from the operating system Start menu or Apps screen.
2
In the PSQL Explorer pane, right-click Engines and select New > Server.
The PSQL Explorer pane is the column on the left side of the window that contains a list of machines to which you are connected.
*Note: The machines listed in your PSQL Explorer will remain between sessions. To remove a machine, right-click the machine name and select Delete.
3
Enter the Server name where the PSQL v12 database engine resides.
You need to be authenticated on the remote engine, and a dialog displays prompting you for a user name and password.
4
You are now connected to the remote PSQL engine.
1
In PCC, click Tools and select ODBC Administrator.
*Note: Windows 64-bit operating systems contain two different executable files for ODBC Administrator, one for 32-bit DSNs and one for 64-bit DSNs. Each ODBC Administrator lists the system DSNs that only match its bitness. For the 64-bit PSQL Server or Workgroup, PCC contains separate options in the Tools menu to start the 32-bit or the 64-bit ODBC Administrator. If an ODBC Administrator is already open, Windows defaults to it. That is, if the 32-bit ODBC Administrator is open and you attempt to start the 64-bit one, Windows displays the 32-bit version (and vice versa). This is a limitation of the Windows operating system, not PSQL.
2
Click the System DSN tab, then Add.
*Note: PSQL does not support File DSNs. You must use User or System DSNs. System DSNs are generally preferred, because they are available to all users on a given computer.
3
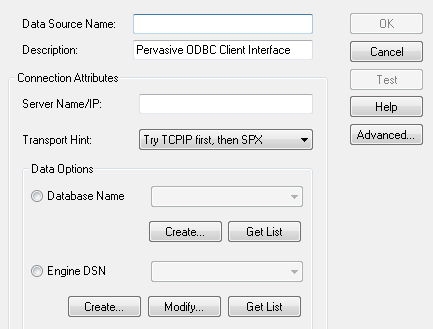
In the Drivers window, select Pervasive ODBC Client Interface for a 32-bit DSN or Pervasive ODBC Interface for a 64-bit DSN.
4
Specify a Data Source Name (DSN) for which you want to set up a connection. This DSN helps you identify the data source.
Figure 5 Pervasive ODBC Interface for Client DSNs
Note that on the 64-bit interface, the Engines DSN option is not available and is not present on the GUI.
5
For Server Name/IP, specify a machine name or TCP/IP address of a machine running the PSQL database engine.
6
7
Specify a Database Name to which to connect. Click Get List to obtain a list of the existing databases on the server listed for Server Name/IP.
For 32-bit DSNs only, you may specify an Engine DSN instead of a database name. (Note that Engine DSNs are deprecated, so it is preferable to specify a database name rather than an Engine DSN.) Click Get List to obtain a list of the existing DSNs on the server listed for Server Name/IP. Click Modify to modify an existing DSN, or Create to create a new DSN.
8
If you want advanced connection attributes, click Advanced and make your selections in the dialog box that appears.
Figure 6 Advanced Connection Attributes for Client DSNs
See Advanced Connection Attributes in ODBC Guide for details about the attributes. Do not modify the Network or TCP/IP Port Number attributes unless you first review the information for them.
Click OK to accept the attribute selections and to return to the ODBC interface dialog.
9
10
Setting Up a Client DSN on a Linux or OS X Client
Use the dsnadd utility. See dsnadd.