Accessing Data via ODBC From Other Applications
This section explains how to access data using Microsoft Access and Microsoft Excel.
The examples covered in this section are:
Before You Begin
Does the Database Have a DSN Available?
*Note: The instructions in this section apply only to PSQL v12, not to previous versions.
Accessing Data Using Microsoft Excel
*Tip: You must have the PSQL client or any version of the PSQL engine installed on the computer where you are using Excel.
1
2
From the Data menu, choose:
Get External Data > New Database Query as shown below.
Figure 11 Accessing PSQL Data using Microsoft Excel
3
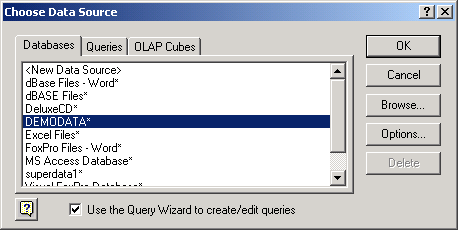
The Choose Data Source box lists the defined data sources for any ODBC drivers that are installed on your computer. From this list, click the Client or Server DSN for the PSQL database you wish to access, as shown in the example below.
Figure 12 Excel Display of ODBC Source List
 
If the database you want does not appear in the ODBC Source list, see Before You Begin.
4
Click OK. You may be prompted to log in to the PSQL database. If the database is not secure, leave the User and Password fields empty. Otherwise enter your assigned user name and password.
5
The Query Wizard opens. Simply follow the wizard to select your options such as which tables to query, how to filter and sort the data, and how you would like Excel to return the PSQL data to you for your use.
Accessing Data Using Microsoft Access
1
2
From the Access dialog box, choose Blank Access database as shown below. Click OK. (Note that you may also add PSQL tables to an existing Access database.)
Figure 13 Create a New Database using Microsoft Access
3
Next, the File New Database dialog box opens and asks you to name the new database. Name the database and click Create.
4
From the Access menu, choose:
File > Get External Data > Link Tables.
*Note: You have the option to Import data or Link Tables to the new database. When you choose Import, you break the link to the ODBC data source immediately following the import procedure. Essentially, Import creates a static copy of the data. When you choose Link Tables, Microsoft Access keeps the connection open and remains dependent upon the ODBC data source each time the data is accessed. This way, the data you see reflects any changes to the data at its source.
*Note: If you wish to link to a file on a local area network, make sure to use a universal naming convention (UNC) path, instead of relying on the drive letter of a mapped network drive in Windows Explorer. A drive letter can vary on a computer or may not always be defined, whereas a UNC path is a reliable and consistent way for Microsoft Access to locate the data source that contains the linked table.
Figure 14 Importing External Data Using Access
5
In the Link dialog box, in the Files Of Type box, select ODBC Databases.
6
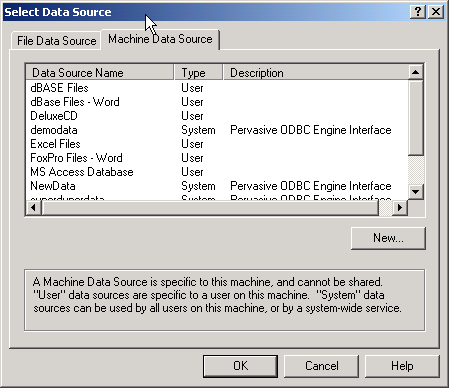
The Select Data Source box lists the defined data sources for any ODBC drivers that are installed on your computer. Click the Machine Data Source tab as shown in the next figure.
Figure 15 Access Display of ODBC Source List
7
*Note: To define a new data source for any installed ODBC driver, click New, and then follow the instructions in the Create New Data Source dialog box and the dialog boxes that follow it before proceeding.
*Tip: If you are linking a table, select the Save The Login ID And Password check box to store the information for the table in the current database, so that users will not have to enter it each time. If you leave the check box cleared, all users must enter the logon ID and password every time they open the table with Microsoft Access in each new session. Your network administrator can also choose to disable this check box, requiring all users to enter a user name and password each time they connect to the database.
If the database you want does not appear in the ODBC Source list, seeBefore You Begin.
8
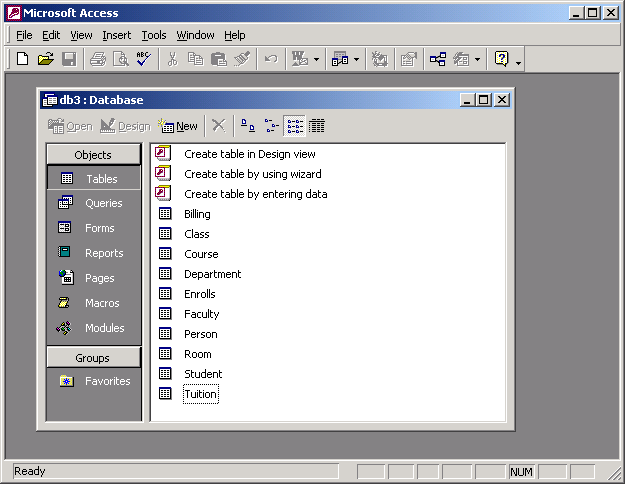
The Access Link Tables dialog box opens. Click each table that you want to import or link, and then click OK.
*Note: Microsoft Access cannot display more than 256 columns in a table. If you need to display more than 256 columns, you may wish to use a different tool.
Linking to your PSQL data is complete. As shown in the figure below, Access presents you with options for designing the new database. View the linked tables by double-clicking the table name.
Figure 16 Using PSQL Data in Microsoft Access
*Note: If you are linking a table and it does not have an index that uniquely identifies each record, then Microsoft Access displays a list of the fields in the linked table. Click a field or a combination of fields that will uniquely identify each record, and then click OK.