Advanced Operations
Features for Power Users and Programmers
Advanced operations are for those who need utilities and methods for accessing audit system beyond what is offered in AuditMaster Viewer.
Managing Schemas from the Command Line
AuditMaster Schema Maintenance Wizard has a command-line version amschemamaint.exe, located under <installation directory>\Audit\Bin in a default installation. The AuditMaster installation calls this utility to create the PSQL Demo and PSQL Generic audit configurations by importing the following two files from the Schema folder in the install image root:
In third-party applications, amschemamaint.exe can be used in scripts to export a schema to a file in the Schema folder on a custom CD to automate its importing at installation time. The sequence of usage would be as follows:
1
2
3
Run amschemamaint.exe to import from the \Schema folder.
Note If you use amschemamaint.exe to customize an installation CD and wish to delete PSQL_Demo_V9.add so that it does not appear in the Audit Configuration window, you may do so. However, do not remove PSQL_Generic.add, since it is needed for successful operation of AuditMaster.
The amschemamaint.exe utility has four forms:
Each of these is explained in the rest of this topic.
import
AuditMaster Schema Maintenance import utility.
Description
Imports a schema from a PSQL database or from a file. See export for steps to create .add files for importing.
Syntax
Database: amschemamaint import ‑d database_path [-m password] ‑p "product name" ‑v version ‑s description [-a folder]
File: amschemamaint import -i file_path_name [-a folder]
Options
 
Example
C:\>amschemamaint import -d d:\<installation directory>\demodata -p "PSQL Demo" -v 10.0 -s "PSQL Demonstration Data" -a \\server_name\volume_name\data
export
AuditMaster Schema Maintenance export utility.
Description
Exports a schema from a PSQL database to a file for later importing into AuditMaster.
Syntax
amschemamaint export ‑d database_path [-m password] ‑p "product name" ‑v version ‑s "description" ‑e file_path_name
Options
 
Example
C:\>amschemamaint export -d d:\<installation directory>\demodata ‑p "PSQL Demo" -v 10.0 -s "PSQL Demonstration Data" -e d:\<installation directory>\demodata\auditschema
remove
AuditMaster Schema Maintenance remove utility.
Description
Removes a schema from the AuditMaster system.
Syntax
amschemamaint remove -p "product name" -v version [-a folder]
Options
 
Example
C:\>amschemamaint remove ‑p "PSQL Demo" ‑v 10.0 -a d:\data\audit
list
AuditMaster Schema Maintenance list utility.
Description
Displays all schemas currently in the audit configuration.
Syntax
amschemamaint list [-a folder]
Options
 
Example
C:\>amschemamaint list
Current schema configurations:
PSQL Generic [<default version>]
PSQL Demo [13.0]
PSQL Demo [13]
Pstore [1.0]
C:\>amschemamaint list -a \\server_name\volume_name\audit\data
Current schema configurations:
PSQL Generic [<default version>]
PSQL Demo [13.0]
PSQL Demo [13]
Pstore [1.0]
Querying Audit Data Directly through SQL
The AuditMaster Viewer client and its query builder are not the only means of access to audit records. You also can run direct SQL queries against these records. To do so, you must first use the Query Data-Model Generator (QDMG) utility provided with AuditMaster. The utility generates a script to create a virtual database of views linked to audit records in the AuditMaster system.
Both current view and archived audit records can be queried directly using the query data-model method. Direct queries can support applications to create reports or otherwise display audit records, as well as serve development and debugging purposes.
Use cases are provided to demonstrate how to apply the direct query method to the Demodata database included in the PSQL installation.
This topic covers the following items:
Note In AuditMaster 12, internal log and settings files are secured and encrypted with a PSQL long owner name, so the SQL query method described here is not supported. However, you can still query audit records created in all other versions.
Query Data-Model Generator Utility
The Query Data-Model Generator (QDMG) utility generates a script, consisting of a set of SQL statements, to run against an empty database. The script populates this virtual database with views that link to audit records stored in the AuditMaster log file. Once the views are created, you can then run queries against them to return results from audit records within AuditMaster.
Syntax
qdmg -d DDF_path [-m password] -p name ‑o file [‑l logfile] [-a folder]
Options
The log file contains records for the current view file in AuditMaster Viewer. You can also access audit records in archived files, but queries on the current view file must be enabled first. Follow these short procedures in the order given:
1
2
3
Creating a Virtual Database
This section gives the steps for using the qdmg utility to create a virtual database for direct queries of audit data. The example uses the Demodata database installed with PSQL.
1
In this example, importing has already been done for Demodata as part of the AuditMaster installation.
If you need instructions to import the schema from your own database, see Managing Schemas.
2
a.
b.
c.
3
a.
b.
Select Admin > Audit Configuration and in the window that appears, find the product name in the list of configurations on the left. The product name is the name you entered when you imported the schema into AuditMaster. In this example, the product name is “PSQL Demo,” which was already imported when AuditMaster was installed.
4
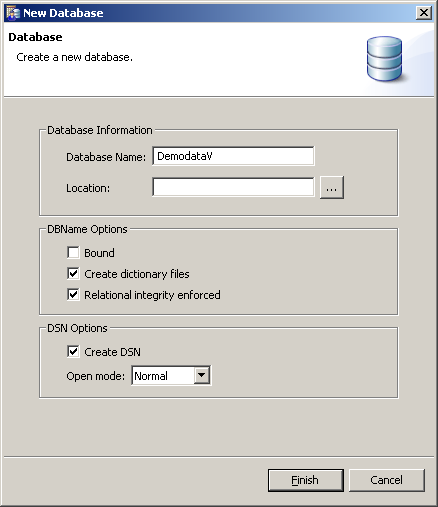
In this example, we name the folder DemodataV, adding the V for “virtual,” but you can choose your own name. The script to populate the virtual database will be saved here, as well as the database itself.
5
Now use qdmg to generate the script based on the following:
The command looks like this:
qdmg -d C:\<installation directory>\Demodata -p "PSQL Demo" ‑o C:\<installation directory>\DemodataV\script
6
The prompt returns the following message:
Query Data-Model Generator Utility for Pervasive AuditMaster
Copyright (C) Pervasive Software Inc. 2004
Query Data-Model was generated into C:\<installation directory>\DemodataV\script.sql
Next, create the database in which to run the script.
7
8
The Create Database Wizard appears.
9
Note You must place the virtual database on the same volume as the AuditMaster installation directory.
10
Click Finish to complete database creation.
11
12
The Select Database dialog box appears.
13
SQL Editor displays the SQL statements in script.sql.
14
Select SQL > Execute All SQL Statements.
The statements in script.sql populate DemodataV with views to audit records.
The virtual database DemodataV now supports queries on audit record columns, as well as on data columns from Demodata.
You may now do any of the following:
The Structure of an Audit Record
The columns of an audit record are described in this section. Its structure is representative of the result returned by a query such as SELECT * FROM vstudent.
The following facts should be noted in the example:
After the AM$ audit data columns, the rest of the row consists of data fields from the audited table and contain values captured from that table at the time of the audit event.
Once you have reviewed the audit record structure, see Running a Query on the Current View File for steps to run a query on the DemodataV example.
The following table compares the columns of an audit record with those displayed in the AuditMaster Viewer grid.
 
Running a Query on the Current View File
Before querying for audit records described under The Structure of an Audit Record, be sure to have done the following:
Run qdmg to generate a script to populate a virtual database with views linked to audit records
If you’ve completed these tasks, you’re ready to run direct queries for audit records as shown in the continuing example in this section. Steps for a simple query are given, as well as those for a more complex delta query to compare Before and After field values.
1
2
In SQL Editor, the default query SELECT * FROM "Student" returns all rows.
3
4
In PSQL Control Center, select File > New > SQL Document.
5
6
SELECT AM$rec_id, AM$opdate, AM$optext, ID, Cumulative_GPA FROM VStudent
The query should return a result like the following:
AM$rec_id AM$opdate AM$optext ID Cumulative_GPA
========== ========== ============= ========= ==============
637 6/2/2005 Modify Before 190907350 4.000
638 6/2/2005 Modify After 190907350 3.000
For a more complex example, you may run a delta query to compare Before and After values. The general syntax for a delta query is as follows:
SELECT field1, field2,...
FROM view after, view before
WHERE after.AM$rec_id = before.AM$dep_rec_id AND
after.AM$field3 <> before.AM$field3
This type of query will display audit records for every instance of an update to field 3. For a large set of audit records, however, such a query may return too large a result. In this example, we will limit the delta query to a specific student ID.
1
2
SELECT after.AM$rec_id, after.AM$opdate, after.AM$optime, after.AM$net_user_id, before.Cumulative_GPA AS "GPA Before", after.Cumulative_GPA AS "GPA After"
FROM "VStudent" after, "VStudent" before
WHERE after.ID = '190907350' AND after.AM$rec_id = before.AM$dep_rec_id
AND after.Cumulative_GPA <> before.Cumulative_GPA;
The query should return a result like the following:
AM$rec_id AM$opdate AM$optime AM$net_user_id GPA Before GPA After
========= ========== ========== ============== ========== ==========
637 6/2/2005 6:23:49 PM db_user 4.000 3.000
Note Once you’re able to run a delta query against a virtual database, you can configure a delta alert. The AuditMaster delta alert feature can use changes in selected columns of an audit record as the alert condition.
Running a Query on an Archived File
This topic refers to the virtual database DemodataV you created under Creating a Virtual Database.
The qdmg script sets selected tables in the virtual database to point to audit records in the current view file. The default path for this file is C:\<installation directory>\Audit\data\amlog. As explained in this section, you can reset the path to an archived file if you know its name.
Archived file names are based on creation date, yyyymmdd.nn, where yyyy is year, mm is month, dd is day, and nn is number of archived file that day, starting with two zeroes. File names end in a capital V. The default folder for archived files is C:\<installation directory>\Audit\Arch.
When an archived file is compressed, it moves to a different folder, the default for which is C:\<installation directory>\Audit\Comp, and the V in the file name changes to Z. When the file is decompressed, it returns to the Arch folder and the Z changes back to V. As with queries within AuditMaster, direct queries run only on uncompressed records.
The method described here uses two SQL scripts:
The following steps demonstrate these scripts using the virtual database DemodataV created earlier. The examples are intended to illustrate how you can write your own versions of these scripts.
1
AuditMaster moves current audit records to an archived file.
2
The newly created archived file appears in the list.
3
4
5
6
-- This script resets the virtual database to
-- the uncompressed archived file 20160220.00V.
ALTER TABLE AM$amlog IN DICTIONARY USING '\
<installation directory>\Audit\Arch\20160220.00V';
ALTER TABLE Billing IN DICTIONARY USING '\
<installation directory>\Audit\Arch\20160220.00V';
ALTER TABLE Class IN DICTIONARY USING '\
<installation directory>\Audit\Arch\20160220.00V';
ALTER TABLE Course IN DICTIONARY USING '\
<installation directory>\Audit\Arch\20160220.00V';
ALTER TABLE Department IN DICTIONARY USING '\
<installation directory>\Audit\Arch\20160220.00V';
ALTER TABLE Enrolls IN DICTIONARY USING '\
<installation directory>\Audit\Arch\20160220.00V';
ALTER TABLE Faculty IN DICTIONARY USING '\
<installation directory>\Audit\Arch\20160220.00V';
ALTER TABLE Person IN DICTIONARY USING '\
<installation directory>\Audit\Arch\20160220.00V';
ALTER TABLE Room IN DICTIONARY USING '\
<installation directory>\Audit\Arch\20160220.00V';
ALTER TABLE Student IN DICTIONARY USING '\
<installation directory>\Audit\Arch\20160220.00V';
ALTER TABLE Tuition IN DICTIONARY USING '\
<installation directory>\Audit\Arch\20160220.00V';
Note The script alters the table location property for AM$amlog in the virtual database and also for all of its copies of the data tables found in the audited database. When you write your own version of this script, be sure you do not alter the table location property for the following virtual database tables: AM$Components, AM$OpList, AM$Products, AM$Tables.
7
After the script runs, you may want to select File > Save SQL Query As to keep it for reuse, perhaps under a name such as 20160220.00V.sql.
The delta query you ran under section Running a Query on the Current View File should now return the same result as when you ran it against the current view, since those audit records have been moved into the archived file to which the virtual database now points.
These steps let you run direct queries on the current view file again.
1
2
3
-- This script resets the virtual database to the current
-- view file. For AuditMaster 6.0 or 6.1, use amview
-- instead of amlog.
ALTER TABLE AM$amlog IN DICTIONARY USING '\<installation directory>\Audit\DATA\amlog';
ALTER TABLE Billing IN DICTIONARY USING '\
<installation directory>\Audit\DATA\amlog';
ALTER TABLE Class IN DICTIONARY USING '\
<installation directory>\Audit\DATA\amlog';
ALTER TABLE Course IN DICTIONARY USING '\
<installation directory>\Audit\DATA\amlog';
ALTER TABLE Department IN DICTIONARY USING '\
<installation directory>\Audit\DATA\amlog';
ALTER TABLE Enrolls IN DICTIONARY USING '\
<installation directory>\Audit\DATA\amlog';
ALTER TABLE Faculty IN DICTIONARY USING '\
<installation directory>\Audit\DATA\amlog';
ALTER TABLE Person IN DICTIONARY USING '\
<installation directory>\Audit\DATA\amlog';
ALTER TABLE Room IN DICTIONARY USING '\
<installation directory>\Audit\DATA\amlog';
ALTER TABLE Student IN DICTIONARY USING '\
<installation directory>\Audit\DATA\amlog';
ALTER TABLE Tuition IN DICTIONARY USING '\
<installation directory>\Audit\DATA\amlog';
Note The script alters the table location property for AM$amlog in the virtual database and also for all of its copies of the data tables found in the audited database. When you write your own version of this script, be sure you do not alter the table location property for the following virtual database tables: AM$Components, AM$OpList, AM$Products, AM$Tables.
4
After the script runs, you may want to select File > Save As to keep it for reuse, perhaps under a name such as currentview.sql.
The delta query you ran under section Running a Query on the Current View File will now return a result for the current view instead of for the archived file.
Summary of Direct Query Methods
This section summarizes the direct query method for audit records:
1
2
3
4
Run the qdmg script in the database.
5
6
7
8
9
Using the Delta Alert Utility
The AuditMaster delta alerts (AMDA) feature provides a means of setting an email alert based on a change to a selected audit record column or columns as the monitored event. Delta alert configuration has the following steps:
1
2
Use the qdmg utility to create a virtual database for the database of the tables you’re monitoring so that you can run delta queries against captured audit records to find the alert condition.
3
Create an AuditMaster alert and enter amda.exe as the RunProgram action and set its parameters.
4
5
The details of these steps are given under Delta Alert Example, which shows how to create a working sample of a delta alert on the Demodata database.
Parameters for the amda Utility
The parameters for the amda utility define the test for the delta alert.
amda -d database -t table -r @RecID -c columns [-u username] [‑p password] [-o operator]
Parameters
For example, the following entry as a RunProgram alert action tests audit records for events marking changes in either the column for amount owed or the column for amount paid in the Billing table in Demodata.
amda -d DemodataV -t Billing -r @RecID -c Amount_Owed,Amount_Paid
This same delta alert is used under Delta Alert Example.
Setting Delta Alert Email Recipients
The file amdaemail.cfg is used to set the mail server, domain, and recipients of email alerts sent by AuditMaster when delta query conditions are true. In a default installation, the file is found in C:\<installation directory>\Audit\Data. It contains the following text:
; *************************************
; * Delta Alert Email Configuration *
; *************************************
; This is a comment.
[SMTP INFO]
;<SMTP Server>
;<Domain>
[EMAIL INFO]
;<email address1>
;<email address2>
;<.............>
The commented variables enclosed in angle brackets are replaced with the values needed for the delta alert to notify mail recipients.
The values in a configured amdaemail.cfg file will look like the following:
[SMTP INFO]
smtp-server
company.com
[EMAIL INFO]
user.name@company.com
Delta Alert Example
This section provides steps to create and configure a delta query to alert recipients by email when billing amounts are changed in the Demodata database.
1
2
You must use the qdmg utility on the monitored database to enable the delta alert feature to run. This example uses Demodata.
If you’ve already created DemodataV, go to the next step.
3
4
5
Query Builder should now look like the following:
6
In the Action for Alert dialog box, select RunProgram and move it to the Selected Actions list.
7
With RunProgram selected, click the Configure button and add and select amda.exe, which is found in a default installation in C:\<installation directory>\Audit\bin\.
The Configure Programs dialog box will look like the following:
8
To store the amda command parameters, click Set Parameters and make entries based on the following:
amda -d DemodataV -t Billing -r @RecID -c Amount_Owed,Amount_Paid
For information on this step, see Setting a RunProgram Action and Parameters for the amda Utility.
The entries will look like the following:
9
10
11
A command prompt window announces that column values have changed and email is being sent to recipients.
Recipients receive a message with a header like the following:
From: AuditMaster
Sent: Wednesday, June 08, 2005 3:14 PM
To: DeltaAlertRecipients
Subject: Delta Alert Fired on Record ID 11392
Record ID is the number of the audit record that triggered the alert. The body of this sample mail message looks like this:
Figure 5 Structure of a Delta Alert Email Message