DataFlow Preferences in KNIME
In the KNIME window that is opened by the File > Preferences command, you can select a combination of Actian settings to configure DataFlow behavior:
Actian Profiles
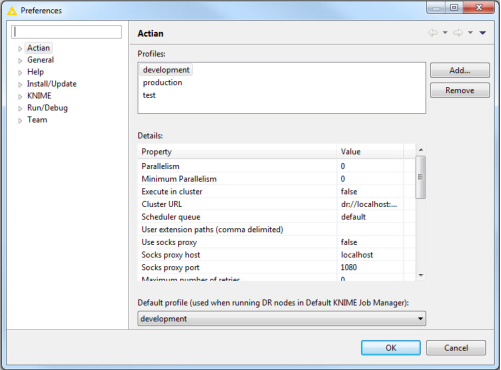
You can use the preferences dialog to set the workflow run-time settings that are specific to DataFlow. To open the Preferences dialog, select File > Preferences from the KNIME menu. The Preferences dialog displays multiple profiles for which you can configure the settings. You can also set a default profile. The DataFlow executor uses the specified profile in the Job Selection Management tab of the workflow Configure dialog.
The following is an example of the Preferences dialog:
Profiles
The Profiles section provides a list of available profiles. Select a profile. The settings are displayed in the Details section.
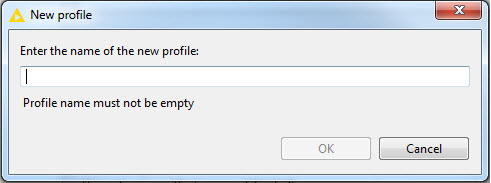
Adding a Profile
Click Add to add a new profile. In the New profile dialog, enter a name for the profile. Following is an example of the dialog:
Removing a Profile
Click Remove to remove the selected profile.
Details
The Details section displays the properties based on the selected profile. Select a property to edit the value.
The following table provides all the properties and their descriptions.
Property | Default Value | Description |
Parallelism | 0 | Specifies the parallelism setting. |
Minimum parallelism | 0 | Specifies the minimum value of parallelism required to execute a job. This property is used when executing a job on a busy cluster. If the required value of parallelism is not reached with the current resources, then the minimum parallelism setting is used to determine the minimum value that is acceptable. To ensure that the accurate number of partitions of parallelism are allocated, set the same value for both minimum parallelism and parallelism levels. |
Execute in cluster | false | Specifies whether the workflow must be executed on a cluster or locally. Set the value to true to execute on a cluster or false to execute it locally. |
Cluster URL | dr://localhost:1099 | Specifies the URL, such as dr://hostname:1099, of the cluster, which is used to execute the workflow. When integrating with Apache YARN, use yarn as the scheme of the cluster URL. For example: yarn://hostname:1099. |
Scheduler queue | default | Specifies the name of scheduler queue. This is used when scheduling the jobs. The scheduler queue name is valid only when a cluster is used for job execution. Currently, scheduler queue names are supported only if YARN is used to execute a job. |
User extension paths (comma delimited) | not applicable | Specifies the list of archived files used by the workflow that runs on a YARN cluster. This is required when you need additional files such as customer components, jar files, and scripts for execution, and these files must be distributed across all the nodes used to run the DataFlow job. |
Use socks proxy | false | Specifies whether to use the socks proxy to contact the cluster. This property sets the socket provider with the specified host and port. Set the value to true to use the socks proxy. |
Socks proxy host | localhost | Specifies the socks proxy host name. |
Socks proxy port | 1080 | Specifies the socks proxy port number. |
Maximum number of retries | 0 | Specifies the maximum number of retries for network communication. The default value (0) does not allow retries. |
Writeahead | 2 | Specifies the number of unread batches that a port can publish before blocking. |
Spooling threshold | 0 | Specifies the threshold for the queue. If the queue exceeds the threshold limit, it is routed to the disk until it shrinks. This saves memory. The default value (0) indicates that the system should set a valid threshold based on the available resources. |
Batch size | 1024 | Specifies the batch size that the operator ports should use to publish the data tokens that are written. Data are published for readers until a full batch is ready or the end of data is reached. |
Collect engine statistics | true | Specifies whether to collect the engine statistics. Set the value to true for the workflow to collect the engine statistics. |
Autosize writeahead (based on number of readers) | true | Specifies whether to auto-size the write ahead based on the number of readers. Set the value to true to auto-size the write ahead. |
Subgraph history size | 10 | Specifies the maximum number of subgraphs to store in memory while tracking the execution history. By default, the last 10 subgraphs for any given operator are stored. |
Storage management path | not applicable | Specifies the path to store the temporary and intermediate files during graph execution. |
Visualization sampling percentage | 0.0 | Specifies the percentage of total data in the workflow that is sampled for use with monitoring plugins. |
Visualization sampling seed | 37 | Specifies the seed that should be used when determining the data for sampling. Setting the sampling percentage to 100 has no effect. |
Sort buffer | 10M | Specifies the size of the buffer used to sort the data in memory. |
Sort IO Buffer | 0 | Specifies the buffer size (in bytes) used for all I/O operations initiated by the Sort operator. The value is in kilobytes (k), megabytes (m), or gigabytes (g). The default size (0) indicates that the framework should set the buffer size at run time based on the current resource availability. |
Sort Max Merge | 0 | Specifies the maximum number of intermediate sort segments to merge concurrently. Adjust this setting to control the resources required to merge sorted segments and create the final sorted result. |
Dump file path | not applicable | Sets the dumpFilePath engine configuration to the specified value. |
Note: For some of the properties, KNIME may have different default values.
Managing Actian Profiles
The Preferences dialog lets you select the default profile, add, or remove a profile.
Default Profile
If the workflow does not have a profile, then it uses the default profile selected. This profile is used when running DataFlow nodes in default KNIME job manager.
To add a profile
1. Click Add in the Preferences dialog.
2. In the New profile dialog, enter a name for the profile.
To remove a profile
In the Preferences dialog, select the profile that you want to remove and click Remove.
Actian Matrix Connections
You must create an Actian Matrix connection to use in the
Load Actian Matrix node. Connection settings are managed as KNIME preferences.
To access these settings
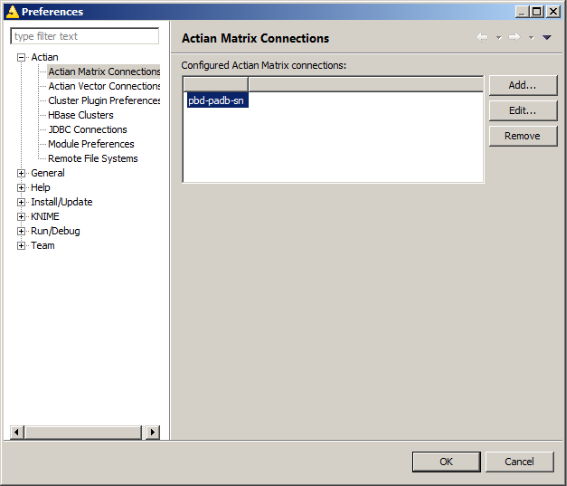
1. In KNIME window, select File > Preferences.
2. In the Preferences dialog, expand Actian and select Actian Matrix Connections to view the list of currently configured Matrix connections.
Managing Actian Matrix Database Connections
The Actian Matrix Connections page lets you add, edit, or remove a connection.
Adding a Matrix Connection
To create a new connection
1. Click Add.
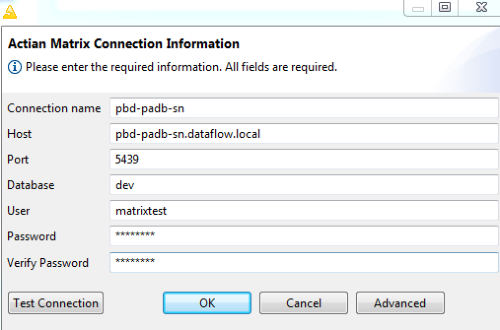
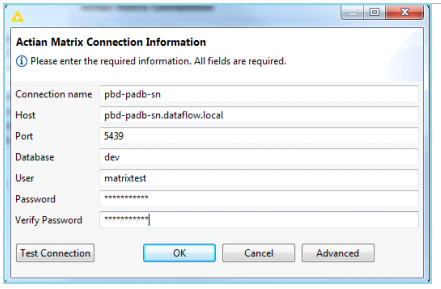
A new dialog opens that lets you specify the following settings:
2. Enter the following mandatory settings:
Connection name
Name for this connection. Each connection must have a unique name. The name only identifies a group of settings in this dialog and is not used to create a Matrix connection.
Host
Host name of the Matrix leader node.
Port
Port number used by the Matrix leader node. Default: 5439.
Database
Name of the database.
User
Database user account used for connections.
Password
Database user account password.
Verify password
Reenter the password.
3. To enable the client-side cursor during reads, click Advanced for additional settings. This allows configuration of the client-side cursor properties, which is useful when reading from large tables. The following options are available:
Enable Client Side Cursor
Enables or disables the client-side cursor.
Set Cursor Max File Size
Specifies the maximum disk cursor size in MB per statement for the client-side cursor. If the results for a single query exceeds this limit, then error is displayed. The value 0 means no limit.
Set Cursor Memory Threshold
Specifies threshold memory cursor size in MB. If the result for a query exceeds the memory amount specified, then the excess data is saved to a file in the directory specified by the path. The value 0 means no threshold and will disable the cursor.
Set Cursor File Path
Specifies the directory to store the client-side cursor files. If the provided path does not exist, then the value is changed to default (TMP/TEMP).
4. Click Test Connection to verify the connection.
5. After the connection test is successful, click OK to save the settings. Click Cancel to close the dialog without adding the connection.
Note: The dialog displays error messages if any of the settings are invalid or if a connection cannot be made. Update the settings and test the connection again.
Editing a Matrix Connection
Click Edit to reset an existing connection. In the Connection Information dialog, enter the required changes and click OK to save.
Removing a Matrix Connection
To delete an existing connection, select it and click Remove. A confirmation is not displayed and the connection is deleted.
Connecting to Kerberos-enabled Matrix
Before entering the host information when adding the connection:
1. Create the <KNIME_HOME>\login.conf file and add the following:
padb-jdbc { com.sun.security.auth.module.Krb5LoginModule required useTicketCache=true; };
2. Add the following in the knime.ini file:
-Djava.security.auth.login.config=<KNIME_HOME>\login. conf
3. Include the Matrix leader host name in /etc/hosts (Linux) or C:\Windows\System32\drivers\etc\hosts (Windows) file.
4. Enter this host name in the connection.
Actian Vector Connections
You must create the Actian Vector connections to use in the Load Actian Vector and Load Actian Vector On Hadoop nodes in KNIME.
To maintain the connections
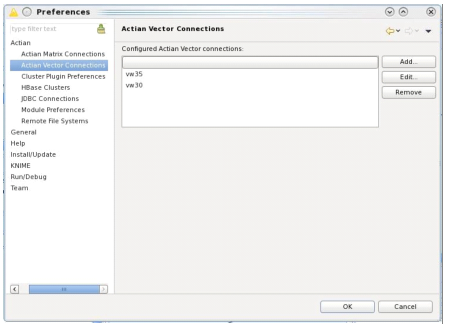
1. In KNIME window, go to File > Preferences > Actian > Actian Vector Connections.
The Preferences page is displayed and provides a list of the connections configured currently.
2. Provide each connection a unique name for identification. The list is available by its connection name.
The following is a sample of the Preferences dialog.
Managing Actian Vector Connections
The Actian Vector Connections page lets you add, edit, or remove a connection.
Adding a Vector Connection
To add a Vector connection
1. Click Add on the Actian Vector Connections dialog.
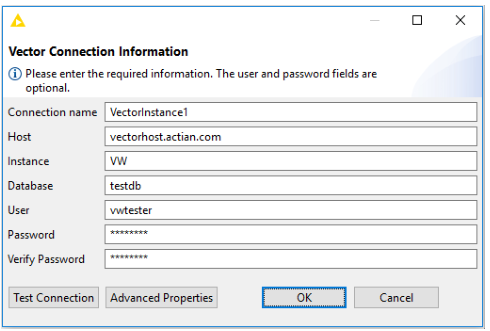
The Vector Connection Information dialog opens.
2. Enter all of the following fields (mandatory):
Connection name
Unique name for this connection. This field is for labeling purposes only and is not used to create a connection to Actian Vector.
Host
Host name of the Actian Vector server.
Instance
Name of the Actian Vector instance. VW is the default instance name.
Database
Name of the database.
User
Database user account used for connections. If you are using Vector on Hadoop, this account may be different from the SSH account used by vwload, which is set in the configuration of the node itself.
Password
Database user account password.
Verify password
Reenter the password.
3. Select Advanced Properties to add any additional JDBC properties that are required for the connection. You also may disable using the default port in which case the Instance property should use the new port value instead of the logical instance.
4. Click Test Connection to verify the connection.
If the test succeeds, click OK to save the connection. Click Cancel to exit without saving.
Note: The dialog displays error messages if any of the settings are invalid or if a connection cannot be made. Update the settings as indicated by the error message.
The following is an example of the dialog. The required information has been entered and the connection tested successfully.
Connecting to Actian Avalanche
When connecting to an Avalanche instance, ensure that you have added the property encryption with the value on to the Advanced Properties. In addition, the default port must be unchecked when you set the custom port used by the database.
Editing a Vector Connection
1. Click Edit in the Actian Vector Connections page to reset an existing connection.
2. On the Vector Connection Information dialog, enter the required changes and click OK to save.
Removing a Vector Connection
To delete an existing connection, select it on the Actian Matrix Connections page and click Remove.
The connection is deleted.
Actian PSQL Connections
Actian Express 2.0 can use data from a PSQL database. For this, you must create an Actian PSQL connection for use by the Actian DataFlow IO nodes
Database Reader and
Database Writer.
For more information about using AAP for PSQL, including the configuration procedure and AAP for PSQL release notes, see
Actian Analytics for PSQL at the PSQL website.
Connection settings are managed as KNIME preferences. The Actian PSQL Connections preference page provides a list of the currently configured connections. Each connection must have a unique name in the list.
To access these settings, in the KNIME window select File > Preferences. In the Preferences dialog, expand Actian and select Actian PSQL Connections to view the list of PSQL connections currently configured.
Managing Actian PSQL Database Connections
The Actian PSQL Connections page lets you add, edit, or remove a connection.
Adding a PSQL Connection
To create a new connection
1. Click Add on the Actian PSQL Connections page.
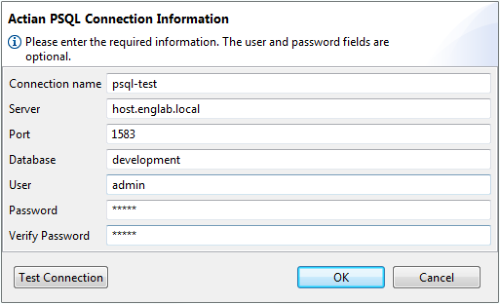
The Actian PSQL Connection Information dialog opens:
2. Enter the following settings (mandatory):
Connection name
Name for this connection. Each connection must have a unique name. The name only identifies a group of settings in this dialog and is not used to create a PSQL connection.
Server
PSQL server name.
Port
Port number used by the PSQL server. Default: 1583.
Database
Name of the database.
User
Database user account used for connections, if needed.
Password
Database user account password, if needed.
Verify password
Reenter the password.
3. Click Test Connection to verify the connection.
If the connection test is successful, click OK to save the settings. Click Cancel to close the dialog without adding the connection.
Note: The dialog displays error messages if any of the settings are not valid or if a connection cannot be made. Update the settings and test the connection again.
Editing a PSQL Connection
Click Edit on the Actian PSQL Connections dialog to reset an existing connection.
On the Actian PSQL Connection Information dialog, enter the required changes and click OK to save.
Removing a PSQL Connection
To delete an existing connection, select it on the Actian PSQL Connections dialog and click Remove.
A confirmation message is not displayed and the connection is deleted.
Cluster Plugin Preferences
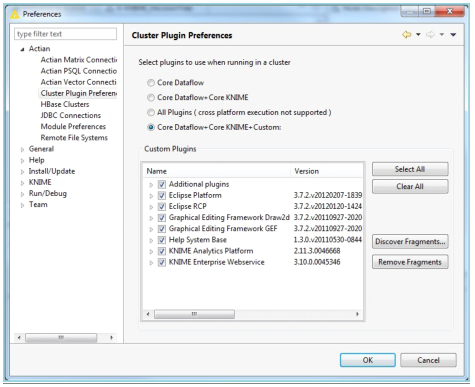
The Actian Cluster Plugin Preferences page lets you select which plugins to use when running in a cluster.
You can select the plugins in KNIME preferences that can be used when running a cluster.
To select a preference
1. Go to File > Preferences.
2. In the Preferences dialog, expand Actian and click Cluster Plugin.
The following options are available:
Core DataFlow
Includes only the basic DataFlow plugins.
Core DataFlow + Core KNIME
Includes the basic DataFlow and KNIME plugins.
All Plugins
Includes all plugins available to KNIME.
Core DataFlow + Core KNIME + Custom
Includes all the core plugins and any additional plugins specified by the Custom Plugins dialog.
3. Click Select All to select all or Clear All to clear all the selected plugins.
4. Click Discover Fragments or Remove Fragments to further customize the jar files from installed plugins which are included in the class path.
5. Click OK to save the selected plugins.
The following image is an example of the dialog.
HBase Clusters
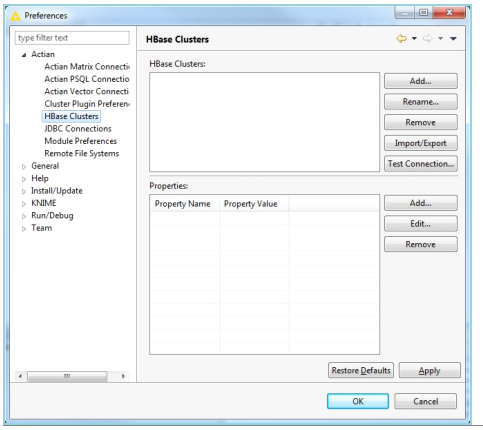
You can use the HBase Clusters preference page in KNIME to configure the HBase clusters that are accessed by the HBase Reader and Writer nodes.
To configure, go to File > Preferences. In the Preferences dialog, expand Actian and click HBase Clusters.
The following image is a sample of the HBase Clusters dialog.
The HBase Clusters section provides the list of clusters that are already configured. Each cluster has a name used for identification within KNIME. When a cluster is selected, its properties are displayed in the Properties section.
Adding an HBase Cluster
To add a cluster
1. Click Add in the HBASE Clusters page.
2. In the Add Cluster dialog, enter a name for the cluster and click OK.
3. Select the cluster and add the properties in the Properties section of the dialog.
Renaming an HBase Cluster
To rename a cluster
1. Click Rename in the HBase Clusters page.
2. On the Rename Cluster dialog, enter the new name and click OK.
After renaming the cluster, you must reconfigure the nodes using that cluster with the new cluster name.
For more information about the list of properties and managing the properties, see
HBase Cluster Properties.
Removing an HBase Cluster
Select the cluster and click Remove on the HBase Clusters page.
In the confirmation message that is displayed, click Yes to remove the cluster.
Importing or Exporting an HBase Cluster
You can import the cluster from a file or URL using Import/Export in the HBase Clusters page.
Import from File...
Imports a cluster from a file. You will be prompted to select a file from the local file system. This file should be in the same format as Hadoop XML configuration files.
Import from URL...
Imports a cluster from a URL. You will be prompted to enter a URL. The file returned by this URL should be in the same format as Hadoop XML configuration files.
Export to File...
Exports the currently selected cluster to a file. You will be prompted to select a file location on the local file system. The file will be in the same format as Hadoop XML configuration files.
Testing a Connection
To test the connection of the selected cluster, click Test Connection. The results are reported.
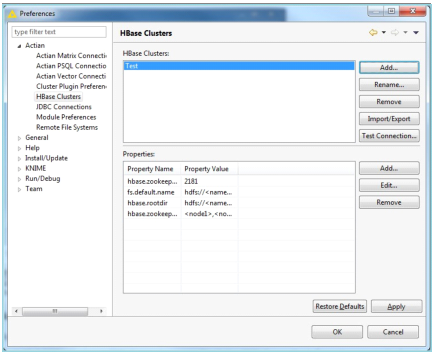
HBase Cluster Properties
This section lists the properties for the selected HBase cluster. The minimum properties needed for connecting to an HBase cluster are:
fs.default.name
The HDFS URL (such as hdfs://headnode:8020)
hbase.rootdir
The root directory where HBase data is stored (such as hdfs://headnode:8020/hbase)
hbase.zookeeper.quroum
The nodes running ZooKeeper
hbase.zookeeper.property.clientPort
The ZooKeeper client port.
Any additional Hadoop or HBase property can be added here as well. Some properties that may occasionally need to be defined include:
hive.metastore.uris
The Hive Metastore URI, if using HCatalog (such as thrift://headnode:9083)
zookeeper.znode.parent
The parent znode in ZooKeeper used by HBase. This should be defined if the default value of /hbase is not being used by your cluster.
Note: For a few Hortonworks clusters, you may need to define this property with a value of /hbase-unsecure.
You may add, edit, or remove properties.
Adding a Property
To add a new property, click Add in the Properties section of the HBase Clusters dialog.
In the displayed dialog, enter a property name and value, and click OK to save.
Editing a Property
To edit a property, select the property and click Edit in the Properties section of the HBase Clusters dialog.
In the displayed dialog, enter a new value for the property and click OK to save.
Removing a Property
To remove a property, select the property and click Remove in the Properties section of the HBase Clusters dialog.
In the confirmation dialog, click OK to remove the property.
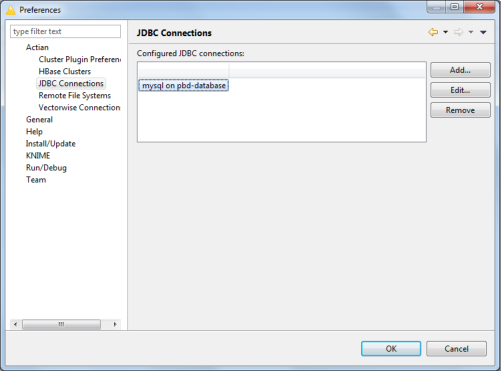
Managing JDBC Connections
This JDBC Connections page lets you manage JDBC database connections. After connections are created and tested, they can be used by the
Database Reader and
Database Writer nodes within RushAnalytics.
To configure JDBC connections, go to File > Preferences. In the Preferences dialog, expand Actian and click JDBC Connections.
The following image is a sample of the JDBC Connections dialog.
The JDBC Connections page provides a listing of the currently configured connections. Each connection should be provided a unique name for identification. The listing is by connection name.
Adding a JDBC Connection
To add a connection
1. Click Add to create a new connection.
The JDBC Connection Information dialog opens for setting the necessary information for a Vector database connection.
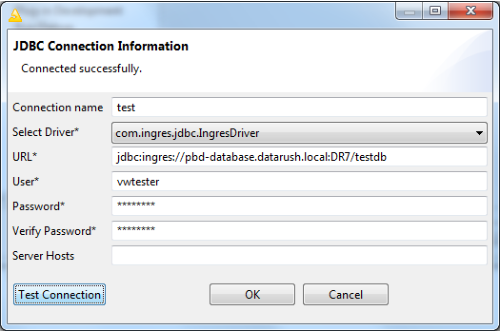
2. Enter the following settings (mandatory) for a Vector database connection:
Connection name
The unique name for this connection. This field is for bookkeeping purposes only and is not used to create a connection to Vector.
Select Driver
The name of the JDBC driver to use. Select an already configured database driver. See
Database Drivers for more information about installing a database driver.
URL
The connection URL for the database instance. Each driver defines the format of the connection URL. When a driver is selected, a template URL is filled in.
User
The database user account used for connections.
Password
The database user account password.
Verify password
Re-type in the password to verify the contents.
Server hosts
Some databases supported distributed operations where multiple database hosts can be used. Supply the host names separated by commas. This is optional.
3. Click Test Connection to test the connection.
If the connection test is successful, click OK to save the connection configuration. Click Cancel to close the dialog without adding the connection.
Note: The dialog displays error messages if any of the settings are invalid or if a connection cannot be made to the database. Update the provided values as indicated by the error message and test again.
The following screenshot shows the dialog used to create or edit a JDBC connection. The required information has been input and the connection tested successfully.
Editing a JDBC Connection
Click Edit in the JDBC Connections page to reset an existing connection.
Enter the required changes and click OK to save.
Removing a JDBC Connection
To delete an existing connection, select it in the JDBC Connections page and click Remove.
The selected connection is deleted.
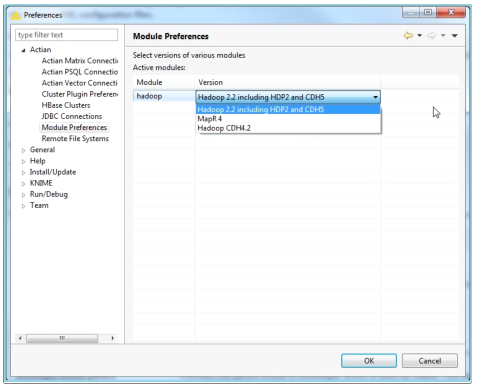
Module Preferences
The Module Preferences page lets you select the version of the various modules available.
To select, go to File > Preferences. In the Preferences dialog, expand Actian and click Module Preferences.
The following image is a sample of the Module Preferences dialog.
Click OK after selecting the version of the module.
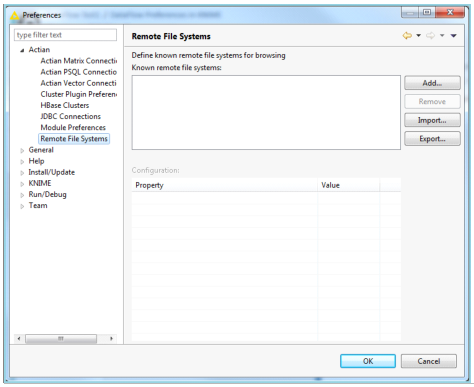
Remote File Systems
The Remote File Systems preference page lets you define known remote file systems for browsing.
To access the page, go to File > Preferences. In the Preferences dialog, expand Actian and click Remote File Systems, which provides the currently configured remote file systems.
The following image is a sample of the Remote File Systems dialog.
Known remote file systems
Lists all the currently configured remote file systems that are available for browsing.
Adding a Remote File System
To add a remote file system
1. Click Add in the Remote File System page.
2. On the displayed dialog, enter a path identifying a remote file system.
Note: A local file path must not be entered.
3. Click OK to save the remote file system.
Removing a Remote File System
To delete an existing remote file system, select it and click Remove.
The selected file system is deleted.
Importing a Remote File System
To import a list of known remote file systems, click Import. Browse to select the file to import.
Exporting a Remote File System
To export the current known remote file systems, click Export. Browse to the file location to export.