Create and Edit Trim
With the exception of boxes, each trim element is contained in a single line, which is treated as a single unit of trim. For multi-line trim elements, use the Create and Trim operations for each separate line of trim you want to create.
After creating trim, you can change the way it displays in the window by giving it attributes. For instance, you can make it blink, display in reverse video, or heighten its brightness. For instructions, see Specify Display Attributes for Trim.
To create new lines of trim
1. Position the cursor where you want a new trim element to be inserted.
2. Choose the Create operation on the Form Layout frame. The original cursor location appears in your window with a flashing plus sign (+).
3. Now choose the Trim operation from the Create submenu.
4. VIFRED displays the message:
5. Enter trim (press <MENU KEY> when done)
6. Type the desired trim. Use text or any other printable character.
7. The trim begins at the cursor position and continues as far as you type, up to the right margin of the form. If you need to extend the right margin, use the Move operation on the Form Layout frame.
8. Press the Menu key to complete the operation.
To edit the text of trim
1. Position the cursor on the trim element you want to modify.
2. Choose the Edit operation on the Form Layout frame
3. Choose the Trim operation on the Create submenu.
4. Enter your corrections.
When you choose the Edit Trim operation, you enter overstrike mode. In this mode, the characters you type replace the existing character (if any) at the cursor position.
You can switch to insert mode by pressing the Mode key as defined for your keyboard. In insert mode, characters entered at the cursor position push existing characters to the right. Pressing the Mode key toggles you back and forth between insert and overstrike mode.
5. When you are finished editing the trim element, press the Menu key to return to the original menu.
Specify Display Attributes for Trim
To specify display attributes for trim
1. Position the cursor on the trim you want to modify.
2. Choose the Edit operation on the Form Layout frame.
The Edit submenu appears.
3. Choose the Attributes operation.
VIFRED displays the Attributes for Trim frame.
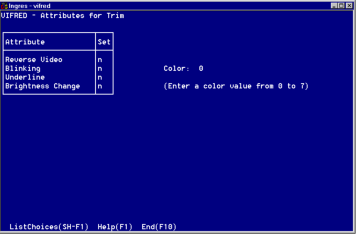
You can set most of the following attributes for boxes and lines, as well as for trim, unless otherwise noted:
Reverse Video
Reverses screen contrast from bright characters on dark background to the opposite, or vice versa.
Blinking
Makes the trim, box, or line blink on and off.
Underline
Underlines the selected trim (not for boxes or lines).
Brightness Change
Toggles the brightness for the trim, box, or line.
Color
Specifies the color of the trim, box, or line.
Except for color, these attributes are either on or off, as indicated by y or n in the column labeled Set. The default condition is n (off).
4. To change an attribute in the Set list, position the cursor on the line for that attribute and type y (yes) or n (no).
5. If you have a color display, type the appropriate color code in the Color field.
Color capabilities vary widely among monitors and can be customized by changing the color specifications in the termcap file entry for your TERM_INGRES setting. Check the appropriate termcap file entry or your monitor documentation for color code assignment information.
6. Select End.
You are returned to the Form Layout frame.
Last modified date: 02/09/2026