Deploying in a Windows Production Environment
For the Quick Start experience, Integration Manager includes an embedded database, an embedded messaging broker, and an embedded Integration Worker. This out of the box configuration is not suitable for production environments.
To preserve production data during maintenance, restarts, or outages of the Integration Manager Service, you must distribute the components.
• Integration Manager Service (includes UI console, APIs, and backend services)
• Production-capable Database Service (MS SQL Server or MySQL)
• Production-capable Messaging Service (RabbitMQ)
• Integration Manager Worker (includes DataConnect engine and DataFlow capabilities)
Note: You can increase Worker concurrency and/or add additional Workers to meet your workload scale and environment requirements.
Configure Distributed Integration Manager
Integration Manager has only one mandatory property change in ProgramData/Actian/IntegrationManager/conf/application.properties file to distribute the core components.
Note: Any change to application.properties requires restarting the Integration Manager Service.
worker.embedded=false
Configure Distributed Integration Manager Worker
To configure Integration Manager Worker
1. Download and install the Integration Worker software from Actian Electronic Software Delivery:
• Windows – https://esd.actian.com/product/Actian_Integration_Manager/2.1/Windows_64-Bit/Integration_Manager_Worker
Note: The default Worker installation is already set up for distributed use; you only need to supply the “queue” connection properties for your RabbitMQ installation.
2. Configure the worker-specific “queue” properties in the ProgramData/Actian/Worker/conf/application.properties file.
Note: Note that Integration Manager and Integration Worker both require “queue” connection properties. (You may use different credentials for each if you desire.)
3. Go to Windows Services, Actian Integration Worker.
4. Right-click Actian Integration Worker and select Start.
Install and Configure Distributed Components
Follow these links for installation instructions:
Install and Configure MS SQL Server Database (Windows)
Microsoft SQL Server is a production-capable database server that you can install locally or on a network server. Microsoft SQL Server is also available as a fully managed cloud service through Amazon Aurora, Azure Database, and Google Cloud SQL.
Integration Manager is compatible with Microsoft SQL Server version 13 (aka SQL Server 2016) or later.
To set up Integration Manager to work with MS SQL Server, follow these steps:
1. Install MS SQL Server.
2. Verify the MS SQL Server service.
3. Configure the Integration Manager DataSource properties.
4. Create a SQL Server-compatible Quartz properties file.
5. Configure the Integration Manager Service for domain login.
Perform the following procedures to achieve these tasks.
Step 1: Install MS SQL Server
You can find the latest MySQL for Windows download at: https://www.microsoft.com/en-us/sql-server/sql-server-downloads
You can find the latest MySQL for Windows installation instructions here: https://docs.microsoft.com/en-us/sql/database-engine/install-windows/install-sql-server?view=sql-server-2016
Step 2: Verify MS SQL Server Service
To verify the MS SQL Server service
1. Go to Windows Services.
2. Confirm that SQL Server (MSSQLSERVER) service is registered and running.
3. Open Programs, Microsoft SQL Server Tools, Microsoft SQL Server Management Studio to confirm your connection information.
4. If you run into problems, see: https://docs.microsoft.com/en-us/sql/database-engine/install-windows/repair-a-failed-sql-server-installation?view=sql-server-2016
Step 3: Configure Integration Manager DataSource Properties
Integration Manager uses the “spring.datasource” prefix properties in the (ProgramData)/Actian/IntegrationManager/conf/application.properties file to create a database connection.
Note: Any change to application.properties requires restarting the Integration Manager Service. Integration Manager will initialize all required database tables at initial startup.
Here are example properties to connect Integration Manager to a MS SQL Server database:
spring.datasource.driver-class-name=com.microsoft.sqlserver.jdbc.SQLServerDriver
spring.datasource.url=jdbc:sqlserver://DB_HOSTNAME;databaseName=datacloud_db;integratedSecurity=true
spring.datasource.initialize=false
spring.datasource.continue-on-error=false
spring.jpa.properties.eclipselink.cache.shared.default=false
spring.liquibase.change-log=classpath:db.changelog-master.xml
Step 4: Create a SQL Server-compatible Quartz Properties File
The default Quartz configuration is not compatible with SQL Server, so you will need to create a custom properties file.
To create a Quartz properties file
1. Create a file named quartz.properties in the (ProgramData)/Actian/IntegrationManager/conf folder .
Note: Any change to application.properties requires restarting the Integration Manager Service.
2. Add the following contents to properly initialize the Quartz subsystem in SQL Server:
org.quartz.scheduler.instanceName=ServerScheduler org.quartz.scheduler.instanceId=AUTO
org.quartz.scheduler.skipUpdateCheck=true org.quartz.scheduler.jobFactory.class=org.quartz.simpl.SimpleJobFactory
#============================================================================
# Configure ThreadPool
#============================================================================
org.quartz.threadPool.class=org.quartz.simpl.SimpleThreadPool
org.quartz.threadPool.makeThreadsDaemons=true org.quartz.threadPool.threadCount=20
org.quartz.threadPool.threadPriority=5
#============================================================================
# Configure JobStore
#============================================================================
org.quartz.jobStore.class=org.quartz.impl.jdbcjobstore.JobStoreTX org.quartz.jobStore.driverDelegateClass=org.quartz.impl.jdbcjobstore.MSSQLDelegate
org.quartz.jobStore.useProperties=true org.quartz.jobStore.misfireThreshold=6000000
org.quartz.jobStore.tablePrefix=QRTZ_ org.quartz.jobStore.isClustered=true
org.quartz.jobStore.clusterCheckinInterval=30000
org.quartz.jobStore.txIsolationLevelSerializable=true
org.quartz.jobStore.acquireTriggersWithinLock=true
org.quartz.jobStore.lockHandler.class=org.quartz.impl.jdbcjobstore.UpdateLockRowSemaphore
#org.quartz.jobStore.lockHandler.maxRetry=7 #org.quartz.jobStore.lockHandler.retryPeriod=3000
Step 5: Configure the Integration Manager Service for Domain Login
To configure domain login
1. Go to Windows Services, Actian Integration Manager.
2. Right-click Actian Integration Manager and select Properties.
3. Click the Log On tab:
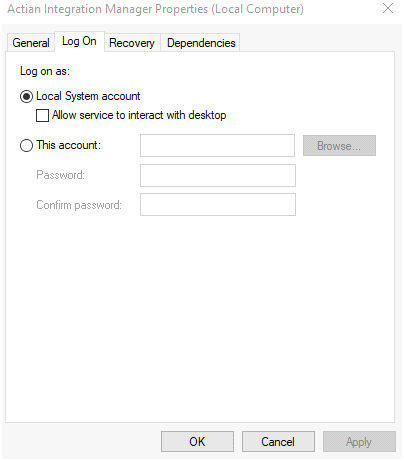
4. Select “This account:” and enter a Windows Domain User with read/write access to MS SQL Server.
5. Click OK.
6. Click the General tab.
7. Right-click Actian Integration Manager and select Start or Restart (depending on whether the service is currently running).
Install and Configure MySQL Database (Windows)
MySQL is a production-capable database server that you can install locally or on a network server. It is also available as a fully managed cloud service through Amazon Aurora, Azure Database, and Google Cloud SQL.
Integration Manager is compatible with MySQL version 5.6.51 or later.
To set up Integration Manager to work with MySQL, follow these steps:
1. Install MySQL.
2. Verify the MySQL Database service.
3. Configure Integration Manager DataSource properties.
Perform the following procedures to achieve these tasks.
Step 1: Install MySQL
You can find the latest MySQL for Windows download at: https://dev.mysql.com/downloads/installer/
You can find the latest MySQL for Windows installation instructions here: https://dev.mysql.com/doc/refman/8.0/en/windows-installation.html
Step 2: Verify MySQL Database Service
To verify the MySQL Database service
1. Go to Windows Services.
2. Confirm that the MySQL Database service is registered and running.
3. Open Programs, MySQL, MySQL Workbench to confirm your connection information.
4. If you run into problems, see: https://dev.mysql.com/doc/refman/8.0/en/windows-troubleshooting.html
Step 3: Configure Integration Manager DataSource Properties
Integration Manager uses the “spring.datasource” prefix properties in the (ProgramData)/Actian/IntegrationManager/conf/application.properties file to create a database connection.
Note: Any change to application.properties requires restarting the Integration Manager Service. Integration Manager will initialize all required database tables at initial startup.
Here are example properties to connect Integration Manager to a MySQL database:
spring.datasource.driver-class-name=com.mysql.jdbc.Driver
spring.datasource.url=jdbc:mysql://DB_HOSTNAME:3306/datacloud_db?useSSL=false&createDatabaseIfNotExist=true
spring.datasource.username=DB_USERNAME
spring.datasource.password=DB_PASSWORD spring.datasource.initialize=false
spring.datasource.continue-on-error=false
spring.jpa.properties.eclipselink.cache.shared.default=false
spring.liquibase.change-log=classpath:db.changelog-master.xml
Install and Configure RabbitMQ (Windows)
RabbitMQ is a lightweight and easy to deploy on premises and in the cloud. It supports multiple messaging protocols. RabbitMQ can be deployed in distributed and federated configurations to meet high-scale, high-availability requirements.
Integration Manager is compatible with RabbitMQ 3.9 or higher. RabbitMQ 3.9 requires Erlang OTP 24. The following steps apply only to a single- node RabbitMQ installation.
Integration Manager is also fully compatible with clustered RabbitMQ deployments. For reference information, see the official RabbitMQ clustering guide: https://www.rabbitmq.com/clustering.html
To set up Integration Manager to work with RabbitMQ, follow these steps:
1. Install Erlang OTP.
2. Install RabbitMQ.
3. Verify the RabbitMQ service.
4. Configure the RabbitMQ console.
5. Configure RabbitMQ users.
6. Configure Integration Manager queue properties.
Perform the following procedures to achieve these tasks.
Step 1: Install Erlang OTP
To download and install Erlang OTP
1. Download Erlang OTP 24 for Windows: https://github.com/erlang/otp/releases/download/OTP-24.2.1/otp_win64_24.2.1.exe
2. Run as administrator.
3. Install using the default configuration (approximately 350 MB).
Step 2: Install RabbitMQ
To install RabbitMQ
1. Download RabbitMQ 3.9 for Windows: https://github.com/rabbitmq/rabbitmq-server/releases/download/v3.9.13/rabbitmq-server-3.9.13.exe
2. Run as administrator.
3. Install using the default configuration (approximately 30 MB).
4. Choose “Allow access” for “Domain networks...” in Windows Defender Firewall, if prompted.
Step 3: Verify RabbitMQ Service
To verify the RabbitMQ Service
1. Go to Windows Services.
2. Confirm that the RabbitMQ service is registered and running.
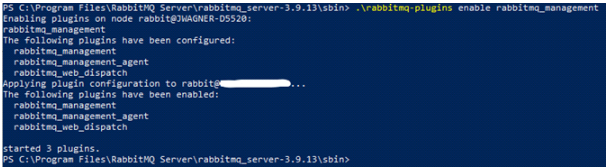
Step 4: Configure the RabbitMQ Console
To configure the RabbitMQ Console
1. Open a Windows console.
2. Go to the sbin directory: cd "C:\Program Files\RabbitMQ Server\rabbitmq_server-3.9.13\sbin"
3. Enable the rabbitmq_management plugin: .\rabbitmq-plugins enable rabbitmq_management
Step 5: Configure RabbitMQ User(s)
To configure RabbitMQ users
1. Open a browser window.
2. Go to: http://localhost:15672/
3. Login (first time):
Username: guest
Password: guest
Username: guest
Password: guest
4. Click the Admin tab.
5. Click “Add a user”.
6. Add credentials for Integration Manager (username/password).
7. Add the “Admin” tag to the user.
Step 6: Configure Integration Manager Queue Properties
Integration Manager uses the “queue” prefix properties in the /conf/application.properties file to connect to the RabbitMQ broker.
Note: queue.port is for the messaging port (default: 5672) and is different from the management API/console port (default: 15672) . Changing any application.properties requires restarting the Integration Manager Service.
Here are example properties to connect Integration Manager to a RabbitMQ Server:
# Messaging Configuration
queue.host=RABBITMQ_HOSTNAME
queue.port=5672
queue.username=RABBITMQ_USERNAME
queue.password=RABBITMQ_PASSWORD
queue.connectionTimeout=20
queue.management-url=http://RABBITMQ_HOSTNAME:15672
queue.host=RABBITMQ_HOSTNAME
queue.port=5672
queue.username=RABBITMQ_USERNAME
queue.password=RABBITMQ_PASSWORD
queue.connectionTimeout=20
queue.management-url=http://RABBITMQ_HOSTNAME:15672
Getting RabbitMQ Help
If you have any issues with the installation, see the official RabbitMQ documentation: https://www.rabbitmq.com/install-windows.html
Enabling TLS for RabbitMQ
If you have a cloud or inter-network installation, you should enable TLS for RabbitMQ: https://www.rabbitmq.com/ssl.html
You will also need to add SSL properties to the Integration Manager messaging configuration:
queue.ssl.enabled=true
queue.ssl.key-store=KEYSTORE FILE LOCATION
queue.ssl.key-store-password=KEYSTORE_PASSWORD
queue.ssl.key-store-type=KEYSTORE_TYPE, e.g. PKCS12
queue.ssl.protocol=TLSv1.2
queue.ssl.key-store=KEYSTORE FILE LOCATION
queue.ssl.key-store-password=KEYSTORE_PASSWORD
queue.ssl.key-store-type=KEYSTORE_TYPE, e.g. PKCS12
queue.ssl.protocol=TLSv1.2
Install and Configure Apache ZooKeeper (Windows)
ZooKeeper is a distributed, open-source coordination service for distributed applications.
Integration Manager leverages ZooKeeper for Job Execution Mutex capabilities (see Job Execution Mutex) when executing across multiple engines, multiple workers, or distributed worker pools.
Integration Manager is compatible with Apache ZooKeeper 3.6.3 in Standalone Operation or Replicated Ensemble Deployments.
To set up Integration Manager to work with ZooKeeper, follow these steps:
1. Install Apache ZooKeeper.
2. Configure Integration Manager ZooKeeper properties.
Perform the following procedures to achieve these tasks.
Step 1: Install Apache ZooKeeper
To install ZooKeeper
1. Download Apache ZooKeeper 3.6.3: https://www.apache.org/dyn/closer.lua/zookeeper/zookeeper-3.6.3/apache-zookeeper-3.6.3-bin.tar.gz
2. Unzip to a Java-friendly path, for example, C:/ProgramData/Apache/zookeeper-3.6.3
3. Create a data directory at C:/ProgramData/Apache/zookeeper-3.6.3/data
4. Rename “zoo_sample.cfg” to “zoo.cfg” in C:/ProgramData/Apache/zookeeper-3.6.3/conf
5. In zoo.cfg, set:
dataDir=C:/ProgramData/Apache/zookeeper-3.6.3/data
6. Add a new system environment variable:
ZOOKEEPER_HOME = C:/ProgramData/Apache/zookeeper-3.6.3
7. Edit the system environment variable PATH by adding the entry:
%ZOOKEEPER_HOME%/bin
8. Open a command prompt and enter zkserver to verify your installation.
For additional information and installation verification activities, see: https://zookeeper.apache.org/doc/r3.6.3/zookeeperStarted.html
Replicated Ensemble deployment is recommended when high-availability is required: https://zookeeper.apache.org/doc/r3.6.3/zookeeperAdmin.html#sc_zkMulitServerSetup
Step 2: Configure Integration Manager ZooKeeper Properties
Integration Manager uses the “zookeeper” prefix properties in the /conf/application.properties file to connect to a ZooKeeper Standalone or Ensemble deployment.
Note: Changing any application.properties requires restarting the Integration Manager Service.
Here are example properties to connect Integration Manager to a ZooKeeper deployment:
# ZooKeeper Connection Info zookeeper.enabled=true
zookeeper.connection-string=10.0.1.101:2181,10.0.2.101:2181,10.0.3.101:2181 #comma-separated list of zk server ips and ports in your ensemble
zookeeper.connection-string=10.0.1.101:2181,10.0.2.101:2181,10.0.3.101:2181 #comma-separated list of zk server ips and ports in your ensemble
Last modified date: 03/14/2022