How You Can Create a Frame from a mastdetl Template
You can create a frame from one of the mastdetl templates using the Frame Assistant. Begin with the following steps:
1. On the Develop tab, select the application in which you want to create the frame in the Applications portlet, and then select the header bar of the Components portlet to make it active.
2. Click File, New, User Frame.
The Create User Frame dialog appears.
3. Enter the component name in the Name field.
4. (Optional) Enter a comment for the component in the Remark field.
5. Select mastdetl from the Application list and a template from the Template list.
6. Click Create.
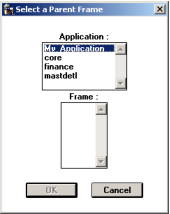
If you selected the detail or explosion template in Step 5, the Select a Parent dialog appears as shown in the following illustration:
For detail frames only, it is then followed by the Select Database Object dialog.
For a detail frame or an explosion frame: Specify its parent frame by selecting an application and a frame from the Application and Frame list fields, respectively, in the Select a Parent dialog, and then click OK.
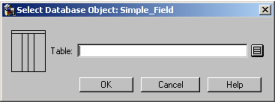
If you selected the simple_field, table_field, or master_detail template in Step 5, then the Select Database Object dialog appears after clicking Create in Step 6. For example:
For simple field, table field, master-detail, and detail frames: Enter the name of the primary table or tables in the Select Database Object dialog, and click OK.
Alternatively, click the control button to select a valid table from the Table Selection dialog. For more information, see
Table Selection Dialog.
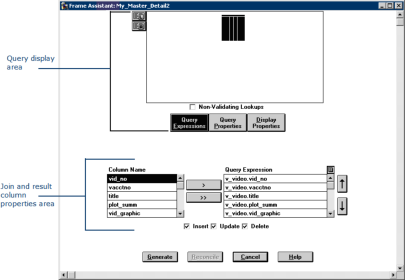
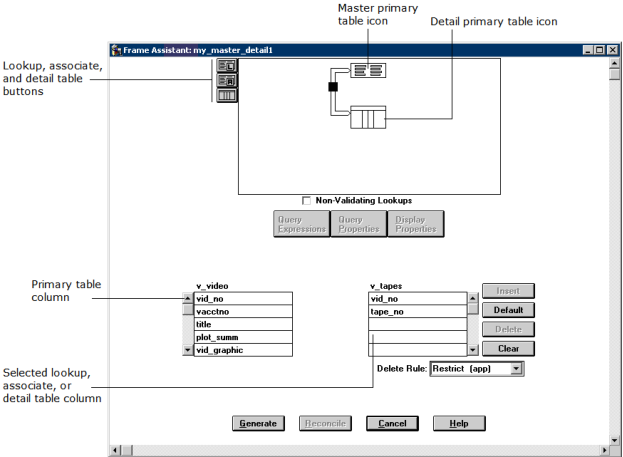
When you create a master-detail frame, the Frame Assistant appears:
The Frame Assistant consists of two distinct areas:
Query display area
Provides a pictorial view of the tables you specify and the join relationships between them. It lets you define lookup tables and associate tables and detail tables (for master-detail and detail frames).
Join and result column properties area
Lets you specify join columns between tables, as well as set query expressions, query properties, and display properties for the result columns of the query.
Note: The contents of these two areas vary slightly depending on the predefined frame template selected. Therefore, see the individual Mastdetl template sections that follow this overview of the Frame Assistant.
7. (Optional) Select query expressions, query properties, and display properties for result columns.
For more information, see:
8. (Optional) Specify additional tables, including lookup or associate tables, for the generated frames.
9. (Optional) Specify join columns and join column properties.
10. Click Generate.
The appropriate frame is created and displayed in the Frame Editor.
11. Specify the frame's properties using the Property Inspector.
For example, you can set such properties as BgColor, BgPattern, IsAutosized, IsMaximizable, IsMinimizable, IsResizeable, and WindowPlacement.
Table Selection Dialog
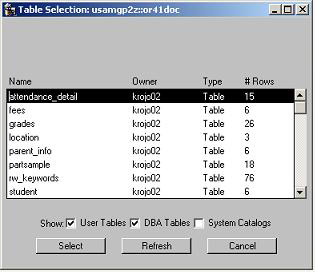
For simple field, table field, master-detail, and detail frames, the Select Database Object dialog provides a control button that opens the Table Selection dialog. Using the Table Selection dialog, you can select a valid table from a list of tables in the database. For example:
This dialog also displays the tables' owners, types, and the number of table rows. The check boxes at the bottom of the window are used to control the types of tables that are displayed, including user tables, DBA tables, and system catalogs.
To select a table in the Select a Table dialog
Select its row and click Select.
Click Refresh to update the display of tables currently in the database.
Table Definition in the Frame Assistant
When the Frame Assistant is opened, graphic icons for the specified primary tables are initially displayed. Additional tables can be added by using the three buttons located at the upper left corner of the query display area, shown in the following illustration:
The upper row of tables in the query display area represents the master query, and the additional rows specify one or more detail queries.
Note: In simple field and table field frames, detail tables cannot be added.
The primary table column contains those tables that serve as the primary source of data for the query. Additional tables that you add are displayed in other columns in the Frame Assistant window.
How You Can Set Query Expressions
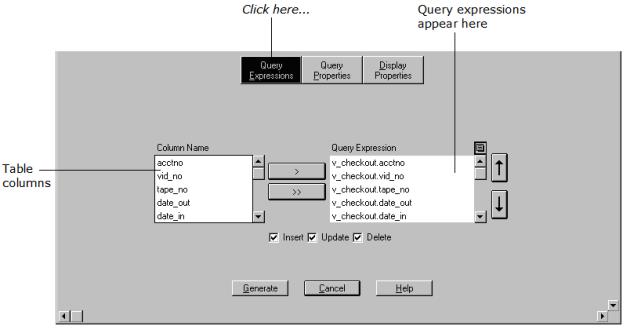
The Frame Assistant lets you define the result columns included in a query. To display the query expressions, select the appropriate table in the query display area, and click Query Expressions in the center of the frame assistant.
The Frame Assistant changes accordingly:
Column Name
Displays all the columns defined in the specified primary table
Query Expression
Lists the query expression that will be used in the SQL query for each column.
In the Query Expression column, you can perform several operations. By clicking the control button, you can insert a row before the current row, delete the current row, or delete all rows. Also, the up and down arrow buttons move the currently selected query expression up or down one position in the list.
To create a new query expression for a table column, click its name in the Column Name list and click the “>” button. Clicking the “>>” button causes a new query expression for each table column to be created by moving all the column names into the Query Expression box.
Insert, Update, Delete Check Boxes
Determine whether data can be inserted, updated, or deleted in the generated frame. These settings apply to all tables in the frame.
How You Can Set Query Properties
You can also set the characteristics of the query of a specific table. This controls how values are retrieved from the table.
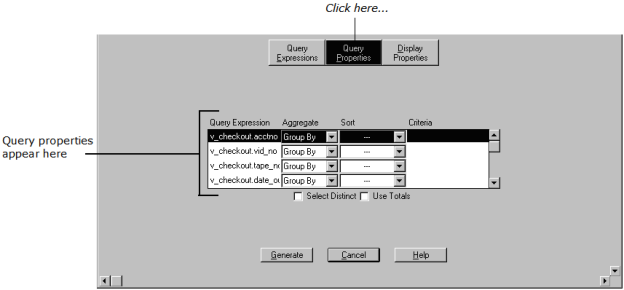
To display the query properties of a table, select the appropriate table in the query display area, and then click Query Properties in the center of the Frame Assistant.
The Frame Assistant changes accordingly:
Query Expression
Displays all the target query expressions/columns defined for the specified primary table and is used to identify which column's properties are being modified
Aggregate Function
Lets you select an aggregate function to be applied to the selected query expression/column. The possible choices of aggregate functions are as follows:
Group By
Combines the results for identical values in the column
Sum
Specifies the column total
Avg
Specifies the average (sum of the values/count)
Min
Specifies the minimum value
Max
Specifies maximum value
Count
Specifies the count of occurrences
Where
Used to further qualify the query for the column based on the contents of the Criteria field
--
Indicates that no aggregate function is specified
Sort Order
Lets you choose the order of rows in the results table:
Ascending
Sorts from the lowest value to the highest
Descending
Sorts from the highest value to the lowest
Column Result Criteria
Specifies the criteria to be used on the column to restrict the rows returned by the query. This field is applicable if Where is specified in the Aggregate column.
Select Distinct
When enabled, eliminates duplicate rows returned from the query
How You Can Set Display Properties
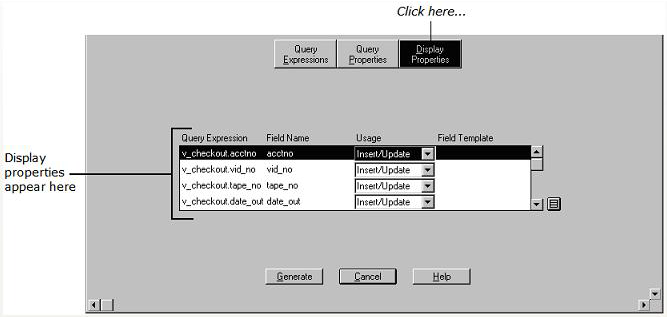
To specify the display characteristics of the fields generated for each of the result columns in a query, select the appropriate table in the query display area, and click Display Properties in the center of the Frame Assistant. The Frame Assistant changes accordingly:
Query Expression
Displays all the target query expressions/columns defined for the specified primary table and is used to identify which column's properties are being modified
Field Name
Specifies the value to be used for the field name and the caption of the field associated with the query expression
Usage
Specifies the operations that can be performed on the field. These operations are further restricted by the frame-wide values specified in the Insert, Update, and Delete options in the Query Properties.
The possible choices for the Usage column include:
Insert/Update
Specifies that new values for the field can be inserted and existing values for the field can be updated
Update only
Specifies that existing values for the field can be updated only
Insert only
Specifies that new values for the field can be inserted only
Display only
Specifies that the displayed value of a field cannot be modified
No display
Specifies that a field associated with the query expression is not generated
Criteria only
Specifies that the column can be used for qualification without a field being generated
Default: Insert/Update
Field Template
Lets you select a field template from any included application. To do so, click the control button to open the Select a Field Template dialog. Then select the desired application and field template, and click the Select button.
How You Can Define Join Column Properties
When you create a master-detail frame or add lookup, associate, or detail tables in the Frame Assistant, the join column or columns must then be configured to define the relationships between the tables.
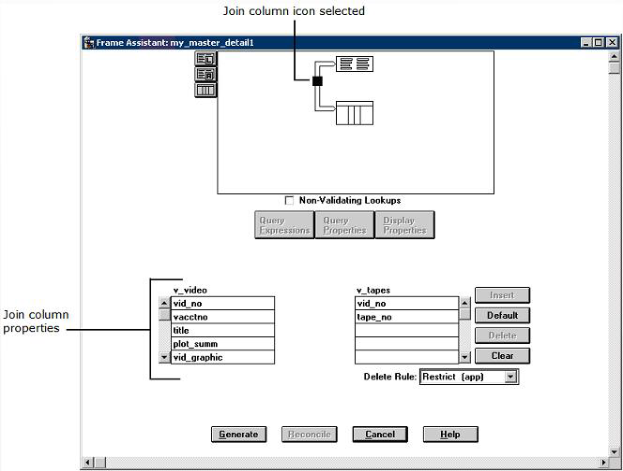
To define the properties for a particular join column (master-detail or associate), click its join icon in the query display area. The Frame Assistant changes to display the join column properties:
The list on the left side displays the columns in the selected primary table. The right side list displays the columns in the selected lookup, associate, or detail table.
Add a Join
You can join columns using the Frame Assistant.
To define the columns to be joined
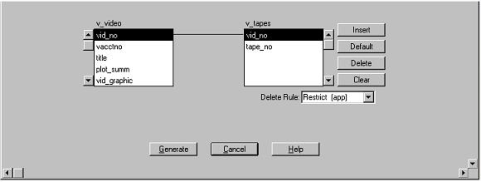
Select the desired column in each list field to be joined, and click Insert.
For example, a join is added to the Frame Assistant as follows:
The Default button adds a join between columns with the same name.
Delete a Join
You can delete joins using the Frame Assistant.
To delete a join
To delete a join that has been inserted, click Delete and then a particular join column.
To clear all joins, click Clear.
Delete Rule Options
The Delete Rule option field specifies how the deletion of rows is handled between the queries of a frame. The available options for Delete Rule are as follows:
Restrict (app)
Specifies that the application prevents the deletion of a master row if associated detail rows exist
Cascade (app)
Specifies that the application cascades the deletion of a master row by also deleting its associated detail rows
Restrict (dbms)
Specifies that the application assumes the presence of internal database rules that prevent the deletion of a master row if associated detail rows exist. The master row will be deleted if no such rules exist, orphaning its associated detail rows.
Cascade (dbms)
Specifies that the application assumes the presence of internal database rules that cascade the deletion of a master row by also deleting its associated detail rows. The master row will be deleted if no such rules exist, orphaning its associated detail rows.
None
Specifies that no delete rules are specified. The master row is deleted, regardless of whether there are associated detail rows.
The following sections illustrate in more detail how to create simple field, table field, master-detail, detail, and explosion frames. Subsequent sections describe how to add lookup, associate, and detail tables to your frame.
