Create a Setup Frame
A Setup Frame is a development-only frame (library frame) used to customize frame or frame template properties and behaviors that cannot be set using the standard Property Inspector and frame toolbar options.
Library frames are frames used for setup or testing, and are available and executable only in Workbench and in library (-l) application images. Although you should indicate their intended use (setup or testing) when creating them, this is simply a marker; it does not affect their behavior. Unlike frame templates, library frames are ordinary executing frames, whose behavior and effect are entirely defined by the code you write for them.
To create a setup frame
1. Select the desired application in the Applications portlet, click in the Components portlet to activate it, and then click File, New, User Frame.
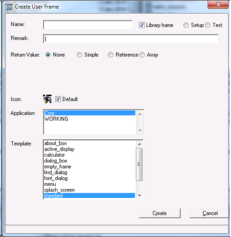
The Create User Frame dialog appears.

2. Enter the name you want to give to the frame.
3. Select the Library frame checkbox, and optionally select the Setup option to indicate that this is to be used as a setup frame.
When you select the Library frame checkbox, a mandatory "|" character appears at the beginning of the remark, indicating that this is a library frame.
4. Add a remark.
For example, "Setup frame for the CountryMap dialog." The "|" prefix will always be restored if you accidentally remove it.
5. Select the application that contains the frame template you want to base this frame on.
The Template list field displays all frame templates defined in the specified application.
Note: If the desired application is not listed in the Application list, click View, Included Applications. Add the application using the Included Application window's File, New menu and the Add Included Application dialog. For more information, see Specify Included Applications.
6. Select the frame template, and then continue creating the frame following the basic steps defined throughout this chapter.
Last modified date: 12/18/2025