Apply Alternate Templates to Frames or Fields Using the ApplyTemplate Utility
The easiest method of accessing the ApplyTemplate utility is from the Develop tab.
To use the ApplyTemplate utility
1. Select the application to which you want to apply changes in the Applications portlet of the Develop tab.
2. Click Tools, Apply Templates.
The Apply dialog appears.
3. Set parameters for the specified application.
4. Click Go.
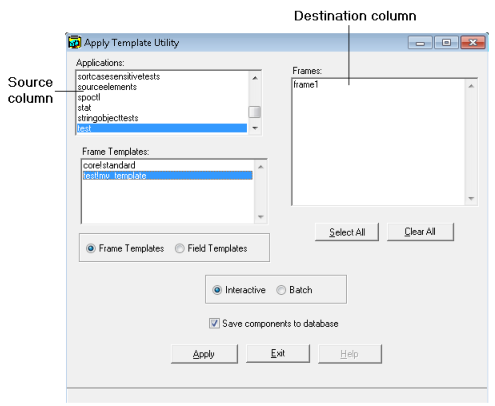
The Apply Template Utility dialog appears:
This dialog contains two columns:
Source column
Is used to select the template whose changes are to be applied
Destination column
Is used to select the frames targeted by the operations
The Applications list box displays all the applications in the database that contain frames that have been generated by predefined templates (or contain frames containing fields generated by templates if you select the Field Templates option).
To use the Apply Template Utility dialog
Note: If you want to apply changes to frames that you have created, start with Step 2.
1. Click the Fields button if you want to apply changes to fields.
2. Select the desired application in the database in the Applications list field.
Depending on whether the Frame Templates or Field Templates option is selected, when an application is selected, the Frame Templates (or Field Templates) list field is populated with the names of the frame templates (or field templates) that have been used to generate frames (or fields) in the selected application.
3. Select a template from the Frame Templates (or Field Templates) list.
If the Frame Templates option is selected, the Frames list field is populated with a list of all frames in the application that have been generated from this template.
If the Field Templates option is selected, the Frames list field is populated with a list of all frames in the application containing fields that have been generated from this template.
4. Select one or more frames from the Frames list in which changes are to be applied.
You can use the Select All and Clear All buttons to select all frames or clear all frames, respectively.
5. Select the mode of operation in which the ApplyTemplate utility is to be run, including one of the following:
Batch
Specifies that the frame or field changes are applied automatically based on the assistant procedure coded by the developer
Interactive
Specifies that the appropriate frame or field assistant dialog is called so that you can enter your own customization parameters associated with the frame or field
6. Specify whether your changes should be stored in the database (selected by default).
Clearing the checkbox allows you to test ApplyTemplate changes without making permanent changes in the database.
7. Click Apply.
The static properties of the frame (or field) template are applied to the target frame or frames; and if appropriate, the corresponding frame assistant or field assistant is called.
The modifications are made to the application’s components in the database (if Save to components to database was selected). If you want these changes to be applied to images that have been previously created, you need to run the
Use the MakeImage Utility) again to create a new image.
For more information about how to ensure compatibility between the ApplyTemplate utility and your assistant procedures, see the chapter “Writing a Template Assistant” in the Programming Guide. This chapter also provides guidelines on how a frame is partitioned, and which areas developers can customize without being affected by future regeneration of the dynamic portions of the frame.
Parameters for the ApplyTemplate Utility
You can specify the following parameters using the Apply dialog:
Username (-u)
Lets you use this command as if you were another user, username.
• You, not username, own all files created by OpenROAD.
• This entry field can be used only if Execute in Background is enabled.
Log Path (-L)
Specifies the name of a log file. This entry field can be used only if Execute in Background is enabled and Trace Window is set to Yes. If the log path specified is not a full path, the file is created in the ingres\files directory.
Note: This parameter is available only when accessing this utility from the Project menu.
Trace Window (-T)
Lets you control display of the Trace window by entering one of the following values:
All
Specifies that the Trace window does appear
Yes
Specifies that the Trace window appears but suppresses informational messages output by the system
Yes (Minimized)
Specifies that the Trace window appears minimized as an icon
No
Specifies that the Trace window does not appear, and a log file is not created
Note: This entry field can be used only if Execute in Background is enabled.
Append to Log File (-A)
Appends the trace output of the current command to the end of the existing error log file. Otherwise, that log file is replaced. This entry field can be used only if Execute in Background is enabled.
Note: The error log file, w4gl.log, is located in %USERPROFILE%\AppData\Local\OpenROAD\Profiles\installation_ID. If the -L flag is passed, a new name and location can be provided for the OpenROAD log file.
Execute in Background
Begins a new process while you are using this utility.
If enabled, Execute in Background makes Username, Log Path, Trace Window, and Append to Log File available for use.
Note: You can set defaults for this utility using the Set Tool Defaults dialog. see
Set Defaults.