Create Attributes for a User Class
When you define attributes for a user class, you specify:
• The name by which they are referenced
• A remark describing the attribute (optional)
• A data type
• A default value (optional)
• Nullability
• Extended properties (tagged values)
You create attributes for a user class in the Class Editor.
To create attributes for a user class
1. Select the application that contains the user class in the Applications portlet of the Develop tab.
2. Double-click the user class in the Components portlet.
The Class Editor is opened.
3. Click the Attributes tab in the Class Editor.
4. Click Edit, Insert, New.
The Create Attribute dialog appears.
5. Enter a name for the attribute in the Name field (for example, my_attribute).
6. Specify the attribute's data type.
For example, you might select Integer from the Data Type option field.
Note: You cannot create a user class with a name of “int” or “integer.”
7. (Optional) Specify other properties for the attribute, such as Remark, Encapsulation (Private), and Default Value.
Note: The Private option, if selected, specifies that the attribute is private, meaning that it can be accessed only by a method of the current user class or any of its subclasses.
8. (Optional) Specify extended properties.
9. Click Create.
The Create Attribute dialog becomes the AttributeProperties dialog.
If you did not specify the properties for the attribute previously, this dialog lets you specify or edit them now.
10. (Optional) Edit the attribute's properties and then click Apply to put your changes into effect.
11. (Optional) Create additional attributes by clicking New and using the previous steps in this procedure.
12. Click Close when you are finished creating attributes.
13. Click File, Save and Close to save your changes and close the Class Editor.
You are returned to the Class Editor where Workbench displays the attributes in the Attributes table field.
Create Attributes from a Table
An alternative method for creating attributes for a user class is to create them from a database table or view. By default this creates not only simple attributes corresponding to the table columns, but user class attributes corresponding to tables referentially related to the specified table.
This process maps all supported data types. For those data types that have no direct OpenROAD correspondence, such as long byte, attributes with equivalent data types (such as LongByteObject) are created, where possible.
Details about the database elements are captured, including names, database table and owner, columns and column sequence, keys, and constraints. Each attribute is also allocated a business category and a subtype. All these settings are stored as tagged values in the attributes or in the userclass itself; you can view and modify them using the Extended Properties editor (see
Edit Tagged Values for a User Class, Attribute, Method, Field, or Frame).
To create a set of attributes that correspond to the columns of a database table or view
1. Create a new user class or open an existing one (for example, My_User_Class).
2. Click the Attributes tab in the Class Editor.
3. Click Edit, Insert, From Database Table.
The Select a Database Table dialog appears. The Database field displays a default name in the format: nodename::databasename.
4. If desired, specify a different database by typing over the name.
5. Specify the table or view name in one of the following ways:
• Enter the name of a table or view in the specified database from which you want to create attributes.
• Click the List Tables button to the right of the entry field, and select a table from the Table Selection dialog that appears. You can sort the tables list by clicking column headers. Select one or more of the following options:
– Your Tables—Displays the tables and views you own.
– Other Tables—Displays tables and views owned by other users.
– System Catalogs—Displays system tables.
Click OK.
The name of the table or view you selected is displayed in the entry field.
6. Specify any extended options:
• Trim prefix from names—Trims a standard prefix from imported attribute names (which are based on column names). Enter the prefix text to trim.
• Capitalize (no underscores)—Removes any underscores and capitalizes the first letter of the name and the letter that follows each underscore. For example, no_underscores becomes NoUnderscores.
• Cascade attribute creation—Automatically creates attributes for all the user classes that may be created during the attribute import process.
By default, attributes are created not only for the table’s columns, but also the table’s relationships to other tables. Relationship attributes have attributes whose data type is a user class (or array of user class), because the related table typically corresponds to a business class. OpenROAD looks for a user class whose name matches the related table; if it finds one, it will use that as the attribute’s data type. If it does not find one, it offers to create it, so that the attribute can be assigned the correct data type.
If you clear the Cascade option, any secondary user classes created will have no attributes. If you select the Cascade option, each secondary user class will have attributes created from the related table to which it corresponds. Some of these attributes may themselves be new user class attributes derived from tables related to the related table, continuing the cascading process. For more information about how cascading is handled, see Step 8.
To identify the tables related to your specified table, the process analyzes database metadata such as constraints, indexes, keys, and cardinalities, and then constructs a list of the relationships found in the form of referential join statements. The list is used to define which relationship attributes (and corresponding business classes) will be generated, and can be output for examination or overridden by a developer-supplied list (see "Use supplied joins" in the following step).
7. Click Advanced options to specify additional options:
• Create simple attributes only—Select if you do not want user class (relationship) attributes to be created. Only scalar (simple data type) attributes that correspond directly to the specified table’s columns are created.
• Write referential joins to file—Creates a file that lists referential joins identified by the processing for later analysis. A default file name is supplied, which you may overwrite. Click Browse to select a new location for the file.
• Use supplied joins—Replaces the generator’s join-identification analysis step with a previously prepared list of joins. The generation process automatically stores the list of joins it identified into the user class, for subsequent reuse.
To use a file to which referential joins were previously output, select Reload from file. A default file name is supplied, which you may overwrite. Click Browse to select a new location for the file. The loaded list will replace any existing stored list.
Typically the supplied list will be a modified version of a file originally output using the "Write referential joins to file" option.
8. Click OK to insert the attributes.
If an attribute is to be given the data type of a user class that does not yet exist, a popup appears, asking you to confirm that you want to do this. Select from the following options:
Yes—The user class (with no attributes and methods) and attribute are created. If another attribute is to be created, the confirmation dialog remains for your next choice.
Yes to All—The user class and attribute are created, and you are not asked again to confirm creation for similar cases.
Note: If multiple user classes and attributes are being created and you selected Cascade attribute creation (see Step 6), “runaway” cascades do not happen. Clicking Yes to All enables cascading for only one set of user class and attributes at a time. At the next cascade level, the confirmation is displayed again. This enables you to keep control of the process without an excessive number of continue requests.
No—The displayed attribute is not created, but creation of any others continues, and the confirmation dialog is displayed again.
No to All—The user class and attribute are not created, and creation of any others is also automatically rejected. The confirmation dialog is not displayed again.
Cancel—The attribute creation process is canceled altogether, and the confirmation dialog closes. No attributes are created.
OpenROAD displays the created column names and data types in the Attributes tab of the Class Editor. Any created user classes appear in the Workbench component list.
9. Click Save on the Class Editor toolbar to save the new attributes.
OpenROAD creates attributes for each of the columns in the specified database table:
• These attributes have the same name as the column unless you have specified the Trim prefix or Capitalize (no underscores) option.
Where two attributes logically have the same name, one is suffixed with a "#".
• These attributes have the same data type as the column unless the type is unsupported in OpenROAD, in which case they will have an equivalent data type.
OpenROAD creates additional attributes for each inter-table relationship it identifies for the specified database table:
• Each attribute name is the name of the database table, plural if necessary (flight or flights, for example).
If there are multiple relationships between two tables (for example, an airport has both flights arriving and flights departing), the name of the attribute distinguishing the relationships is used instead. If no name can be established because the name is reserved or already in use, the table name will be suffixed with an incrementing number (flight1, flight2).
• These attributes are given a data type of either a user class or an array of user class, depending on the direction of the inter-table relationship. The user class name is the name of the database table.
You can edit or delete any of the attributes and create additional attributes of your own. For more information, see
Edit an Individual Attribute and
Edit Tagged Values for a User Class, Attribute, Method, Field, or Frame.
Overriding the Table Relationships List
The primary way to override the list of relationships identified by OpenROAD when creating attributes and user classes from database tables is to capture the list using Write referential joins to file, modify it, and supply the file to OpenROAD using the Use supplied joins option.
However, you can also achieve this using include scripts: an include script called db_disjoined_tables will exclude relationships between pairs of tables, and an include script called db_joined_tables will add relationships that OpenROAD may have failed to identify.
In each include script, specify a comma-separated pair of tables on each line, for example:
airport,airline
In db_disjoined_tables, this would exclude all relationships that airport has with airline.
If you want to add comments to the script (for example, to identify the particular circumstances that a script should be used for), enclose them in /* … */ brackets. All lines containing comments will be ignored.
Overriding the Attribute Datatypes
It is possible to override the datatypes assigned to the created attributes by providing a procedure called "override_datatype" in your application or one of its included applications. This can be useful where, for example, the database column is a varchar that defines a filehandle or dbhandle, or is a longbyte that defines a bitmap.
The procedure should contain the single parameter:
attribute = AttributeObject default null;
and return a varchar containing the datatype, for example "integer", "varchar(256)", or "bitmapobject".
The following example, similar to the default procedure used by OpenROAD, illustrates how this procedure should be defined:
procedure override_datatype (
attribute = AttributeObject default null;
) =
declare
attname = varchar(32) not null;
datatype = varchar(32) not null;
enddeclare
{
attname = Lowercase(attribute.Name);
datatype = attribute.datatype;
case Lowercase(datatype) of
'longbyteobject', 'varchar(256)':
{
if (attname like '%pic%' or
attname like '%image%' or
attname like '%icon%' or
attname like '%map%' or
attname like '%graph%' or
attname like '%photo%') then
datatype = 'bitmapobject';
endif;
}
'longvarcharobject', 'varchar(76)':
{
if (attname like '%pic%' or
attname like '%image%' or
attname like '%icon%' or
attname like '%map%' or
attname like '%graph%' or
attname like '%photo%') then
datatype = 'bitmapobject';
else
datatype = 'stringobject';
endif;
}
default:
{
/*no action*/;
}
endcase;
return datatype;
}
Overriding the Attribute's Category and Subtype Tagged Value Settings
The business category and subtype settings allocated to each attribute enable displays created from these userclasses to be more accurate and user-friendly.
However, they are primarily name-based (an attribute called "name" is likely to belong to the category "identification" and the subtype "name"), which means they will be incorrect for applications using languages other than English, and may be inaccurate for business applications with special terminologies.
You can adjust individual settings using the Extended Properties Editor (see
Edit Tagged Values for a User Class, Attribute, Method, Field, or Frame). But to systematically change the allocation of category and subtype, you may provide procedures called "determine_attribute_category" and"determine_attribute_subtype" in your application or one of its included applications.
Both procedures must return ER_OK and have the following signatures:
integer = determine_attribute_category(attribute = AttributeObject, table_name = varchar(65), column_name = varchar(32), column_typecode = integer, column_length = integer, column_role = integer, column_type = varchar(32), query_state = integer)
integer = determine_subtype_category(attribute = AttributeObject, table_name = varchar(65), column_name = varchar(32), column_typecode = integer, column_length = integer, column_role = integer, column_type = varchar(32), query_state = integer)
Some of these parameters are for internal use only and should be ignored: column_type, query_state. The other parameters are:
attribute
Specifies the attributeobject whose category or subtype is to be determined
table_name
Specifies the name of the database table from which the attribute was derived
column_name
Specifies the name of the database column from which the attribute was derived
column_typecode
Specifies the datatypecode of the database column from which the attribute was derived (for a list of datatypecodes and their meanings, see the appendix "System Constants and Keywords" in the Language Reference Guide)
column_length
Specifies the length of the database column from which the attribute was derived
column_role
Specifies whether this column is a key column in the database table: a non-zero value means that it is a key column
The following example code segment illustrates how the attribute's category could be determined:
typecode = column_typecode;
if (typecode = DTC_INTEGER)
and (attribute_name like '%id' or
attribute_name like '%no' or
attribute_name like '%num') then
attribute.SetTaggedValue(tag='category', textvalue='identifier');
elseif (typecode = DTC_CHAR or
typecode = DTC_VARCHAR or
typecode = DTC_NCHAR or
typecode = DTC_NVARCHAR)
and ((attribute_name like '%name') or
(attribute_name like 'first%' or attribute_name like 'last%') or
(attribute_name like '%code' and
(attribute_name not like '%zip%'
and attribute_name not like '%post%')) or
(attribute_name like '%user') or
(attribute_name like '%aka%')) then
attribute.SetTaggedValue(tag='category', textvalue='identifier');
elseif (typecode = DTC_LONG_BYTE)
and (attribute_name like '%pic%' or
attribute_name like '%image%' or
attribute_name like '%graph%' or
attribute_name like '%photo%') then
attribute.SetTaggedValue(tag='category', textvalue='identifier');
The following example code segment illustrates how the attribute's subtype could be determined:
case column_typecode of
DTC_CHAR,DTC_VARCHAR,DTC_NCHAR,DTC_NVARCHAR: //string
{
if (attribute_name like '%name%') then
attribute.SetTaggedValue(tag='subtype', textvalue='name');
elseif ((attribute_name like '%aka%')
or (attribute_name like '%label%')) then
attribute.SetTaggedValue(tag='subtype', textvalue='label');
elseif (attribute_name like '%email%') then
attribute.SetTaggedValue(tag='subtype', textvalue='email');
elseif (attribute_name like '%code%')
and (attribute_name not like '%post%')
and (attribute_name not like '%zip%') then
attribute.SetTaggedValue(tag='subtype', textvalue='code');
else
attribute.SetTaggedValue(tag='subtype', textvalue='string');
endif;
}
Properties for User Classes
Descriptions of properties that you can set for a user class attribute follow.
Extended Properties
Specifies the set of TaggedValue entries for this user class.
Properties for User Class Attributes
Descriptions of properties that you can set for a user class attribute follow.
Name
Specifies the name of the attribute. This name must be a valid OpenROAD name.
Important! In OpenROAD, the following objects can be named: applications, classes, components, databases, database tables and columns, parameters, procedures, user events, and variables. The rules for these names, or alphanumeric identifiers, are as follows:
• Names can contain up to 32 characters.
• Names must begin with an alphabetic character or an underscore (_).
• In addition to letters and numerals, a name may contain these characters: #, @, and $.
• Names are not case sensitive.
• A name may not be a reserved word (see the 4GL Keywords section in the “System Constants and Keywords” appendix of the Language Reference Guide).
Note:
• You cannot change this property at runtime because 4GL cannot dynamically use different variable names for the same object.
• If you create an attribute for a column of a database table, OpenROAD uses the column name as the attribute name by default. You can optionally change this name.
Remark
Specifies a description of the attribute
Encapsulation
If the Private toggle is enabled, specifies that the attribute can be accessed only by a method of the current user class or any of its subclasses
Note: In object‑oriented programming, you can limit access to an object's attributes and methods. The process of allowing only the object itself to have access to its attributes and methods is called encapsulation. In OpenROAD, you accomplish this restriction by flagging an attribute or method as private. You can only reference a private attribute or method in the 4GL code of the methods of the defining user class or its subclasses. For more information, see Encapsulating Attributes and Methods in the chapter “Working with Classes” in the Programming Guide.
Type
Specifies the variable type of the attribute:
• Simple
• Reference
• Array
Data Type
Specifies the data type of the attribute for simple type variables only. Valid options are:
• Varchar
• Nvarchar
• Integer
• Smallint
• Float
• Decimal
• Date
• Money
Length
Specifies the maximum number of characters of the attribute for simple type variables, varchar, and nvarchar data types only
Nullable
Specifies that a null value is allowed for simple type variables only
Note: If the data type of the attribute is a class, this property is always TRUE.
Class Name
Specifies the name of a system class or another user class in the current application or an included application for reference or array variables only
Default Value
Specifies the default value of the attribute. Valid options are:
System
Provides a system-assigned initial value
Null
Sets the initial value to a null string. (This option is always available for reference and array types, and only available for simple types if you have made the attribute nullable.)
String
Lets you specify a string for the initial value in an adjacent entry field. (This option is available only for simple type attributes.)
Extended Properties
Specifies the set of TaggedValue entries for this attribute.
Each tagged value contains a varchar tag (up to 256 bytes) as identifier, and a StringObject value as text content, and an Object item that provides keyed access to any number of objects. A visibility setting defines where and when a tagged value is available and editable.
Tagged value entries can be added, changed, and deleted. Any new tag and its allowed or typical values can be defined usefully in the user tag files described below.
The list of standard tags and appropriate values is defined in the following XML files, located in the %II_SYSTEM%\ingres\files directory:
appedtags.xml
Contains the list of tags that Workbench uses. These tags are available automatically for use by developers, but the definitions should not be edited or added to.
appedtagvalues.xml
Contains the list of appropriate value sets that Workbench uses. Any tag may use one or a combination of these value sets as its allowed or typical values.
These value sets are available automatically for use by developers, and the list value sets are in a form suitable for the ValueDefinitionProxy.BuildListSet() method, but they should not be edited or added to.
usertags.xml
(For use by developers) Contains the list of site, installation- or application-specific tags that developers may find necessary in addition to the built-in tags. You can edit this file to define your town tags and values for runtime use.
usertagvalues.xml
(For use by developers) Contains the list of appropriate value sets that developer-defined tags use. Any tag may use one or a combination of these value sets as its allowed or typical values.
You can edit this file to define your town tags and values for runtime use. We recommend that you follow the definition patterns used in appedtagvalues.xml—in particular, to define the list value sets in a form that they can exploit the ValueDefinitionProxy.BuildListSet() method.
Note: The Attributes from Database Table facility creates a number of tagged value entries, most defining information determined from the database, in some cases provisionally. The values of these entries can be edited where appropriate, but renaming or deleting the tags themselves may produce unexpected results.
Edit a User Class Property
You can edit a user class's tagged values in the Extended Properties Editor. For a detailed description, see
Edit Tagged Values for a User Class, Attribute, Method, Field, or Frame.
To open the Extended Properties Editor, click the Extended Properties edit button.
Edit an Individual Attribute
You can edit an individual attribute in the Class Editor.
To edit an individual attribute
1. Select the application that contains the user class in the Applications portlet of the Develop tab.
2. Double-click the user class in the Components portlet.
The Class Editor is opened.
3. Click the Attributes tab in the Class Editor.
4. Select the name of the attribute.
5. Click Edit, Properties.
Alternatively, position the mouse cursor on the name of the attribute and click the secondary mouse button.
The AttributeProperties dialog appears.
6. Change any of the attribute's properties as desired.
7. Click Apply and then click Close.
You are returned to the Class Editor.
8. Click File, Save and Close in the Class Editor to save your changes and exit the editor.
Edit Tagged Values for a User Class, Attribute, Method, Field, or Frame
You can edit an component's tagged values using the Extended Properties dialog. You access some form of this dialog when you are editing:
• Applications—when you click the Application Properties dialog's Edit button
• Fields—when you select a specific field and then click the TaggedValues property in the Property Inspector
• Frames—when you select the frame background and then click the TaggedValues property in the Property Inspector
• Classes—when you click the Class Editor's Edit button or click Tools, Edit Extended Properties
• Class attribute or method properties—when you click the Method Properties or Attribute Properties dialogs' Edit button
For user classes that were generated or populated using the Insert from Database Table facility, an alternative way to view and edit the tagged values created during this process is to use the Customize Class facility. For more information, see
Create a Display from a User Class.
For more information about the default extended properties, which are defined in XML files included in the OpenROAD installation, see Extended Properties in
Properties for User Class Attributes.
To edit an attribute's tagged values
1. Click the Extended Properties edit button (or the TaggedValues field in the Property Inspector).
The Extended Properties dialog appears. The tags displayed are those defined as being principal tags for this type of element. For an attribute, the list will also include the following principal tags:
• scalarattribute, if this attribute has a simple (scalar) data type
• arrayattribute, if this attribute has an array data type
• objectattribute, if this attribute has an object data type
To view the full list of tags defined for this type of element, click the All tags link. To revert to the principal list, click the Main tags link.
2. Move the mouse over the tag or value you want to edit.
• If the mouse cursor is over a tag name, a dropdown icon will appear. Click this icon to display a list of the current tags defined and select the tag you want. Alternatively, simply type in the tag name you want to use.
• If the mouse cursor is over a tag value, and the allowed or typical values take the form of a list, a dropdown icon will appear. Click this icon to display a list of the allowed or typical values for this tag, and select the value you want. Alternatively, simply type in the value you want to use.
3. To view or define longer text values, do one of the following:
• Resize the Extended Properties dialog to the width you need.
• Select an attribute row and then click the Edit full text icon to the right of the All tags/Main tags button to open the Edit Text String dialog. You can leave this dialog open; it will reflect the current value of the currently selected tag. Any changes you make to it are applied automatically to the TaggedValue as a change that needs no confirmation.
4. To insert a new tag above the selected row, click the Add/delete tags icon to the right of the All tags/Main tags button and select Insert New Tag from the popup menu.
See the next step for more information about added tags.
5. To add a new tag at the end of the list, click the Add/delete tags icon to the right of the All tags/Main tags button and select Add New Tag from the popup menu.
If the new tag has the same name as a predefined tag type, the new one will be displayed and not the "ghost" (default or inherited) definition tag. (If you subsequently delete the added tag, the predefined ghost tag will reappear.) Ghost tags let you know which tags you may want to add locally (if the generator has not already done so). Principles of tag creation include:
• If an inherited tag (colored purple) has an appropriate value, you do not need to add a local tag.
• If a tag is displayed in the default color, it in essence does not exist for the user class, property, field, or frame you are editing. If you need such a tag, add it locally.
• If an inherited tag has an inappropriate value, add a local tag.
• You may add previously undefined tags if you find them useful for your purposes.
• You can only overtype tag names that you have added but not yet defined a value for and not yet saved.
• You can delete local tags you have created, but you cannot delete inherited or default (ghost) tags.
6. To delete a local tag you have previously created, select the tag row and then click the Add/delete tags icon to the right of the All tags/Main tags button and select Delete Current Tag from the popup menu.
Note: You can delete local tags you have created, but you cannot delete inherited or default (ghost) tags. If you delete a local tag that has the same name as a ghost tag, the predefined ghost tag will reappear.
7. Close the dialog when you have completed your changes.
8. Click Apply in the Attribute Properties Editor to confirm your changes and return to the Class Editor.
9. Click Edit, Save to save your changes, and then click Close to exit the Class Editor.
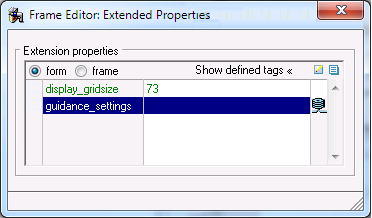
View an Attribute's Tagged Value Items
The tagged values editor enables tagged value items (objects stored with a tagged value) to be viewed but not directly edited. To create, change, or delete tagged value items, you must write your own 4GL code or use a provided utility.
To view an attribute’s tagged value items
1. Click the Extended Properties edit button (or the TaggedValues field in the Property Inspector).
2. Click the Show all tags link if necessary to see the tagged value you are interested in.
The column on the right displays an "item" icon for each tagged value that has stored items.
3. Click the item icon of the tagged value whose item or items you want to view.
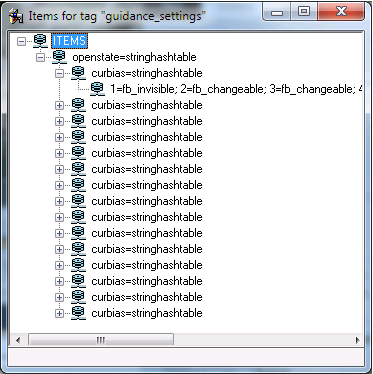
A popup dialog appears, displaying the tagged value's stored item or items in tree view format.
Note: Items can be of any object type, but to be saved with the component, they must be of a type that can be saved. The following are not saveable: user classes, abstract system classes—ones for which no system class attribute has as datatype (exceptions are StringHashTable, Array, and LongByteObject). Saving a component with items that are not saveable leads to unpredictable behavior and is unsupported.
Most stored items are simple objects, such as bitmaps, stringobjects, and lists. But some stored items may be named containers for other objects: hashtables and tagged values are particularly useful because they allow the stored items to be keyed; arrays may also be used.
The following example (from one of the built-in frame templates) illustrates that tagged value items can be as complex as the situation requires. Here, the stored item is a string hash table with a series of entries that are themselves string hash tables. This single tagged value defines the various biases to apply in different frame states for different fieldtypes.
Delete an Attribute
You can delete an attribute using the Class Editor.
To delete an attribute
1. Select the application that contains the user class in the Applications portlet of the Develop tab.
2. Double-click the user class in the Components portlet.
The Class Editor is opened.
3. Click the Attributes tab in the Class Editor.
4. Select the name of the attribute.
5. Select the name of the attribute to be deleted.
6. Click Edit, Delete.
The attribute is deleted.