Create a Palette Field
A palette field appears as a group of buttons, each displaying an image and representing an option to the user (similar to the field palette in the Frame Editor). The user selects an option by clicking one of the images. You can display the buttons in multiple columns, either horizontally or vertically.
When you add an option to a palette field, you must specify an image file in addition to the text and integer values.
For information about modifying the available options, see
Add and Delete List Field Items.
To create a palette field
2. Select the Palette icon on the field palette.
3. Place the palette field on the form using its upper left corner as a guide.
Note: When determining the placement of a palette field on a form, keep in mind that its size is determined by its contents.
4. Select the ValueList property in the Property Inspector.
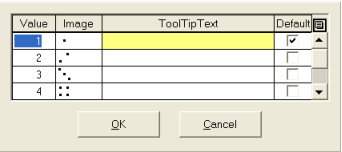
The Value List dialog appears. For example:
This dialog lets you specify the image and tooltip text to be associated with each button in the palette field. Edit the information and click OK.
5. Set the other properties for the palette field, including Columns and Orientation.
Palette Field Properties
All the properties for palette fields are described under
Common Field Properties, with the exception of the following property that is specific to the palette field type:
Columns
Specifies the number of columns in the field
Note: The columns can be displayed horizontally or vertically, depending on the value of the Orientation property.
Default: 2