List Fields
A list field displays a series of options from which the user can make one or multiple selections depending on its SelectionType property.
OpenROAD Workbench lets you activate the “quick find keys” feature for list fields. This feature lets end users type a character to move to the first (or next) row in the column whose value begins with that character.
Note: This feature is available only when the field bias is set to FB_CHANGEABLE. For more information, see
Field Biases.
Create a List Field
You can create a list field on a form.
To create a list field
2. Select the List Field icon on the field palette.
3. Position the cursor on the form and click to create the list field.
4. Set the properties for the list field.
For complete descriptions of each field property, see
List Field Properties and
Common Field Properties.
List Field Properties
All the properties for list fields are described under
Common Field Properties, with the exception of the following properties that are specific to the list field type:
ExactWidth
Specifies the exact outer width of the field. If both MinimumWidth and ExactWidth are positive, ExactWidth takes precedence. If both MinimumWidth and ExactWidth are 0, the default width will be just big enough to hold the largest item in the field.
Default: 0
HasSingleCharFind
Specifies whether the end user may move the focus of the list field to the next row, whose value begins with the character the end user enters. Possible values are:
TRUE
Specifies that the end user can change the field focus
FALSE
Specifies that the end user cannot change the field focus
Default: TRUE
Note: The field bias must be set to Changeable for this feature to be available. For more information, see
Field Biases.
MinimumWidth
Specifies the minimum outer width of the field. If it is smaller than the smallest width of the items in the field, the largest width of the items is used.
Default: 0
SelectionType
Indicates the number of rows that the end user may select. Valid options are:
SEL_SINGLE
Specifies that only a single row in a list field or table field may be selected at a time
SEL_MULTIPLE
Specifies that multiple rows of a list field or table field may be selected at a time. To make multiple selections, the end user clicks the desired rows while holding down the Shift key.
Default: SEL_SINGLE
VisibleRows
Specifies the number of list field options displayed on the form at one time
Default: 4
ValueList
Specifies the choices for the list field using the Value List dialog.
Add and Delete List Field Items
The following procedures describe how to modify the list of choices that a list field provides.
Note: You can also use these procedures to modify the choices for option fields, palette fields, radio fields, list views, and option menus associated with control and pop-up buttons.
To specify items in a list field
2. Select the list field on the form.
The Property Inspector displays its properties.
3. Select the ValueList property.
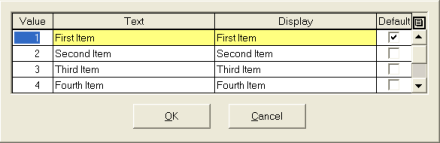
The Value List dialog appears:
4. Tab to the Display column and replace the default text, "First Item," with your text.
Repeat this step as many times as needed for any remaining items.
5. Select the default item for the list field, if any, by selecting the Default option.
6. Click OK.
The item text in the list field is replaced with the items you defined.
To add another item to an existing list field
2. Select the list field on the form.
The Property Inspector displays the list field's properties.
3. Select the field's ValueList property.
The Value List dialog appears.
4. Select the row in the Value List dialog where you want to insert the new item.
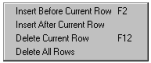
5. Click the control button to the right of the Default column.
An option menu appears:
6. Select where you want to insert the new row.
A new row appears in the Value List dialog.
7. Enter the text and display values for the new choice.
8. Click OK.
To delete an item from an existing choice list
1. Select the list field on the form.
The Property Inspector displays its properties.
2. Select the field's ValueList property.
The Value List dialog appears.
3. Highlight the row you want to delete.
4. Click the control button to the right of the Default column.
An option menu appears.
5. Select Delete Current Row.
6. Click OK.
The specified item is deleted from the list field.
Note: You can also cut, copy, and paste list items using this same control button.