Create a Toolbar Palette Field
You can create a palette field for a toolbar using the Property Inspector.
To create a palette field for a toolbar
1. Click Insert, Palette Field in the Toolbar Editor.
A palette field is added to the toolbar.
2. Select the palette field, and then select the ValueList property in the Property Inspector.
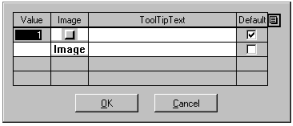
The Value List dialog appears:
Note: This dialog displays slightly different fields for palette fields than for option fields.
3. Click in the first cell of the Image column.
A standard File Selection dialog appears.
4. Locate and select an image file and then Click Open.
You are returned to the Value List dialog, and a truncated image is inserted in the first cell of the Image column.
Alternatively, you can now open the icon gallery.
5. Enter a value (for example, 2) in the second cell of the Value column.
6. Repeat the previous steps for subsequent cells in the Image column, if you have other buttons to modify.
7. Click OK.
The palette field now displays one or more buttons with the specified images.
Note: When creating a palette field, keep in mind that its size is determined by its contents. Therefore, 16 x 16 pixel bitmaps are commonly used for toolbar buttons, including palette buttons.
8. (Optional) Specify other properties for the palette field, including Columns and Orientation.