Report Procedure Tool
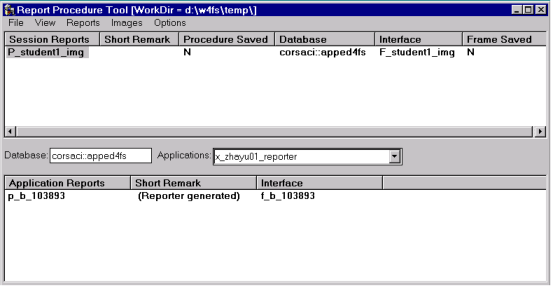
The Report Procedure Tool consists of the menu bar and the following regions:
• Dynamic procedure list
• Database/application information
• Report list
Dynamic Procedure List
This view-only list displays the dynamic procedures created during the current Reporter session. It contains the following fields:
Session Reports
Indicates the dynamic procedure name
Short Remark
Displays a short comment describing the report
Procedure Saved
Indicates whether the procedure has been exported
Database
Indicates the default database for the report
Interface
Defines the associated print dialog frame
Frame Saved
Indicates whether the frame has been exported
Database/Application Information
The database/application information area has the following fields:
Database
Specifies the name of any accessible database with which to establish a connection
Applications
Lists the OpenROAD applications in the specified database
Report List
There is no way to distinguish Reporter procedures from other procedures. To facilitate the identification of Reporter-generated procedures contained in OpenROAD applications, the first part of the short remark is an identifier tag "<...>" that the Procedure Tool uses.
Note: If you edit Reporter-generated procedures or frames, ensure that you do not change the identifier tag if you want the Procedure Tool to recognize the Reporter-generated objects. Failure to recognize a component prevents it from being displayed in the Application Reports List, but does not otherwise interfere with functionality.
The fields in this view-only list are:
Application Reports
Lists reports in the currently selected application
Short Remark
Displays the short remark with the idenntifier tag removed
Interface
Identifies the associated Print dialog frame
Report Procedure Tool Menu Bar
The menu bar has the following main menu items.
File Menu
The following items are found on the File menu:
Save Session Report
Exports selected dynamic procedure and specified associated components (Reports/Options/Include) to a file. This operation always writes out the export file or files, even if they are unchanged.
Save Image Server
Exports a new or updated Image Server Frame to a file
Import Dyn Proc
Temporarily loads a report procedure from an export file
Exit
Exits the Reporter Procedure Tool, prompting to save any unsaved components
View Menu
The following items are found on the View menu:
Application Info
Shows Database/Application and Application Report areas in the dialog. This is definable as a user preference.
Refresh Applications
Reloads the application list for the selected database
Refresh Reports
Reloads the report list for the selected application
Image Server
Displays the current Image Server Frame
Batch File
Displays the current application report import script for viewing only
Reports Menu
Note: All menu items marked with an asterisk (*) are definable as user preferences.
The following items are found on the Reports menu:
Run
Runs the currently selected dynamic procedure using the Procedure Tool’s settings for locating images.
Convert RW Reports
Run the Report-Writer Conversion Tool RWConv to convert Report-Writer reports into 4GL procedures that can be run using the Reporter API. For more information, see
RWConv Utility (Report Converter).
Install To Application/Write Install Script
Imports selected report components to selected application or creates a batch file for execution at a later time.
These two items are alternate views of the same menu button and are controlled by Reports, Options, Immediate.
You are prompted to save if the component has not been exported during the current session.
Batch Import
Opens a file chooser dialog so that you may select an existing application report import script to execute.
Options
The Options menu contains the following commands:
Replace Existing*
If selected, uses '–m –nreplace' when importing procedures to the target application and does not prompt if clashes are detected.
If unselected and a clash is detected, you have the option to overwrite. (Clashes cannot always be detected.)
Default: unselected
Immediate*
If selected, exported reports are imported into the target application immediately by 'w4gldev backupapp in ...'
If unselected, a report import script is created and can be run from Reports/Batch Import, or at any time from the Windows Run command or from a command window.
Default: unselected
Add Selected/Add All*
Selects which dynamic procedures to install to the target application: only selected procedures, or all procedures
Include…
Specifies what types of procedures to include. Applies to both export and import of the selected dynamic procedures.
Procedure*
Includes dynamic procedures
Default: selected
Dialog Frame*
Includes the associated print dialog frame
Default: unselected
Image Server*
Includes the current Image Server
Default: unselected
Trace*
Specifies standard OpenROAD trace flags (No, Yes, Min) to be used on import of procedures to applications
Images Menu
Note: All menu items marked with an asterisk (*) are definable as user preferences.
The following options are found on the Images menu:
Image Server
Contains the following image server options:
Load
Imports an image server frame from disk and initializes the Image Server global variable
Create New
Creates a new Image Server Frame from a built-in template
Add Images
Adds images to the dynamic image server frame from the currently available dynamic procedures
Add Image Options
Contains the following add image options:
Replace Existing Image*
(Not yet implemented.) If an image of the same ID already exists in the image server, replace it.
Add Selected Session Procedure/
Add All Session Procedures*
Adds images for the currently selected procedure or for all listed dynamic procedures
Options
Contains the following options:
Check for Images*
Checks for images during the installation of reports to target applications
Default: selected
Use Image Server*
Specifies whether to run the dynamic procedure using the image server (selected) or with database-resident images (unselected)
Default: selected
Use Image Dir*
Specifies whether to run dynamic procedure using the specified image directory (selected; see Disk-resident Images)) or with original paths for images (unselected) Default: selected
Options Menu
Note: All menu items marked with an asterisk (*) are definable as user preferences.
The following items are found on the Options menu:
Auto
Specifies the following automatic options:
Refresh Apps*
Reloads the application list when the database is changed
Default: selected
Refresh Reports*
Reloads the report list when an application is changed
Default: selected
Load ImgSvr*
Loads the image server on startup of the frame
Default: unselected
Files
Specifies the following file options:
Replace Existing*
Overwrite existing files without prompting
Default: unselected
Use Default Names*
Derives names from component names (recommended)
Default: selected
Batch File*
Sets or changes the report import script name
Default: unselected
Image Directory*
Sets or changes the bitmap image directory
Image Server*
Sets or changes the Image Server Frame name
Default: unselected
Working Directory*
Sets or changes the directory for report procedures (shown in title bar)
Default: unselected
Report Procedure Tool Tutorial
The followiung is a brief tutorial to familiarize you with the Report Procedure Tool.
Before You Begin
1. Start Reporter and load a report from the database or import one from a file.
2. To test most of the new features, you should use a report with at least two different image trims and have at least one of each kind: database-resident and disk-resident.
3. Copy disk-resident images to a directory that is different from the one defined in the report. All runtime disk-based images should reside in the same directory.
4. Compile or print the report in Reporter. After it is run or compiled, you may close the report document.
5. Click Tools, Procedure List.
The Report Procedure Tool dialog opens.
Using the Procedure Tool
When the Procedure Tool starts, depending on the settings, it may load:
• The application list for the current database
• The report list for the current application
• The default Image Server Frame from disk
If the Procedure Tool is run more than once in the same session, the global Image Server may already be initialized. If auto load is set for the Image Server, you will be given the opportunity to retain the in-cache version of the frame and not reload from disk.
When the Procedure Tool Frame appears, all Report procedures created in the current session by successfully compiling or printing reports are listed as Session Reports. The reports do not need to be open. The title of the frame will include the working directory.
File Names
When report components are saved to disk the use of files is controlled by two options (Options, Files):
Replace Existing
If selected, overwrite without prompting if file already exists; otherwise prompt for confirmation.
Use Default Names
If selected, derive names from component names; otherwise display a file popup.
Saving Report Procedures
Any report procedures or dialog frames already exported during this session will be marked with "Y" in the Procedure Savedor Frame Saved column.
To Export a report or its associated components (frame and image server), click File/Save Session Report. The current procedure or its components (see Reports, Options, Include) will be exported to files as described previously.
Running Report Procedures
A dynamic procedure may be run directly from here. The default mode for running the dynamic procedure is "runtime," using an image server or directory if image trim support is required. To run a procedure as if from Print in the main window, unselect Images, Options, Use Image Server and Images, Options, Use Image Directory.
To rerun a report that you are designing, if the report has not changed since the last run, or you want to run the previously printed version before regenerating a new version from a changed design, it is quicker to use Reports, Run than the main window’s File, Print.
Importing Reports to Target Applications
Note: For a target application to use report procedures, it must include repcomp.img and repopen.img.
1. Select the target database, if necessary, by entering a valid 'node_name::database_name' into the Database entry field.
2. If the Application list is not loaded or is out of date, click View, Refresh Applications. If the Applications option field displays "Load Applications," then selecting this option will also load the application list.
3. Select the target applications from the Applications option field.
4. If the Application Report List is not loaded or is out of date, click View, Refresh Reports, or if the Application Reports List displays "Load Reports," click this row to load reports.
5. Click Reports, Import to Application or Reports, Write Install Script—only one of these options is available at a given time and is controlled by Reports, Options, Immediate.
If the selected report or any of its specified components (Reports, Options, Include) has not been saved during the current session, you will be prompted to:
• Continue: Use a corresponding component on disk.
• Cancel Install: Abort attempt to import the procedure.
• Save Now: Export the required components and continue. If some requested component cannot be saved you will be allowed to cancel the installation.
Otherwise you will be prompted to confirm the components to be imported.
If Reports, Options, Immediate is selected, the exported report components will be imported into the target application; otherwise an import script will be written and can be run using Reports, Batch Install.
Note: The Reports, Options, Replace Existing option does the following:
• If selected, applies the '-m –nreplace' flag to the import without prompting for confirmation.
• If unselected and name conflicts are detected, you will be given the option to Skip, Cancel Install, or Replace. Name conflicts can only be detected if the current application report list is up to date.
Working With Image Trim
As described previously, reports that use image trim in their definitions may require additional support when imported to target applications. If this support is not provided, the report can still be run:
• With image-trim if database or disk resident images are available on the target machine/database and stored as on the design machine/database.
• Without image-trim if original images are not available.
Image Directories
Disk-resident image trim must exist in the original directory from which it was defined or in a single directory anywhere on the local machine if the environment variable II_REPIMAGE_DIR is set to point to that directory or the parameter PM_ ImgDir is passed to the report or its dialog frame. For a given report, all disk-resident image trim must be stored in the same way.
In the Procedure Tool a report can be run in either mode determined by the setting of Images, Options, Use Image Dir. The image directory can be set by Options, Files, Image Directory, and this overrides II_REPIMAGE_DIR if it is also set.
Image Servers
Image trim that was database-resident at design time may exist in the Reporter images catalogs that must be a copy of the design database Reporter images catalogs, or the image bitmaps may be copied into an Image Server Frame.
An Image Server is an OpenROAD frame managed by a Reporter-defined userclass. The Image Server Frame becomes part of the target application for report procedures and may be constructed by the Procedure Tool. An appropriate Imager Server frame must be created or loaded from disk. Options, Files, Image Server may set a default name and it is expected to reside in the working directory.
Note: In either case, if an Image Server is already initialized you will be prompted to keep or replace it.
Images, Image Server, Load
Loads an image server frame from disk and initialize the Global Image Server object
Images, Image Server, Create
Builds a new image server frame
Images/Image Server/Add Images
Determines which database-resident images are required by the specified report or reports and adds them to the image server frame. Each image has a unique ID that corresponds to the ID in the design database. Multiple documents can share the same image.
Note: A single image server frame can support multiple reports, but all of them must come from the same design database.
Images, Image Server, Add Image
Replace Existing
(Currently, always unselected) Specifies that any attempts to add an image trim that is already present will be ignored.
Note: Each report can add an association for an existing image to the server frame—these associations are held in a viewable TableField (View, Image Server)
Add Selected/Add All
Adds images from the current procedure or all procedures listed as Session Reports.
File, Save Image Server
Exports the image server to disk. This option is available only if the server has been modified.