The table_field Template
Like the simple_field frame template, the table_field frame template creates a standard database table browser. The generated frame consists of a table field, which is automatically loaded with the results of a single query against one or more joined tables. Each table field column maps by name and type to one of the result columns of the query. This frame can display all rows returned by the query at a time.
Note: Unlike simple field frames, frames generated from this template can call frames generated from the detail or explosion frame templates.
Create a Table Field Frame
You can create a table field frame using the table_field frame template.
To create a frame using the table_field frame template
1. On the Develop tab, select the application in which you want to create the frame in the Applications portlet, and then select the header bar of the Components portlet to make it active.
2. Click File, New, User Frame.
The Create User Frame dialog appears.
3. Enter the component name in the Name field (for example, My_Table_Field).
4. (Optional) Enter a comment for the component in the Remark field.
5. Select mastdetl from the Application list and the table_field template from the Template list.
6. Click Create.
The Select Database Object dialog appears.
7. Enter the name of a primary table in the Table field of this dialog.
For more information about using the control button to the right of the entry field to specify a table, see
Table Selection Dialog.
8. Click OK.
The Frame Assistant appears.
Using the Frame Assistant, you can optionally specify additional tables, including lookup or associate tables. You can also select query expressions, query properties, and display properties for result columns.
For more information, see:
9. Click Generate.
The frame is created and displayed in the Frame Editor.
Note: An Open Row and an Open List button are provided in the Frame Editor. They will appear in a running table field frame only if it is selected as the parent frame for either an explosion or a detail frame (for more information, see
Create an Explosion Frame) or
Create a Detail Frame).
10. (Optional) Specify the frame's properties using the Property Inspector.
Use a Table Field Frame
When the table field frame is generated, it displays the table browser, containing the data rows resulting from the query and a current row indicator.
To run the table field frame
Click Debug, Go on the floating menu bar.
View Data
The table field frame provides a variety of features that let you view the data in a table. It contains a table browser with a vertical scroll bar that lets you scroll through the records. Its row indicator in the upper left corner of the frame indicates the currently selected record.
In a table field frame, you can choose which rows appear in your frame and the order that they appear.
To sort data
Click Form, Sort to choose the order that the data rows appear in the frame.
To query data
Click Form, Query to perform a query on the database.
For more information, see
How You Can Perform a Query.
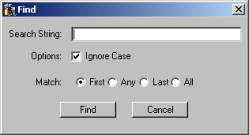
To find a row (to find a text string in the table field)
1. Click Row, Find.
The Find dialog appears:
2. (Optional) Select the Ignore Case option to make the search case-independent.
3. Select among the First, Any, Last, or All options to find a particular occurrence of the string.
4. Click Find.
If the string is found, the row in which it appears is highlighted.
Note: To repeat the last Find operation, click Row, Find Next.
Edit Data in a Table
The table field frame also lets the end user edit data in the table, including inserting, updating, or deleting rows (records).
To insert and delete data
Select one of the corresponding commands from the Row menu to perform standard row operations, such as adding a new row, duplicating the current row, deleting a row, or deleting all rows.
To update data
Click inside the table cell and enter the new value to update an existing value in the table.
Press Tab or Shift+Tab to move between the columns in the table. To move to the next row, press Enter or Tab.
To create a new table
1. Click Form, New.
2. Click the control button to create the first table row. Then select Create First Row from the menu, which creates the first row.
To save data
Click Form, Save.
Copy a Table
You can copy a table in a table field frame to the Clipboard.
To copy the table in a table field frame
1. Click Row, Copy Table.
The Copy Table dialog appears.
The two options on the dialog are:
Include Field Names
If enabled, specifies that field names are copied into the first row of the Clipboard
Flip Rows and Columns
If enabled, specifies that row and column data is reversed. The data that appears in the nth row is copied into the nth column, and vice versa.
2. Click Copy to Clipboard to perform the operation.