Query Plan Viewer
A Utility to Help You Optimize Queries
Perhaps the most complex aspect of SQL performance is query optimization. The database engine performs query optimization automatically, but the query structure itself can affect the overall performance and how the engine optimizes.
Nearly all queries can be written more than one way and yet return the same result set. For example, consider the simple query SELECT * FROM table1. Assume that table1 has five columns named col1, col2, and so forth. You could write the query as SELECT col1, col2, col3, col4, col5 FROM table1 to give the same result set.
Visually comparing these two queries, SELECT * appears much simpler than listing each column by name. However, listing each column by name in the query delivers a very slight performance boost. The reason is that with SELECT *, the asterisk symbol must be parsed into the column names. Such parsing is not needed when the query itself has already performed that task.
The best way to improve performance is to minimize the time required to run queries against the database. This appendix cannot discuss every possible query optimization because queries can be quite complex and can vary tremendously in structure. However, you can better determine how to optimize your queries by using Query Plan Viewer.
Query Plan Viewer is a graphical utility with which you can view query plans selected by the database engine. A query plan can be viewed for a SELECT, INSERT, UPDATE, or DELETE statement. Query Plan Viewer is compatible with wide character data.
Query Plan Settings
Two SQL statements let you control whether you want to create a query plan and what name to give the plan. Both statements apply only to the SQL session.
You can execute the statements in PSQL Control Center or from any utility that can send SQL statements to the PSQL database engine.
Table 183 Query Plan SQL Statements for Settings
SQL Statement | Discussion |
SET QRYPLAN=<on | off> | Instructs the database engine to create a query plan for use with Query Plan Viewer, or not. |
SET QRYPLANOUTPUT=<NULL | file_name> | Sets the location and name of the query plan file. NULL specifies not to create a query plan file. A single query plan file can contain plans resulting from multiple queries. For your reference, the query plan file contains the code page identifier of the encoding used for each query. Regardless which database encoding a query used, Query Plan Viewer correctly displays wide character data. By default, Query Plan Viewer looks for the file name extension .qpf. You may use whatever file name extension you want, or omit one. Example: You want to create a query plan named select_salary and store the query plan file in a directory named mydirectory on drive D off of the root: SET QRYPLANOUTPUT='d:\mydirectory\select_salary.qpf' The database engine creates the query plan output file, so the path must be a location on the machine where the database engine is running. The path should not reference client-side locations or client drive mappings. |
Graphical User Interface
Query Plan Viewer contains two windows: the
Query Viewer and the
Plan Viewer.
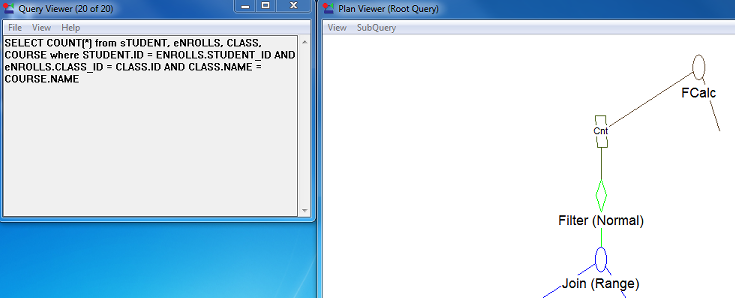
Query Viewer
The Query Viewer displays the SQL query. Only one query plan can be viewed at a time but multiple plans can be opened concurrently. The Query Viewer also contains menu commands to open a query plan file, to navigate to the desired query plan when two or more plans are open concurrently, and to export a query plan.
The Query Viewer can be resized as necessary. It includes a vertical scrollbar for ease in viewing the SQL query.
The Query Viewer window uses a font suitable for wide character data. Query Plan Viewer checks the system fonts available and chooses the first available one of the following:
•Consolas
•Lucida Console
•Andale Mono
•Courier New
Plan Viewer
The Plan Viewer contains a graphical representation of the query plan in a tree form with nodes that represent different components of the query.
The Plan Viewer can be resized as necessary. It includes vertical and horizontal scrollbars for ease in viewing the query plan tree in different sizes. It contains menu commands and keyboard shortcuts to resize the tree as necessary and to zoom in and out on the tree.
Different types of nodes appear in the Query Viewer depending on the query. Each node represents a step in the execution of a query. For example, nodes can represent selection from a base table, joining the results from two tables into a single result set, calculating an aggregate value, determining group break occurrences and combining group results into a single result set.
Nodes
The following table summarizes the nodes.
Table 184 Plan Viewer Nodes
Node Symbol | Node Meaning |
| Represents data coming from a table in the database. The name displayed under the rectangle is the name of the table. If present, the name shown under the table indicates the index used to retrieve data from the table. An asterisk to the right of the index name indicates that the index contains unique values. |
| Represents a row selection operation. The word in parentheses can be either "Normal" or "Range:" •A Normal filter is applied after the row is returned from the downstream node. •A Range filter appears only directly above a base table. The Range filter causes a restricted record retrieval from the table based on an index value. |
| Performs a distinct operation. This node normally appears at the top or close to the top of the plan tree. Eliminates duplicates from the result set before returning rows from the query. |
| Detects group breaks based on a GROUP BY clause. |
| Works with Group Break node to assist in correctly accumulating aggregates for SELECT and HAVING clauses. |
| Performs a JOIN between two nodes. The value in parentheses indicates the type of JOIN performed: •"Outer" indicates left for right outer join without any indexes. •"OuterRange" indicates left or right outer join using an index. •"Normal" indicates a Cartesian join. •"Range" indicates an inner join using an index. |
| Performs aggregate value accumulation. This node is used for MIN, MAX, AVG, COUNT, SUM, and STDEV, and for these aggregates when the DISTINCT clause is used with them. The word inside the node indicates the type of aggregate being accumulated. When an aggregate is accumulated in conjunction with a GROUP BY clause, the aggregate nodes appear between the group break and group nodes. |
| Handles accumulating aggregates when no GROUP BY clause is present. |
| Handles data retrieval from a single subquery of the main query. This node never appears when you view the root query plan, only when you view a subquery. |
| Handles creation of temporary tables and data retrieval from temporary tables. References to the base table under this node are changed to reference columns of the temporary table. |
| Processes the UNION and UNION ALL operations. Cycles through the underlying query execution plans to retrieve data for the UNION result set. The Plan Viewer displays unions with the first query as the root query, the second query as Subquery 1, and so forth. |
Note If you change the aspect ratio of the Plan Viewer while resizing it, the aspect ratio of the node symbols change accordingly. Consequently, they do not always look identical to the examples in the table.
Node Details
If you double-click the following query plan nodes, a pop-up window appears, showing more detailed information:
•Table
•Filter
•Subquery
•Ordered temporary table
Double-clicking the other nodes provides no detailed information for them. When you mouse over a node with additional available details, the cursor changes to a hand.
The following table explains the type of detailed information displayed.
Node Type | Detailed Information |
Table | •Name of table •Total rows in table •Estimated number of rows to be read •Range information. Range information is used only when the base table is on the right side of a JOIN and the retrieval of data from the table can be optimized through the use of an index. Range information includes: •Column or columns retrieved •Value used to initiate range retrieval (the value normally comes from another table and column) and the value to terminate retrieval •Initial operations to perform, such as greater than (GT), greater than or equal to (GE), less than (LT), and so forth •Method of comparison to determine when to stop (GT, GE, and so forth) |
Filter (Normal) | Text representation of conditions used to evaluate row. If present, wide character data is displayed correctly. |
Filter (Range) | •Information about index used •How filter is reducing set of rows returned •Type of first read from table (GT, GE, and so forth) •Condition that must evaluate to TRUE to stop reading more records (GT, GE, and so forth) |
Subquery | Type of subquery and optimizations being performed for subquery |
Ordered temp table | •List of columns included in the temporary table •Column indication of whether column is used to order rows of the temporary table (a key) or is a value to pass up the tree |
The Plan Viewer also contains menu commands to view the plan at different zoom levels and to display subqueries, if any.
Query Plan Viewer Tasks
This section discusses the following tasks:
►To create a query plan
1 Execute SET QRYPLAN = on to turn on the creation of a query plan.
2 Execute the SET QRYPLANOUTPUT statement and specify the location and name of the query plan file.
3 Execute a SQL SELECT, INSERT, UPDATE, or DELETE statement (which creates its corresponding query plan).
4 Execute SET QRYPLAN = off to turn off the creation of query plans.
►To start Query Plan Viewer
1 Do one of the following actions:
•In PSQL Control Center, click Tools > Query Plan Viewer.
•Execute the file w3sqlqpv.exe located in the PSQL\Bin directory.
►To view a query plan
1 In the Query Viewer, click File > Open.
2 Navigate to the location of the desired query plan file, then select the file and click Open.
The title bar of the Query Viewer informs you how many query plans are open and which plan you are viewing.
3 If you have more than one query plan open, use the View menu commands to navigate among the plans:
•First or Ctrl + F. Displays the earliest loaded query plan.
•Last or Ctrl + L. Displays the latest loaded query plan.
•Next or Ctrl + N. Displays the next latest query plan.
•Prev(ious) or Ctrl + P. Displays the next earliest query plan.
•Goto or Ctrl + G. Displays the query plan based on the ordinal number of the loaded plans.
►To export a query plan to an XML file
1 In the Query Viewer, click File > Export XML.
2 Navigate to the location of the desired query plan XML file, click the file then click Open.
Note You can specify the name of a new XML file in the same dialog box.
Tip The Export XML menu item is enabled only if the query plan is loaded into the viewer.
The following table explains the schema of an XML file derived from a SQL query.
Element and Attributes | Explanation | Parent Element | Child Elements |
<QPF filename=filename> filename: path and name of QPF file | QPF file on which XML file is based; one per XML file | Header Information | <Query> |
<Query number=number> number: query number displayed in Query Plan Viewer; first is 1, second is 2, and so forth. | Query in the <QPF> file; at least one per XML file | <QPF> | <SQL> <TreeRoot> |
<SQL> | SQL statement used to generate plan. If your SQL scripts declare a Unicode character string literal prefixed with an uppercase “N,” the prefix appears in the <SQL> element. See also child
<Properties> for <Filter>. | <Query> | |
<TreeRoot name=name> name: Root Query or Subquery X | Indicates root query or subquery | <Query> | All Node Elements: <Join> <Filter> <Base> <Distinct> <Set> <FCalc> <Group> <GroupBreak> <OrderedTempTable> <Union> <Subquery> |
Node Elements | Each is a node in the query plan tree (a part of the SQL statement) | <TreeRoot> or the <Child>, <LeftChild>, or <RightChild> of another node element | |
<Join> | | <TreeRoot> | <Text> <Properties> <LeftChild> <RightChild> |
<Filter> | If your SQL scripts declare a Unicode character string literal prefixed with an uppercase “N,” the prefix does not appear in the <Properties> child element. See also
<SQL>. | <TreeRoot> | <Text> <Properties> <Child> |
<Base> | Represents a leaf in diagram tree | <TreeRoot> | <Text> <Properties> |
<Distinct> | | <TreeRoot> | <Properties> <Child> |
<Set> | | <TreeRoot> | <Text> <Properties> <SetString> <Child> |
<FCalc> | | <TreeRoot> | <Properties> <LeftChild> <RightChild> |
<Group> | | <TreeRoot> | <Properties> <Child> |
<GroupBreak> | | <TreeRoot> | <Properties> <Child> |
<OrderedTempTable> | | <TreeRoot> | <Properties> <Child> |
<Union> | | <TreeRoot> | <Properties> <Child> |
<Subquery> | | <TreeRoot> | <Properties> <Child> |
Node Element Children | Varies; provide additional information about node or link to child of node tag | Varies | |
<Text> | | <Join> <Filter> <Set> Optionally, <Base> | |
<Properties> | | All node elements | |
<SetString> | | <Set> | |
<Child> | | <Filter> <Distinct> <Set> <Group> <GroupBreak> <OrderedTempTable> <Union> <Subquery> | |
<LeftChild > | | <Join> <FCalc> | |
<RightChild> | | <Join> optionally, <FCalc> | |
►To adjust the display size of a query plan in the Plan Viewer
Click View then a desired sizing command:
•Autofit. Sizes the query plan so that the entire plan is viewable in the Plan Viewer. The view resizes if you resize the window. Autofit is the default when you view a query plan.
•100%, 50%, or 25%. Sizes the query plan to the specified percentage.
•Percent. Sizes the query plan to the percent you specify.
•Zoom In (-) or Zoom Out (+). Enlarges the size of the query plan (zoom in) or reduces the size of the query plan (zoom out). You can zoom between 5% and 500%.
►To scroll through a query plan in the Plan Viewer
Click View then a desired scroll command:
•Scroll Right or Right Arrow. Scrolls toward the right side of the pane.
•Scroll Left or Left Arrow. Scrolls toward the left side of the pane.
•Scroll Up or Up Arrow. Scrolls toward the top of the pane.
•Scroll Down or Down Arrow. Scrolls toward the bottom of the pane.
►To reload a changed query plan
In the Query Viewer, click File > Refresh.
This re-reads the currently loaded query plan file.
►To view details of a query plan node
In the Plan Viewer, double-click one of the following nodes:
•Table
•Filter
•Subquery
•Ordered temporary table
►To view a subquery on a query plan
In the Plan Viewer, click Subquery then the number of the subquery (the first subquery in the main query corresponds to Subquery 1, the second subquery corresponds to Subquery 2 and so forth). A query plan can contain any number of subqueries, or none. All subqueries for a query plan appear on the Subquery menu. When you select a subquery, its name appears in parentheses in the Plan Viewer title.
Examining Query Plans and Evaluating Query Performance
Query Plan Viewer is particularly useful in the development stage of a project for you to test your queries and see how the database engine executes them. You can prepare each of your queries, generate a query plan file and then examine each plan. Based on the information for each query, you can add or remove indexes and then see the affect of the changes. You can also modify the queries to see if a change in the syntax of the statement affects its performance.
Creating Example Query Plans for Comparison
As an example, you can demonstrate the use of Query Plan Viewer using the following steps and a few tables from the Demodata database sample database provided with PSQL.
For comparison, you will delete an index from the Enrolls table, execute a query and create a query plan file, add the index back to Enrolls, then execute the query again and create a comparison query plan file.
1 In PSQL Control Center (PCC), execute the SQL statements to turn on the creation of a query plan and specify the following name of the query plan file:
example1.qpf. See
Query Plan Settings.
2 In PCC, execute the following query for the Demodata database:
DROP INDEX Enrolls.ClassID
Since Demodata is optimized when installed, you need to drop the index from the Class_ID column of the Enrolls table.
3 In PCC, execute the following query for the Demodata database:
SELECT Student.ID, Class.Name, Course.Credit_Hours FROM Student, Enrolls, Class, Course WHERE Student.ID = Enrolls.Student_Id AND Enrolls.Class_ID = Class.ID AND Class.Name = Course.Name
This query retrieves all enrolled students, the classes in which they are enrolled, and the credit hours for each course.
4 In PCC, specify the following name of the query plan file:
example2.qpf. See
Query Plan Settings.
5 In PCC, execute the following query for the Demodata database:
CREATE INDEX ClassID ON Enrolls(Class_ID)
6 In PCC, execute the following query for the Demodata database:
SELECT Student.ID, Class.Name, Course.Credit_Hours FROM Student, Enrolls, Class, Course WHERE Student.ID = Enrolls.Student_Id AND Enrolls.Class_ID = Class.ID AND Class.Name = Course.Name
Notice that the query runs faster.
Viewing the Example Query Plans
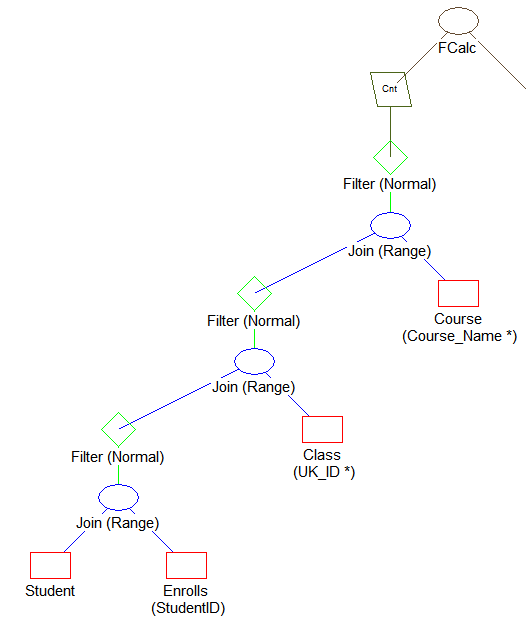
In Query Plan Viewer, use File > Open to open example1.qpf (). You should see something like the following:
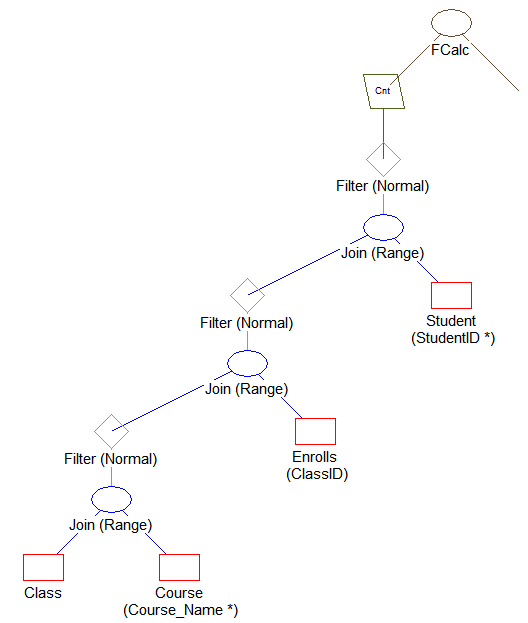
For comparison, open example2.qpf in Query Plan Viewer. You should see something like the following:
Note the following about this plan:
•Records are scanned from the Course table.
•Records are retrieved from the Class table based on the Course.Name value using the Class.Name index.
•Records are retrieved from the Enrolls table based on the Class.ID value scanning through the Enrolls table.
•Records are retrieved from the Student table based on the Enrolls.Student_Id using the Student.ID index.
•The selection of data from Enrolls uses the newly created index ClassID.
In a similar manner to this example, you can compare your own queries to determine which syntax and structure is right for your needs.