Using PSQL
A Walk-through of Basic User Tasks
The following topics cover basic tasks in working with PSQL databases:
Starting and Stopping the Database Engine
These topics cover stopping and starting the PSQL engine. When you change certain engine settings, you need to stop and restart the them to take effect. Choose the steps for your engine and platform:
Starting and Stopping the Server Engine on a Windows Server
On Windows server environments, PSQL Server runs as services. The services are loaded as part of the installation process and are set to be always available if you followed the default installation.
Services Dependencies
Additional PSQL products such as DataExchange also install services. DataExchange depends on both PSQL Transactional Engine and PSQL Relational Engine services.
The following table summarizes the behavior of the dependent services for start, stop, and restart actions of the database engine services. Note that behavior of the dependent services is the same regardless which application is used (PCC, Windows Services, Net Start, PSC).
Database Engine Service | Start | Stop | Restart | Service Action for Data Exchange |
PSQL Transactional Engine | | | | No action |
| | | Stop |
| | | Restart |
PSQL Relational Engine | | | | No action |
| | | Stop |
| | | Restart |
If you start the service for DataExchange, the PSQL Relational Engine starts as a prerequisite service.
Dependent services stop without displaying a message that they will be stopped.
►To start the database services on a Windows server using PCC
►To stop the database services on a Windows server using PCC
►To start the database services on a Windows server using Control Panel
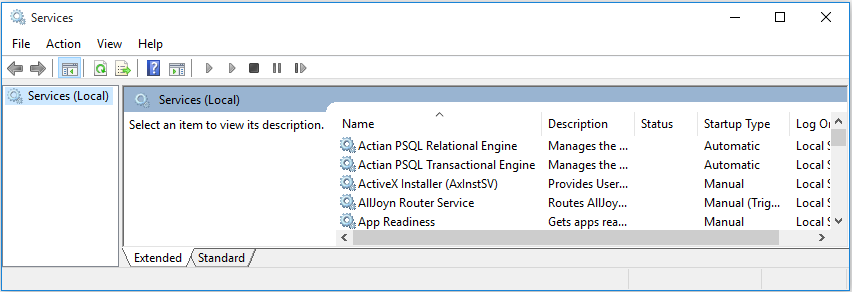
1 In the Windows Control Panel, double-click Administrative Tools then double-click Services.
A dialog box similar to the following appears. The Status column shows the services are not running.
2 Right-click Actian PSQL Relational Engine and select Start, or click it and select the Start link to the left. Do the same for Actian PSQL Transactional Engine.
►To stop the database services on a Windows server using Control Panel
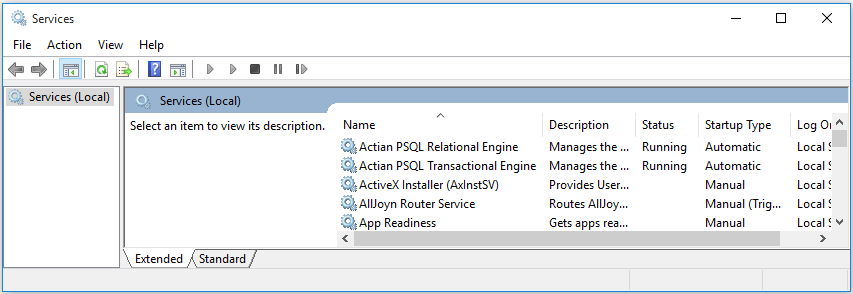
1 In the Windows Control Panel, double-click Administrative Tools then double-click Services.
A dialog box similar to the following appears. The Status column shows the services are running.
2 Right-click Actian PSQL Relational Engine and select Stop, or click it and select the Stop link to the left. Do the same for Actian PSQL Transactional Engine.
►To start the database services on a Windows server by using Net Start or PSC
1 At a prompt, run one of the following commands:
•net start "Pervasive.SQL (<transactional | relational>)"
•psc start "Pervasive.SQL (<transactional | relational>)"
►To stop the database services on a Windows server by using Net Stop or PSC
1 At a prompt, run one of the following commands:
•net stop "Pervasive.SQL (<transactional | relational>)"
•psc stop "Pervasive.SQL (<transactional | relational>)"
Starting and Stopping the Workgroup Engine on Windows
►To start the Workgroup Engine as an application on Windows
This step assumes that the Workgroup Engine was installed as an application. For more information see
Installing PSQL Workgroup for Windows in
Getting Started with PSQL.
1 Click Start Workgroup Engine from the operating system Start menu or Apps screen.
►To stop the Workgroup Engine as an application on Windows
This step assumes that the Workgroup Engine was installed as an application. For more information see
Installing PSQL Workgroup for Windows in
Getting Started with PSQL.
1 Click Stop Workgroup Engine from the operating system Start menu or Apps screen.
A warning message appears when you try to stop the engine if any of the following is true:
•There are active clients.
•No activity has taken place since the engine loaded.
•Less than 10 seconds has elapsed since the last operation took place.
►To start the Workgroup Engine as a service on Windows
These steps assume that the Workgroup Engine was installed as a service, the installation default. For more information see
Installing PSQL Workgroup for Windows in
Getting Started with PSQL.
2 Substitute “PSQL Workgroup Engine” as the service name if you use Windows Services control panel. Substitute “psqlWGE” as the service name if you use net start or psc.
►To stop the Workgroup Engine as a service on Windows
These steps assume that the Workgroup Engine was installed as a service, the installation default. For more information see
Installing PSQL Workgroup for Windows in
Getting Started with PSQL.
2 Substitute “PSQL Workgroup Engine” as the service name if you use Windows Services control panel. Substitute “psqlWGE” as the service name if you use net start or psc.
Starting and Stopping the Database Engine on Linux, macOS, and Raspbian
On Linux, macOS, and Raspbian, the database engine runs as a daemon. The daemon is loaded as part of the installation process and is set to be always available if you used the complete installation.
You must be logged in as the root user to start and stop the PSQL daemon process. Use the shell script psql as shown in the following examples.
►To start the database engine
At a command prompt, enter the following according to your type of system.
Linux and Raspbian
/etc/init.d/psql start
macOS
/usr/local/psql/etc/init.d/psql start
For PSQL 64-bit Server, this command starts both the transactional and relational engines.
►To stop the database engine
At a command prompt, enter the following according to your type of system.
Linux and Raspbian
/etc/init.d/psql stop
macOS
/usr/local/psql/etc/init.d/psql stop
For PSQL 64-bit Server, this command stops both the transactional and relational engines.
►To force stop the database engine
If the database engine does not start or stop correctly using these start and stop commands, you may need to force stop the engine. A force stop removes any shared memory and semaphores created by PSQL and stops the relational and transactional processes.
At a command prompt, enter the following according to your type of system.
Linux and Raspbian
/etc/init.d/psql force
macOS
/usr/local/psql/etc/init.d/psql force
Verifying That the Database Engine is Running from a Remote PowerShell Session
On Windows server environments, PSQL Server runs as services, which are loaded as part of the installation and set to be always available if you follow the default installation. After installation, you can verify that the database engine is running by using the PowerShell Get-Service command remotely from another machine. After establishing a trusted connection and opening a remote session, enter the following at a PowerShell command prompt:
Get-Service -DisplayName "Actian PSQL*"
If the engine is running, this command returns the following:
Status Name DisplayName
------ ---- -----------
Running Pervasive.SQL (... Actian PSQL Relational Engine
Running Pervasive.SQL (... Actian PSQL Transactional Engine
Starting and Stopping the Database Engine on Windows IoT Core or Nano Server
If the relational or transactional engine is stopped, you can use the following commands to manually start them, which must be run in the order given here:
Start-Service -DisplayName "Actian PSQL Transactional Engine"
Start-Service -DisplayName "Actian PSQL Relational Engine"
The engine services start automatically with the operating system. If you need to stop them, use the following command:
Stop-Service -DisplayName "Actian PSQL*"
After running this command, the Get-Service command returns the following:
Status Name DisplayName
------ ---- -----------
Stopped Pervasive.SQL (... Actian PSQL Relational Engine
Stopped Pervasive.SQL (... Actian PSQL Transactional Engine
Granting Administrative Rights for the Database Engine
This topic begins by outlining those PSQL tasks that require administrative-level access at the operating system level and those that do not. It then walks you through the steps to grant a user administrative-level access for each of the supported operating systems.
Note This information applies only to Server and Client Reporting engines unless otherwise noted.
Tasks Requiring Administrative Rights
Administrative-level rights are required to perform the following tasks:
•Create and configure named databases and tables
•View or modify a table design with Table Editor
•Set engine configuration options
•View and set engine monitoring values
•View certain engine configuration settings
•Restart the engine when running as a service
How Administrative Rights are Granted
To have administrator-level access you must either:
•Possess full administrator-level rights on the machine on which the database engine is running (a domain administrator, for example, may lack full permissions on certain local machines)
or
•Be a member of the operating system group Pervasive_Admin.
To modify a table design with Table Editor, you must have full administrator rights on the machine on which the database engine is running even if you are a member of the Pervasive_Admin group.
Note For Linux and macOS servers, administrator-level rights can be granted only by using the
btadmin utility to add users and passwords to the btpasswd file.
The Pervasive_Admin option is offered so that you can grant users administrative rights to the database engine without granting them administrative rights to the operating system where the database engine resides.
Rights Within an Active Directory Environment
You may use one or more Pervasive_Admin groups within an Active Directory environment. See
Active Directory Service in
Getting Started with PSQL.
Rights Provided to Non-Administrative Users
Run-time-only access enables a user without administrator-level rights to perform the following tasks:
•Extract a list of DSNs
•Extract a count of DSNs
•Extract information on a DSN
•Extract information on the location of the DBnames configuration file (dbnames.cfg)
•Connect to databases
•Retrieve, update, insert, and delete data (as permitted by database security)
Tasks for Granting Administrative Rights
To grant a user administrative rights, follow the instructions for your platform:
Granting Administrative Rights on a Windows Server
Users who are members of Pervasive_Admin or of Administrators are permitted to perform administrative tasks on the database engine.
►To grant a user database administrator rights on a Windows 32-bit Server Platform
Note You must be logged onto the Windows server as a user with full administrator-level rights on the server or be a member of the Pervasive_Admin group defined on the server.
1 In the Windows Control Panel, double-click Users and Passwords.
2 Click the Advanced tab. In the Advanced User Management area, click Advanced.
3 Click the Groups folder. From the menu, click Action > New Group.
4 Type in Pervasive_Admin as the group name.
(To add users to this group, click Add, select user name, click Add then OK.)
5 Click Create to create the group.
6 Click Close.
Services Settings and Log In Authority
Certain operating system settings for the PSQL services must be in effect for you to log in to the machine running the database engine. These settings apply whether or not you use a Pervasive_Admin user group.
The settings apply to the PSQL Server Engine and to the Workgroup Engine if you are running the Workgroup Engine as a service. If you are running Workgroup Engine as an application and want to change it to run as a service, see
Running the Workgroup Engine as a Service in
Getting Started with PSQL.
Default Setting
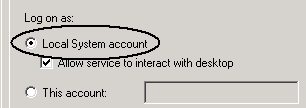
By default installation, both the Transactional and Relational services set Log on to Local System Account.
Logging On as “This Account”
If you change the Log on as setting to This account, you must change the user rights policy Act as part of the operating system for the account. Otherwise, remote login fails.
For example, the Monitoring utility requires that you log in to the operating system on the machine where the database engine is running. You will receive a message that login failed if the account specified for This account cannot act as part of the operating system.
Note that even the Administrator account requires that you set the user rights policy for Act as part of the operating system.
You specify This account on the services property sheet.
User Rights Policy Tasks
The following tasks explain how to change the user rights policy.
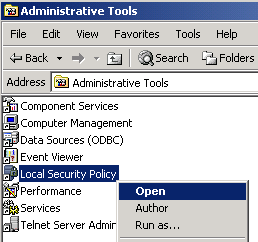
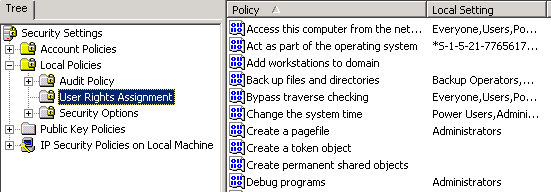
►To Set User Rights Policy on Windows 32-bit Platforms
1 Access the operating system Control Panel.
2 Double-click Administrative Tools.
3 Right-click Local Security Policy, then click Open.
4 Expand the tree for Local Policies, and click User Rights Assignment.
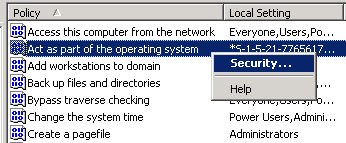
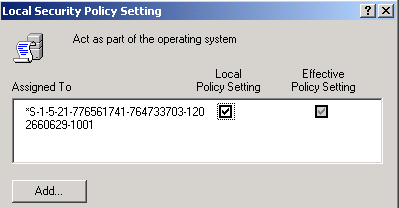
5 In the policy pane, right-click Act as part of the operating system, then click Security.
6 Click Add.
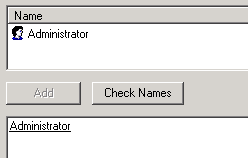
7 In the Name pane, click the user or group for whose account you want to grant the user policy. (For example, you could grant the policy to the Pervasive_Admin group.)
8 Click Add.
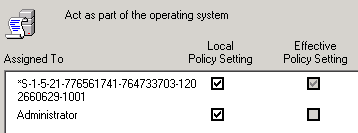
The user name is added to the bottom pane. For example, the following illustration shows that the Administrator has been added.
9 Click OK.
The user name is added to the settings for local security policy.
10 Click OK.
11 Exit the window for Local Security Settings, then exit Administrative Tools.
Granting Administrator Rights on Linux and macOS
►To grant a user administrator rights
A user cannot remotely administer a server engine unless that user has first been set up as a database user with administrative rights. You can perform this task by using the btadmin utility at the server command line.
See also
PSQL Account Management on Linux, macOS, and Raspbian in
Getting Started with PSQL for a complete discussion of configuring the environment for administrative rights.
1 Log in to the server as psql or as root if the variables for PATH and LD_LIBRARY_PATH, or DYLD_LIBRARY_PATH on macOS, have been set and exported. No other user is permitted to run btadmin.
2 Create a new user with administrative rights by running btadmin:
btadmin -p passwd a+ user_name
For example, if you wanted to create an administrative user tim with password tim56, you would enter the following command:
btadmin -p tim56 a+ tim
Note Users created with btadmin are not related to Linux or macOS system users. These users are known only to the database engine.
Logging in as Administrator on Any Platform
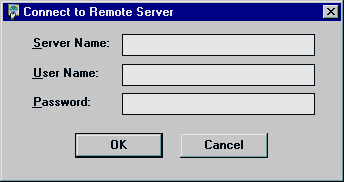
►To connect to a remote PSQL server
1 Use the Monitor utility to connect to a remote server. See Advanced Operations Guide for details on this utility.
2 Enter your operating system user name and password, and click OK.
Figure 1 Connect to Remote Server Dialog Box
The password is encrypted before being sent over the network using a unique and predefined internal encryption key. The PSQL engine decrypts the user name and password, and verifies access. It then returns a status code to the client indicating the success or failure of the verification.
Setting Up ODBC Database Access
This topic reviews some conceptual information on setting up ODBC access to your database.
Topics covered include the following basic concepts:
Note The PSQL Java utilities do not require DSNs. The PSQL Control Center, for example, uses JDBC not ODBC. DSNs are required only if your application uses ODBC to access the database.
ODBC Standard
PSQL adheres to the Microsoft standard for ODBC database connections. According to the standard, applications using ODBC must connect to databases through data source names (DSNs) defined in the operating system.
Note PSQL does not support File DSNs. You must use user or system DSNs. System DSNs are generally preferred, because they are available to all users on a given computer.
Every PSQL database that you expect to access using an ODBC application must have a DSN that identifies the database. A DSN that points to the PSQL database engine is called an Engine DSN. Engine DSNs are 32-bit only and are deprecated. A 32-bit DSN that points to an Engine DSN or to a named database is called a Client DSN. A DSN on a 64-bit operating system is simply referred to as a 64-bit DSN, without designation of Engine or Client.
New or revised 32-bit applications, local or remote, should connect to a named database instead of using Engine DSNs. Alternately, applications could use DSN-less connections by specifying the PSQL ODBC driver name (see
PSQL ODBC Driver Names in
ODBC Guide). Avoiding the use of Engine DSNs positions your application for the future when Engine DSNs will no longer be supported in PSQL.
Windows 64-bit operating systems contain two different executable files for ODBC Administrator, one for 32-bit DSNs and one for 64-bit DSNs. Each ODBC Administrator lists the system DSNs that only match its bitness. For the 64-bit PSQL Server or Workgroup, PCC contains separate options in the Tools menu to start the 32-bit or the 64-bit ODBC Administrator. If an ODBC Administrator is already open, Windows defaults to it. That is, if the 32-bit ODBC Administrator is open and you attempt to start the 64-bit one, Windows displays the 32-bit version (and vice versa). This is a limitation of the Windows operating system, not PSQL.
Figures
2 shows examples of possible DSN configurations.
Figure 2 Example DSN Configurations
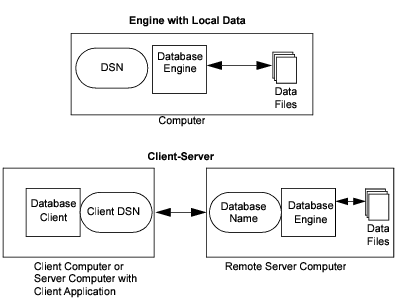
Servers and Clients
PSQL servers are also clients. The client components of PSQL are installed with every Server engine or Workgroup engine. So you can use your server machine to connect to other servers as a client. PSQL clients can connect to remote machines where a PSQL Server engine is installed.
Data Source Names
The ODBC client-server architecture calls for the naming of each specific data set so that it can be referred to by a well-known name. There are generally three ways to create DSNs:
1 Create a DSN from the server console.
2 Create a DSN remotely from a client machine.
3 Create a Client DSN on each client machine.
While PSQL tools can access remote databases without a client DSN present on the client machine, ODBC-based applications such as Microsoft Excel and Microsoft Access cannot do so. You must create a client DSN on each client computer that needs to access network databases from local ODBC applications.
Internal Database Name
The method used by PSQL to identify a database is an internal Database Name (DBNAME). If you are using ODBC to access the database, you need to create a data source name (DSN) entry that refers to one DBNAME. You may set up more than one DSN that refers to the same DBNAME. If the physical location of the data files on the server is changed, only the DBNAME needs to be updated. All DSNs remain unchanged.
Applications Using the MicroKernel Engine
PSQL databases that are accessed only through the MicroKernel Engine do not need DSNs. However, the database tables are not visible in PCC nor can they be manipulated using PCC. To view table data with PCC in readable form, the table must be defined in the data dictionary files (DDFs). See DDF Builder User’s Guide.
Also, databases created with the PSQL Java utilities do not require DSNs. The PSQL Control Center, for example, uses JDBC not ODBC.
Setting Up Database Access with PCC
You must know the name of the server where the database is located. If the database already has a DBNAME, PCC uses it. If you wish to create a new database but use existing data files, you must know the location of the data files on the server.
To create up a DSN on a remote machine, you must possess administrator rights on the remote machine that houses the database you wish to access. You must have operating system rights to create a System DSN on the local machine.
Setting Up Database Access on Windows
►To set up database access on Windows
Existing databases with a DBNAME on the registered server can then be accessed from PCC.
The new database can then be accessed from PCC.
►To set up ODBC database access on Windows
Existing databases with a DBNAME and a DSN on the registered server can then be accessed from PCC.
2 Optionally, follow the steps listed in
To create a new database and ensure that the
Create 32-bit Engine DSN option is selected.
By default, PCC creates a 32-bit system DSN with the same name as the database name. The new database has a DSN associated with it and can be accessed through ODBC.
►To set up Engine DSNs using ODBC Administrator
Note that the ODBC Interface GUIs for 32-bit and 64-bit Windows operating systems are different. The one for 32-bit DSNs allows you to specify an Engine DSN. The 64-bit interface driver supports only named databases. The 64-bit Client Interface can connect to a local named database, thus replacing the function of the Engine DSN, or to a remote named database. Connection to an Engine DSN is not supported.
Note Because 32-bit Engine DSNs have been deprecated, Actian Corporation recommends that new or revised 32-bit applications connect to a named database through a Client DSN or use a DSN-less connection by specifying “Pervasive ODBC Client Interface.” See
To set up a Client DSN using ODBC Administrator.
1 In PCC, click Tools then ODBC Administrator.
2 Click the System DSN tab, then Add.
3 In the list, click Pervasive ODBC Engine Interface.
4 Click Finish.
5 In the ODBC engine interface dialog, enter a Data Source Name.
6 For Database Name, select in the list for which you want to create the engine DSN.
7 Click Advanced if you want to specify advanced connection attributes.
8 Click OK.
9 Click OK.
Setting Up Database Access on a Linux or macOS Server
►To set up a named database
Database names are created in Linux and macOS by using the dbmaint utility at the server. For a complete description of dbmaint, see
dbmaint or read the dbmaint man page.
1 To create an empty database, use the following at the command prompt:
dbmaint a | d | l [-b] [-i] [-e] -nDbname [-ldictpath] [-ddatapath]
The list of commands for dbmaint include:
a – Add database name
d – Delete database name
l – List all database names
Options include:
-b – Create bound database
-i – Create database with relational integrity enforced
-e – Do not create dictionary files for database
-nDBName – Set database name
-lDictpath – Set dictionary path
-dDatapath – Set data path
-a – Show all data in the DBNames list
For example, to create DBName TEST with relational integrity, enter:
dbmaint a -i -nTEST
Note Unless datapath is specified, the new database is created in the default location $PVSW_ROOT/data. Likewise, if dictpath is not specified, the dictionary is created in the default location.
•To delete an existing database, use the following at the command line:
dbmaint d -nDbname
For example, to delete the newly created database TEST, enter:
dbmaint d -nTEST
•To list all existing databases:
dbmaint l [-a]
2 Set up DSNs using the dsnadd utility. See
dsnadd.
Setting Up Client Access from a Windows Client
►To enable client access to a remote PSQL database
1 Access Control Center from the operating system Start menu or Apps screen.
2 In the PSQL Explorer pane, right-click Engines and select New > Server.
The PSQL Explorer pane is the column on the left side of the window that contains a list of machines to which you are connected.
Note The machines listed in your PSQL Explorer will remain between sessions. To remove a machine, right-click the machine name and select Delete.
3 Enter the Server name where the PSQL database engine resides.
You need to be authenticated on the remote engine, and a dialog displays prompting you for a user name and password.
4 Enter the user name and password in the appropriate fields and click OK.
You are now connected to the remote PSQL engine.
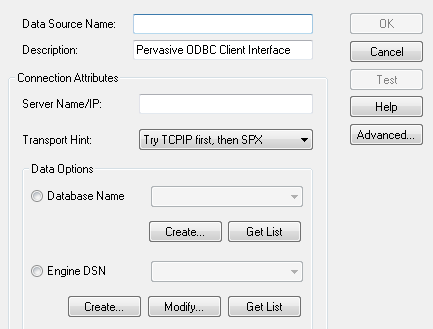
►To set up a Client DSN using ODBC Administrator
1 In PCC, click Tools and select ODBC Administrator.
Note Windows 64-bit operating systems contain two different executable files for ODBC Administrator, one for 32-bit DSNs and one for 64-bit DSNs. Each ODBC Administrator lists only the system DSNs that match its bitness. For the 64-bit PSQL Server or Workgroup, PCC contains separate options in the Tools menu to start the 32-bit or the 64-bit ODBC Administrator. If an ODBC Administrator is already open, Windows defaults to it. That is, if the 32-bit ODBC Administrator is open and you attempt to start the 64-bit one, Windows displays the 32-bit version (and vice versa). This is a limitation of the Windows operating system rather than PSQL.
2 Select the System DSN tab and click Add.
Note PSQL does not support File DSNs. You must use user or system DSNs. System DSNs are generally preferred, because they are available to all users on a given computer.
3 In the Drivers window, select Pervasive ODBC Client Interface for a 32-bit DSN or Pervasive ODBC Interface for a 64-bit DSN.
4 Specify a Data Source Name (DSN) for which you want to set up a connection. This DSN helps you identify the data source.
Figure 3 Pervasive ODBC Interface for Client DSNs
Note that for the 64-bit setup, the Engines DSN option is not available and is not present on the GUI.
5 For Server Name/IP, specify a machine name or TCP/IP address of a machine running the PSQL database engine.
6 Select the Transport Hint desired.
7 Specify a Database Name to which to connect. Click Get List to obtain a list of the existing databases on the server listed for Server Name/IP.
For 32-bit DSNs only, you may specify an Engine DSN instead of a database name. (Note that Engine DSNs are deprecated, so it is preferable to specify a database name rather than an Engine DSN.) Click Get List to obtain a list of the existing DSNs on the server listed for Server Name/IP. Click Modify to modify an existing DSN, or Create to create a new DSN.
8 If you want advanced connection attributes, click Advanced and make your selections in the dialog box that appears.
Figure 4 Advanced Connection Attributes for Client DSNs
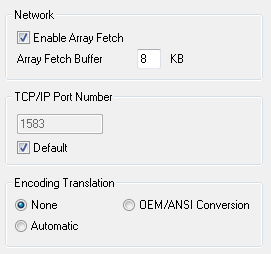
See
Advanced Connection Attributes in
ODBC Guide for details about the attributes. Do not modify the
Network or
TCP/IP Port Number attributes unless you first review the information for them.
Click OK to accept the attribute selections and to return to the ODBC interface dialog.
9 Click OK.
10 You can now set up another DSN or exit the ODBC Administrator.
Setting Up a Client DSN on a Linux or macOS Client
Use the dsnadd utility. See
dsnadd.
Accessing Data on a Remote Engine Using PCC
You can use PCC to access a PSQL engine and its data on a remote system. The remote system can be any PSQL Server accessible on your network. This method may be particularly useful for accessing engines running in Windows Nano Server and IoT Core environments.
Tip You must log in as an administrative user on the remote engine to perform most functions. This means that you must have full administrator-level rights on the remote server or be a member of the Pervasive_Admin group defined on the remote machine.
►To access data on a remote PSQL engine
The following example shows the use of PCC to view and work with data on a remote engine.
1 In the PCC, expand the Engines node and select the remote engine, then double-click Databases to expand it.
2 Under Databases, double-click DEMODATA, then double-click Tables.
3 Under Tables, double-click the Dept table.
By default, results of a SELECT * FROM query are displayed in an active grid as shown in Figure
5.
Data displayed in the grid is updatable. Changes made in the grid are stored in the database.
Figure 5 Displaying the Dept Table in Demodata

4 Refine the query to restrict the results to only departments that start with the letter M by altering the query at the top half of the screen with the following statement:
SELECT * FROM Dept WHERE Name LIKE 'M%'
5 Click the
Execute in Grid toolbar button or press F9 to display the results of the revised query shown in Figure
6.
Figure 6 Refining Your Query - Dept Table in Demodata
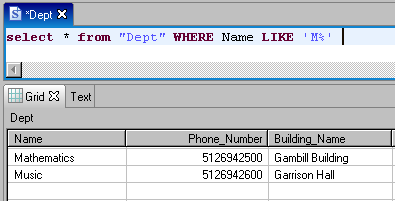
You have now obtained data from the remote database engine.
For information on advanced operating and maintenance tasks, including database operations, see Advanced Operations Guide.
Accessing Data via ODBC from Other Applications
This section explains how to access data using Microsoft Access and Microsoft Excel.
The examples covered in this section are:
Before You Begin
Does the Database Have a DSN Available?
•If you are connecting from a client workstation or from a Workgroup workstation to a server, you must have a Client DSN defined on your workstation for the given remote database. Information on how to create a Client DSN is provided in
Setting Up Client Access from a Windows Client.
•If you have a Workgroup engine installed on your computer, you may have a DSN defined on your computer for either local or remote databases. Information on how to create a DSN is provided in
Setting Up Database Access on Windows.
Note The instructions here apply only to PSQL v12 and later versions.
Accessing Data Using Microsoft Excel
►To access PSQL data using Excel
Tip You must have the PSQL client or any version of the PSQL engine installed on the computer where you are using Excel.
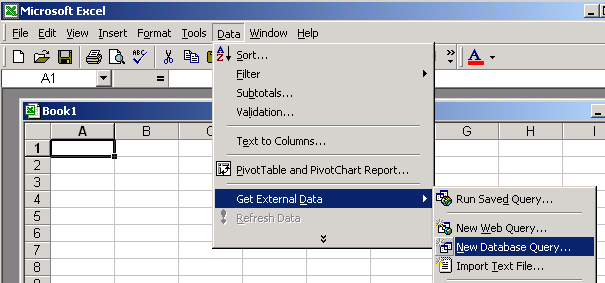
1 Start Excel.
2 From the Data menu, choose:
Get External Data > New Database Query as shown below.
Figure 7 Accessing PSQL Data using Microsoft Excel
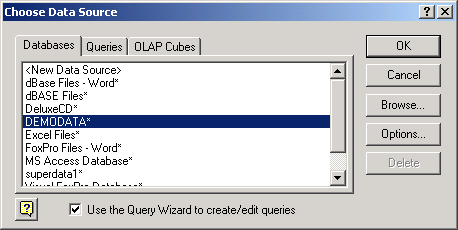
3 The Choose Data Source box lists the defined data sources for any ODBC drivers that are installed on your computer. From this list, click the Client or Server DSN for the PSQL database you wish to access, as shown in the example below.
Figure 8 Excel Display of ODBC Source List
If the database you want does not appear in the ODBC Source list, see
Before You Begin.
4 Click OK. You may be prompted to log in to the PSQL database. If the database is not secure, leave the User and Password fields empty. Otherwise enter your assigned user name and password.
5 The Query Wizard opens. Simply follow the wizard to select your options such as which tables to query, how to filter and sort the data, and how you would like Excel to return the PSQL data to you for your use.
Accessing Data Using Microsoft Access
►To access data from Microsoft Access
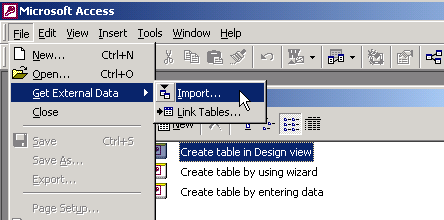
1 Open Microsoft Access.
2 From the Access dialog box, choose Blank Access database as shown below. Click OK. (Note that you may also add PSQL tables to an existing Access database.)
Figure 9 Create a New Database using Microsoft Access
3 Next, the File New Database dialog box opens and asks you to name the new database. Name the database and click Create.
4 From the Access menu, choose:
File > Get External Data > Link Tables.
Note You have the option to Import data or Link Tables to the new database. When you choose Import, you break the link to the ODBC data source immediately following the import procedure. Essentially, Import creates a static copy of the data. When you choose Link Tables, Microsoft Access keeps the connection open and remains dependent upon the ODBC data source each time the data is accessed. This way, the data you see reflects any changes to the data at its source.
Note If you wish to link to a file on a local area network, make sure to use a universal naming convention (UNC) path, instead of relying on the drive letter of a mapped network drive in Windows Explorer. A drive letter can vary on a computer or may not always be defined, whereas a UNC path is a reliable and consistent way for Microsoft Access to locate the data source that contains the linked table.
Figure 10 Importing External Data Using Access
5 In the Link dialog box, in the Files Of Type box, select ODBC Databases.
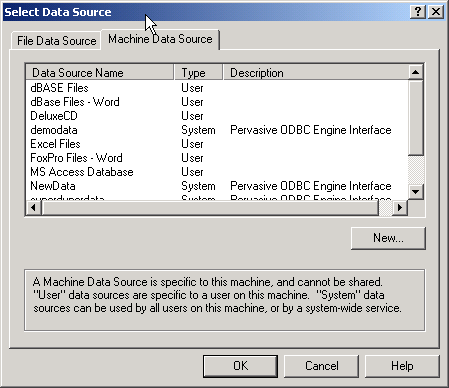
6 The Select Data Source box lists the defined data sources for any ODBC drivers that are installed on your computer. Click the Machine Data Source tab as shown in the next figure.
Figure 11 Access Display of ODBC Source List
7 Select the ODBC data source that you want to link. If the ODBC data source that you selected requires you to log on, enter your user name and password (additional information might also be required), and then click OK.
Note To define a new data source for any installed ODBC driver, click New, and then follow the instructions in the Create New Data Source dialog box and the dialog boxes that follow it before proceeding.
Tip If you are linking a table, select the Save The Login ID And Password check box to store the information for the table in the current database, so that users will not have to enter it each time. If you leave the check box cleared, all users must enter the login ID and password every time they open the table with Microsoft Access in each new session. Your network administrator can also choose to disable this check box, requiring all users to enter a user name and password each time they connect to the database.
If the database you want does not appear in the ODBC Source list, see
Before You Begin.
8 The Access Link Tables dialog box opens. Click each table that you want to import or link, and then click OK.
Note Microsoft Access cannot display more than 256 columns in a table. If you need to display more than 256 columns, you may wish to use a different tool.
Linking to your PSQL data is complete. As shown in the figure below, Access presents you with options for designing the new database. View the linked tables by double-clicking the table name.
Figure 12 Using PSQL Data in Microsoft Access
Note If you are linking a table and it does not have an index that uniquely identifies each record, then Microsoft Access displays a list of the fields in the linked table. Click a field or a combination of fields that will uniquely identify each record, and then click OK.
Deleting DSNs
The procedures in this topic do not delete Data Dictionary Files (DDFs) or data files.
By default, when you delete a database in the PSQL Control Center, the associated DSN entries are removed simultaneously.
►To toggle automatic removal of DSN entries when deleting a database in PCC
1 On the PCC Window menu, click Preferences. Expand the PSQL node if it is not already expanded.
2 Click General.
3 Clear the option Always remove associated DSN entries and click OK.
When you delete a database in PCC, you will be prompted by the
Confirm DSN Removal dialog before deleting it.
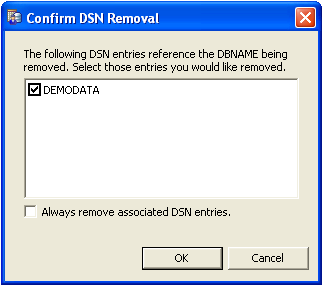
You can clear those DSNs that you do not want to delete.
4 You can turn on automatic removal of DSN entries at anytime by selecting Always remove associated DSN entries in:
•Confirm DSN Removal dialog
•General screen of the Preferences dialog.
►To Delete a DSN using ODBC Administrator (Windows platforms only)
1 In PCC, click Tools and select ODBC Administrator.
2 In the ODBC Administrator window, click the System DSN tab.
3 Select the DSN you wish to remove, and click Remove
You are prompted to confirm removal of the DSN.
4 Click Yes.
5 After the DSN has been removed, click OK to exit ODBC Administrator.
If you are simply deleting an unwanted DSN, you are finished. If you need to recreate the DSN, you should refer to one or more of the following sections:
If you need to do this | Refer to this section |
Recreate an Engine DSN on a Server engine or a Workgroup engine | One of: |
Recreate a Client DSN on a client workstation | |