|
1
|
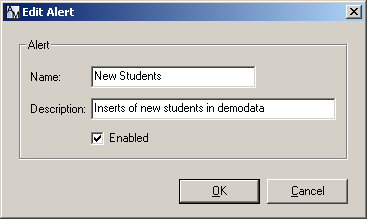
Select a alert from the Alerts window, and click the Edit button.
|
|
2
|
|
2
|
Click the Delete button.
|
|
3
|
Click Yes to confirm.
|
|
2
|

|
3
|
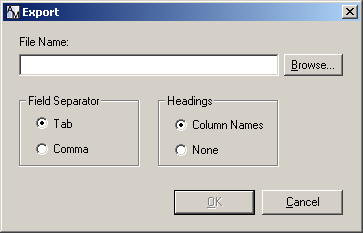
If you want to load and customize a saved report, click the Open Report File button and select the settings file for an existing report.
|
|
4
|
In the Report Title field, enter a name for this report.
|
You may select up to 30 columns. If you already selected a range of columns and rows, these are listed under Selected Columns. You may double-click other column names to move them to Selected Columns. Clicking Select All moves over all columns.
|
6
|
Select the Rows to Print.
|
|
w
|
All Rows. Click to select all rows of the columns you selected.
|
|
w
|
A Range of Rows. Click to define a range of rows and change the row numbers shown, which by default indicate the rows you highlighted in the audit record grid before you opened Report Builder.
|
|
w
|
Table Border. If you want the tables to have borders, select the border type from the drop-down list.
|
|
w
|
Print Page Numbers. Check the box beside the option to include the page number. Select whether to print the page number in the Left Footer or Left Header of the printout, as well as whether to include Date and Time.
|
|
w
|
Print Report Title. Select whether you want the report title to appear On Every Page or On the First Page Only.
|
|
w
|
Print Date and Time. Select if you want the date and time to appear in the footer of each printed report page.
|
|
8
|
When you are finished, click Print Preview.
|
|
9
|
From the File menu in the Report Print Preview window, you may do the following:
|
|
w
|
Select Save Report As to save the current report settings for future reuse.
|
|
w
|
Select Open Report to use the settings in a saved report.
|
|
w
|
Select Page Setup to adjust standard page settings.
|
|
w
|
Select Print Setup to adjust standard printer settings.
|
|
w
|
Select Print to print the report.
|
|
w
|
Select Exit to return to Report Builder.
|
|
2
|

|
w
|
In the Direction drop-down list, select a direction to start the search. These include, From Top row down, the Next row down, and the Previous row down.
|
|
w
|
In the Position drop-down list, select a search position. Select Anywhere or Beginning of cell, as appropriate.
|
|
w
|
To match upper and lower case spellings, select the Match Case checkbox.
|
|
w
|
To match the entire search string instead of just part of a cell, select the Match Entire String checkbox.
|
|
w
|
Select Entire Grid to search all columns.
|
|
w
|
Select Current Column to search only the column selected, which is indicated as a blue field in the yellow highlighted field that you have clicked. If this column is not the one you want to set as the current column to search, close the Search window, click the desired column, and search again.
|
|
w
|
Select Specific Column and select a column name from the drop-down list.
|
|
6
|
When you are ready, click Find Next.
|
|
3
|
|
5
|
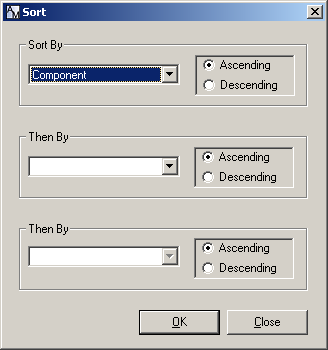
For example, if you are sorting by Time, to start the list with the most recent records, choose Descending.
|
6
|
To sort again using a second and third column, select from each Then By drop-down list, including Ascending or Descending.
|
|
7
|
Click OK.
|
|
2
|
|
5
|
|
|
||||||
Note For more information on database operations in a Pervasive security environment, see the security chapter in Pervasive PSQL Advanced Operations Guide.
|
Table 7-6
|
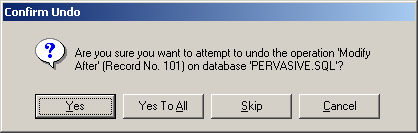
Note: Remote client logins do not support undo.
|
2
|
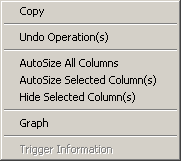
Select Undo Operation(s).
|
|
3
|
If you selected multiple records to undo, you may select Yes to All to attempt to undo all of them without further interaction, or use the Skip and Yes buttons to work through them one at a time.