Using PSQL Control Center
A Tour of PSQL Control Center
PSQL Control Center (PCC) is a graphical tool for creating and managing databases and controlling your database engine. It allows you to access nearly all the functions of the product from one place. The following topics lead you on a tour of PCC to learn its interface and common operations.
An Overview of PSQL Control Center
PSQL Control Center (PCC) is an integrated framework in which users can connect to PSQL engines, set up and modify databases and tables, query and update data, tune engine performance, and access the PSQL documentation library.
PCC uses a file explorer motif – a tree of objects – referred to as PSQL Explorer. This tree can be expanded to reveal detail. Examples of objects include engines, databases, tables, and users. The following figures illustrate PCC with several tabbed views displayed. PSQL Explorer is on the left.
Figure 13 PSQL Control Center on Windows Platforms
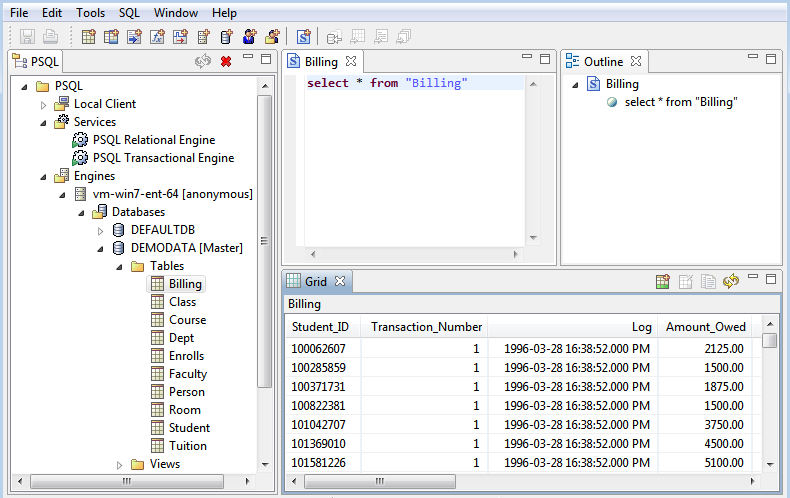
Figure 14 PSQL Control Center on Linux Platforms
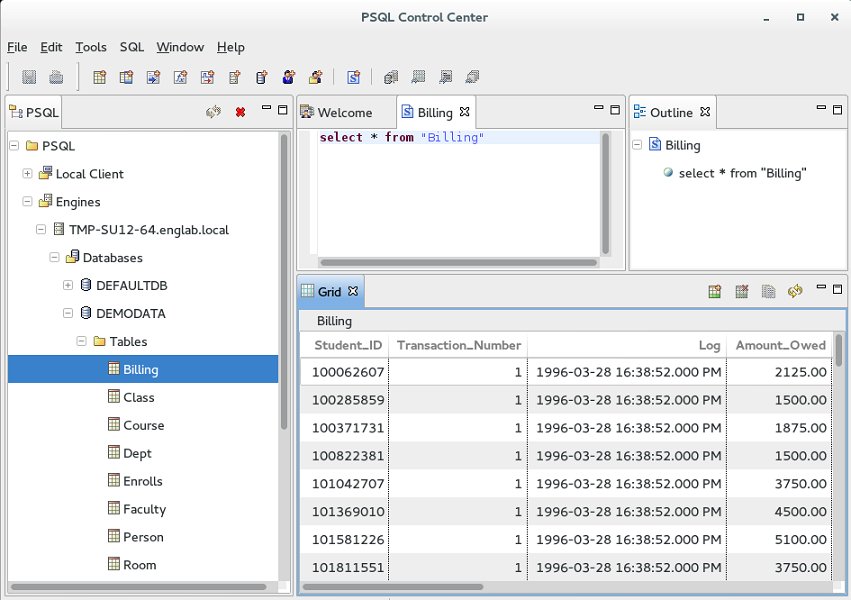
Depending on the Linux distribution or if you are using Mac OS, the appearance of PCC may differ, but functionality is the same.
Installing PCC
On Windows platforms, PCC is installed by default when you install a database engine or a client. See
PSQL Optional Features in
Getting Started with PSQL.
On Linux and macOS, PCC is included in the full installation. See
Full and Client Installations on Linux, macOS, and Raspbian in
Getting Started with PSQL.
Starting PCC on Windows
Access Control Center from the operating system Start menu or Apps screen. You may also run the executable file pcc.exe.
Starting PCC on Linux
Start PCC by running the executable script file pcc from a command prompt. The script file is located, by default installation, in the usr/local/psql/bin directory.
We recommend that you start PCC from a command prompt and
not by double-clicking the script file using a file browser application. See Table
Table 5,
Troubleshooting Guide for Running PCC.
The following requirements must be met to start PCC on Linux.
Table 4 Requirements for Starting PCC on Linux
Requirement | Discussion |
PSQL server or client | A compatible PSQL server or client must be installed on the same machine. |
X server access | The xhost command controls client access to X Window System. By default, xhost turns on access. Only the user who starts X Window System can start PCC. To turn off X Window System client restrictions, enter xhost + in a terminal window. |
Java Runtime Environment (JRE) | The JRE components required to run PCC are installed as part of PSQL. PCC uses the local version of the JRE installed as part of PSQL. |
If you have met the requirements to run PCC and still are having difficulty running the utility, refer to the following troubleshooting guide.
Table 5 Troubleshooting Guide for Running PCC
Troubleshooting Condition | Discussion |
You receive the error “java.lang.UnsatisfiedLinkError." | This error typically occurs if you try to start PCC by double-clicking the script file using a file browser application. Start PCC from a command prompt. This error can result if the LD_LIBRARY_PATH variable is not set. The PCC script sets this variable for you. You may also explicitly set the variable with the following command: export LD_LIBRARY_PATH=$LD_LIBRARY_PATH:/usr/local/psql/lib64 |
You receive the error "SWT no more handles" when trying to run PCC as user psql or root. | You are not required to log in as user psql or root to run PCC. However, if you are neither of these users, you must be a member of group pvsw. The "SWT no more handles" error is caused by the X server denying a connection to a client. Before switching to user psql or root, open a console window and enter xhost + to allow other clients to connect to the X server. Now you can switch to user psql or root. Also, sometimes the display environment variables needs to be set. As user psql or root, type the following command at a console window: export DISPLAY=:0.0 or export DISPLAY=localhost:0.0 |
You want to view the error log file for PCC or redirect the errors to the console window. | By default, the log file of PCC errors is located in a subdirectory of the user’s home directory (the subdirectory is dir_pcc/workspace/.metadata). For troubleshooting, you may find it more convenient to redirect the errors to the console window. To redirect errors to the console window, use the ‑consoleLog option when starting PCC: pcc -consoleLog |
You receive the following error message: "Unable to connect to database engine. Make sure the target machine is accessible and an engine is running on the target machine.” | The context of this error occurs if you attempt to administer the local server. To administer the local server, you must be a member of the pvsw group or be the root user. |
You receive the error: “GTK IM Module SCIM: Cannot connect to Panel!” then trying to run PCC as a user other than root. | On some Linux operating systems, it is necessary to specify the environment variable GTK_IM_MODULE. To resolve this problem, before starting PCC, run the following command in the console window:
export GTK_IM_MODULE=scim-bridge |
Starting PCC on macOS
On macOS, only the user logged in to the Desktop can start PCC. Open Finder and then Applications > Actian PSQL > PSQL Control Center.
Situations Requiring That You Clear PCC Cache
For efficiency, PCC caches certain information. The cache must be cleared after you install or upgrade products that interact with PCC so that the change appears in PSQL Explorer. For example, if you were to install or upgrade DataExchange, you would then need to clear the PCC cache.
The cache can be cleared only by starting PCC with a parameter from the command line.
►To clear PCC cache
1 Exit PCC if it is running (select File > Exit).
2 At a command prompt, change directory to the PSQL\bin\ folder in the PSQL installation directory.
For default locations of PSQL files, see
Where are the PSQL files installed? in
Getting Started with PSQL.
3 Enter the following command:
pcc -clean
PCC starts and clears its cache. The newly installed or upgraded products should then appear in the PSQL Explorer.
Note Use of the -clean parameter when starting PCC provides no advantage under normal usage. It is needed only if you install or upgrade a plug-in product.
Editors and Views within PCC
The PCC main window offers various editors and views:
You can display and work with objects through the different editors and views. Multiple editors of the same type, such as SQL Editor, can be open at the same time. Each object being edited is represented by a tab on top of the editor. The tab contains the name of the object. Data modified within an editor must be explicitly saved (for example, with File > Save).
Views, such as PSQL Explorer, can be opened only one at a time. Your actions within a view are applied immediately, without your having to save them.
Editor and View Characteristics
The following table summarizes the characteristics of the editors and views.
Table 6 Characteristics of PCC Window Views
Characteristic | PSQL Explorer | SQL Editor | Grid | Text | Outline | Table Editor |
Contains icons specific to that view | | | | | | |
Can be closed | | | | | | |
Can be minimized | | | | | | |
Can be maximized | | | | | | |
Can be restored to previous size | | | | | | |
Can be opened in new window | | | | | | |
Can be rearranged within PCC main window | | | | | | |
Can be "pulled" from PCC and placed on desktop | | | | | | |
PSQL Explorer
This view displays a tree of objects of various types and enables you to do many tasks.
Objects and Their Properties
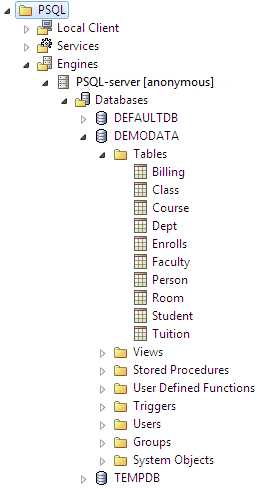
The tree of objects includes a root node named PSQL. The root node contains objects such as clients, services (if applicable), database engines, databases, tables, views, stored procedures, user-defined functions, triggers, groups, users, and system objects (such as system tables).
Most objects in PSQL Explorer can be expanded to reveal more detail. Click the expand icon to the left of an object to see objects under it. The expand icon may be a plus sign “+”, a triangle “”, or some other similar symbol. The collapse icon appears after you click an expand icon. Click the collapse icon to hide subordinate objects.
If properties (configurable settings) apply to an object, you can access them by right-clicking an object and selecting
Properties. You can also click an object then press
Alt+
Enter to display properties. See also
Configuration Reference in
Advanced Operations Guide.
Figure 15 Example Objects Shown in PSQL Explorer
Right-click Tasks
In addition to accessing properties, numerous other tasks can be invoked from PSQL Explorer by right-clicking an object. The following table summarizes the tasks.
Table 7 Right-click Tasks for Objects in PSQL Explorer
Working with | Task | Right-click | For information, see |
All Objects | View or set object configuration properties | Any object and select Properties | |
System | Register a server to work with a remote database engine
(The local engine is automatically registered to PCC when you install PSQL) | The PSQL node You can right-click any object subordinate to the PSQL root to work with a remote engine | |
Work with PSQL services on Windows machines | The Services node (if applicable to the installation) | |
Log in/out (database engine) | A database engine under Engines node | |
Monitor concurrent sessions and data usage | A database engine under Engines node | |
Monitor certain activities and attributes | A database engine under Engines node | |
Delete a remote database engine | A database engine under Engines node | |
Databases | Create | The Databases node This task can also be performed from any object subordinate to the Engines node | |
Delete | A database under Databases node | |
Log in/out (database) | A database under Databases node | |
Associate table(s) with a new database
(repair database name in tables bound to an original database name) | A database under Databases node |
To repair a database name and associate copied tables with a new database |
Schemas,
Tables | Export database schema | A database under Databases node | |
Export table schema | A table under Tables node | |
Add table
(performs a SELECT * from table_name query) | A database under Databases node, or
a table under Tables node | |
Open table | A table under Tables node | |
Edit table | A table under Tables node | |
Import table | A table under Tables node | |
Export table | A table under Tables node | |
Delete table | A table under Tables node | |
Users,
Groups | Add user | A database under Databases node or
a user | |
Add group | A database under Databases node or
a group | |
Delete user or group | A user or group | |
Triggers,
Stored Procedures,
User-defined Functions,
Views | Create | A database under Databases node, or
a trigger,
stored procedure,
user-defined function, or
view This task can also be performed from any object subordinate to the Engines node | |
Edit | A database under Databases node, or
a trigger,
stored procedure,
user-defined function, or
view This task can also be performed from any object subordinate to the Engines node | |
Delete | A database under Databases node, or
a trigger,
stored procedure,
user-defined function, or
view This task can also be performed from any object subordinate to the Engines node | |
SQL Editor
SQL Editor allows you to run Structured Query Language (SQL) statements against a PSQL database. See
SQL Editor for a detailed discussion.
Grid
The Grid window view shows in a matrix format, like a spreadsheet, the result of running SQL statements. Each field is represented as a column and the data appears in cells within the columns. You can change data directly in the Grid cells as well as add additional rows to the Grid.
Both Table Editor and SQL Editor use the Grid. See
To view table data while using Table Editor and
Grid Window View for further details.
Text
The Text window view shows in a text format the result of running SQL statements. The text is display only. You cannot change data values by changing the text, but you can copy text. See
Text Window View for a detailed discussion.
Outline
The Outline window view allows you to view the SQL statements in a tree structure. The root node of the tree is the same name as the name of the SQL Editor window view. See
Outline Window View for a detailed discussion.
Note that the editor must support an outline or the Outline window view is not available. Currently, only SQL Editor supports an outline view.
Table Editor
Table Editor allows you to add, delete, or change the characteristics of columns within a table. The table may be one newly created or an existing table that you want to edit. See
Table Editor for a detailed discussion.
Preferences
You can set general preferences for your experience in PCC. You can also set preferences for the window views in PCC or for the external tools.
►To set general preferences for Grid
1 In the PCC Window menu, click Preferences. Expand the PSQL node if it is not already expanded.
2 Click General.
The following are the options that can be set in the General Preferences:
Select Always remove associated DSN entries to have all DSN entries for any database automatically deleted along with the database without prompting.
Clear Do not prompt for new database each time a SQL document is opened to be prompted to select a database each time you open a SQL document in the SQL Editor. If this option is deselected, select it to use the most recently selected database when you open a SQL document. The selected database is not maintained across PCC sessions. If you close and reopen PCC, you will have to select a new default database context.
Preferences for PCC Window Views
You can set preferences for the following PCC window views:
•Data Grid
•Defragmenter
•Monitor
•SQL Editor
•Table Editor
•Text
►To set preferences for PCC Window Views
1 In the PCC Window menu, click Preferences, and expand the PSQL node if needed.
2 Perform one of the following actions:
•To set preferences for Data Grid, click Data Grid.
•To set preferences for Defragmenter, click Defragmenter.
•To set preferences for Monitor, click Server Monitor.
•To set preferences for SQL Editor, click SQL Editor.
•To set preferences for Table Editor, click Table Editor.
•To set preferences for Text Output, click Text Output.
File Encoding Preferences
The preference setting for File Encoding allows you to work more easily with files containing wide character data. This setting provides the following features:
•An option to use the PCC dialogs for File Open and File Save.
•A list of encodings from which to select the default to be used for the following PCC actions:
•PCC File Open
•PCC File Save
•Import Data
•Export Data
•Export Schema
►To set a preference to use PCC dialogs for File Open and File Save
1 In PCC, select Window > Preferences > PSQL > File Encoding.
2 Make sure that the option Do not prompt for encoding during File Open and File Save is not selected. By default, the option is not selected.
3 Click OK.
►To set a preference for default encoding
1 In PCC, select Window > Preferences > PSQL > File Encoding.
2 Select an encoding from the Default encoding list and click OK.
Table 8 Default Encoding Choices
Encoding | Discussion |
(system code page) | The default is the system code page currently in use. For example, on Windows platforms in English you commonly see windows-1252. |
Big5 | Big5 is a Chinese character encoding method used for traditional Chinese characters. |
EUC_JP | Extended Unix Code (EUC)_JP is a variable-width encoding used to represent the elements of three Japanese character set standards: JIS X 0208, JIS X 0212, and JIS X 0201. |
Shift_JIS | Shift_JIS (Japanese Industrial Standards) is a character encoding for the Japanese language. |
UTF-8 | UTF (Universal Character Set Transformation Format)-8 is an 8-bit variable-width encoding that can represent every character in the Unicode character set. It was designed for backward compatibility with ASCII and to avoid the complications of endianness and byte order marks (BOM). |
UTF-8 with BOM | Same as UTF-8 except with a byte order mark (BOM)—which is a Unicode character used to signal the endianness (byte order)—written to the file during the save action. |
UTF-16BE | A UTF encoding in 16-bit with byte order of big endian (BE). |
UTF-16BE with BOM | Same as UTF-16BE except with a BOM written to the file during the save action. |
UTF-16LE | A UTF encoding in 16-bit with byte order of little endian (LE). |
UTF-16LE with BOM | Same as UTF-16LE except with a BOM written to the file during the save action. |
Notes: By default, PCC remembers the encoding of a file that has been opened. If you modify the file and save your changes, the changes are saved in the original encoding. However, if you use the PCC File Save As dialog to save your changes, the changes are saved to the encoding specified on the dialog. PCC automatically detects the encoding of a file if the file contains a BOM and displays that encoding in the PCC File Open dialog. If the file does has no BOM and byte order is important, you need to select the proper encoding for the save action. |
Note You can also access the File Encoding preference setting from the dialogs for File Open, Save File, Import Data, Export Data, and Export Schema. Click Change default encoding in the dialog.
Additional Utilities
Some utilities have not yet been tightly integrated within the PCC framework. However, they may still be started from within PCC by selecting them through the Tools menu:
•ODBC Administrator – Separate choices for 32-bit Administrator and 64-bit Administrator on 64-bit operating systems (see
DSN Setup and Connection Strings in
ODBC Guide). Note that Windows uses whichever ODBC Administrator is open if you try to invoke the other one. That is, if the 32-bit ODBC Administrator is open and you attempt to start the 64-bit one, Windows displays the 32-bit version (and vice versa). In other words, only one version of ODBC Administrator runs at a time. This is a limitation of Windows rather than PSQL.
•Monitor (see
Monitoring in
Advanced Operations Guide)
•Gateway Locator (if PCC is installed with PSQL Workgroup) (see
Gateway Configuration in
Getting Started with PSQL)
Note These utilities appear in the Tools menu by default only on Windows platforms. For all platforms, you can customize the Tools menu. See the next topic for instructions.
External Tools
You can add your own software programs to the PCC Tools menu.
►To add external tools
1 In the PCC Window menu, select Preferences. Expand the PSQL node if it is not already expanded.
2 Click External Tools.
3 Click New.
4 Type a name for Tool Label that you want to appear in the Tools menu.
5 Type the path and file name of the program for Tool Location.
You can click the ellipsis button

to browse to the file location.
6 Optionally, type any parameters for Tool Parameters that should be passed to the program when the program starts.
7 Click OK.
8 Click OK (or Apply then OK) to close the Preferences dialog.
►To set preferences for external tools
1 In the PCC Window menu, click Preferences. Expand the PSQL node if it is not already expanded.
2 Click External Tools.
3 Click the desired tool in the External Tools list.
4 Perform one of the following actions:
•To remove the tool from the list, click Remove.
•To move the tool toward the top of the list, click Up.
•To move the tool toward the bottom of the list, click Down
Services on Windows Servers
PCC offers a convenient way to work with PSQL servers on Windows machines without having to use the Windows Services control panel. You can start, stop, and set the startup policy from within PCC.
You must stop the relational and transactional services to completely stop PSQL. Stopping just one of the services does not stop the database engine completely.
This section applies only to Windows platforms, not to Linux.
Note PSQL products other than the database engine also run as services. The services of these other products can have a dependency on the database engine services. See
Services Dependencies for further information.
►To start or stop services
1 In PSQL Explorer, expand the Services node.
2 Right-click the service that you want to stop or start.
3 Perform one of the following actions:
•Click Start Service to start the service
•Click Stop Service to stop the service
•Click Restart Service to stop then start the service.
Tip You can also stop or restart all services with a single command. Right-click the Services node, then click Stop All Services or Restart All Services.
►To set services startup policy
1 In PSQL Explorer, expand the Services node.
2 Right-click the service for which you want to set a startup policy.
3 Click Properties and select the desired policy:
Startup Policy | Meaning |
Manual | You must manually start the service after the operating system starts. |
Automatic | The service automatically starts when the operating system starts. |
Disabled | The service is removed from operation and is not affected by starting the operating system. |
4 Click OK (or Apply then OK).
Services Properties
Database Engines
You can use PCC to work with database engines that are on your machine or with remote server engines. To work with a remote server engine, you must introduce it to PCC. This procedure is called registering the server.
Your local server is automatically registered to PCC when you install PSQL. The local server appears in the PSQL Explorer as the first entry under the Engines node.
►To register a remote server engine
1 In PSQL Explorer, right-click the top node PSQL.
2 Click New > Server.
3 Identify the server that you want to register.
Type the name by which the server is identified on the network or type the IP address of the server.
4 Click Finish.
The server should now appear in the PSQL Explorer window of PCC under the Engines node.
►To log out from a database engine
These steps do not erase the data or database from the server. A logout only disconnects the communication between the database engine and the PCC on your computer.
1 In PSQL Explorer, expand the Engines node.
2 Right-click the server engine from which you want to log out.
3 Click Logout (name).
Name reflects the name of the user currently logged in to the server through PCC. Name is anonymous if no specific user name and password were provided.
Any nodes expanded for the database engine are collapsed.
►To reconnect to a database engine
1 In PSQL Explorer, expand the node for the server engine.
►To log in to a database engine
1 Right-click the database name in the PCC PSQL Explorer then click Logout (name).
Name reflects the name of the user currently logged in to the server through PCC. By default, name is anonymous, meaning that no specific user name and password were provided.
Any nodes expanded for the database engine are collapsed.
2 Right-click the database name.
3 Click Login.
4 Type a User Name and Password.
You can leave these blank to log in as anonymous.
5 Click OK.
►To delete a remote database engine
Certain situations, such as a machine no longer in use, can necessitate deleting a remote database engine.
1 In PSQL Explorer, expand the Engines node.
2 Right-click the remote database engine that you want to delete.
3 Click Delete.
Note that the deletion occurs immediately without further prompting.
Database Engine Properties
Capacity Usage Viewer
PCC provides Capacity Usage Viewer to monitor concurrent sessions and data usage for all database engines. This is especially useful when you are considering migrating between PSQL engines that use different license models.
See
Capacity Usage Viewer in
Advanced Operations Guide.
Monitor
PCC integrates a Monitor utility which allows you to monitor certain activities and attributes of the database engine. The utility can monitor aspects of the MicroKernel Engine and the Relational Engine. It presents information organized into a series of tabs, that can be rearranged for your convenience, with columns of data that can rearranged and sorted. It presents a snapshot of a particular moment and can be refreshed either manually or automatically.
See
Monitoring Database State in
Advanced Operations Guide.
Defragmenter
PCC provides the Defragmenter utility to enable you to detect data file fragmentation that may be causing loss of engine performance. Defragmenter also enables you to correct the fragmentation by rearranging records that have become out of order and removing unused space left by deletions. Defragmenting a file does not alter its data in any way, and records can be created, read, updated, or deleted while the files that store them are being defragmented. You can use Defragmenter features during database engine execution with no need for down time or disruption of business operations in most cases.
See
Monitoring Data File Fragmentation in
Advanced Operations Guide.
Databases
A database is a collection of data stored together. Newly created databases are empty and may be populated with tables. See
PSQL Databases in
Advanced Operations Guide for a detailed discussion.
The properties of a database include such items as file locations, referential constraints, security, and whether the database is bound.
Note If you wish to add a database to a Server engine, you must have administrative rights on the server operating system. If you do not have administrative rights, you will not be permitted to add the database.
►To log out from a database engine
1 In PSQL Explorer, expand the Engines node.
2 Expand the node for the registered server to display the databases on that server.
3 Right-click the database from which you want to log out.
4 Click Logout (name).
Name reflects the name of the user currently logged in to the database. If the database does not have security enabled, name is Master. Name may also be Master if the current user is logged in as Master.
Any nodes expanded for the database are collapsed.
Database Properties
You set properties for a database from a Properties dialog in PCC. This window lists the following property nodes:
Code Page
This section details the property settings for Code Page.
Note The database engine does not validate the encoding of the data and metadata that an application inserts into a database. The engine assumes that all text data was translated by the client to the encoding of the server or the client database code page, as explained in
Database Code Page and Client Encoding in
Advanced Operations Guide.
Database Code Page
This property specifies the encoding to use for metadata and is stored in DBNAMES.cfg. Note that this property applies to the database, which means that it potentially affects
all client applications that exchange data with that database. A compatible encoding must be established between the PSQL database engine and a client application. See
Database Code Page and Client Encoding in
Advanced Operations Guide for the various ways in which this can be accomplished.
Note Changing the database code page does not convert existing data or metadata in the database. To avoid data corruption, ensure that the code page setting matches the current encoding of any preexisting data or metadata in the database.
Database code page is particularly handy if you need to manually copy PSQL DDFs to another platform with a different OS encoding and still have the metadata correctly interpreted by the database engine.
The default code page is “server default,” meaning the operating system code page on the server where the database engine is running. The link “Change code page” provides additional information about the setting and lets you select a specific code page.
PCC Connection Encoding
PCC is, itself, a client application to the database engine. As a client, PCC lets you specify the code page (the encoding) to use for each database session when PCC reads and inserts metadata and data. The default for an existing database is to use the encoding of the machine where PCC is running. This is the legacy behavior of PCC. The default for a new database is to use automatic translation.
The following explains the interaction between the settings for PCC Connection Encoding and Database Code Page.
PCC Connection Encoding Set to a Specific Encoding | PCC Connection Encoding Set to "Automatic Translation" |
PCC ignores
Database Code Page and uses the encoding specified to read and insert data and metadata. (This is the legacy behavior of PCC.) | PCC and the database automatically establish compatible encoding. The database metadata and data are translated from the encoding specified for
Database Code Page to the encoding used on the system where PCC is running. |
Note PCC Connection Encoding applies only to PCC. It has no affect on other client applications.
When a database has OEM character data in it, the legacy solution was for the access method, such as ODBC using a DSN, to specify OEM/ANSI conversion. Now it is possible to set the OEM code page for the database and have the access method specify automatic translation. See also
Automatic in
ODBC Guide.
Directories
The property settings for Directories specify where certain types of files reside on physical storage.
Dictionary Location
This location specifies where the dictionary files (DDFs) reside on physical storage. This location must be on the same server to which you are connected and where the database engine is running. The location must be formatted as though you are working directly at the server machine.
•For Windows operating systems, enter a path in the form drive:\path, where drive is a drive letter on the server.
•For Linux, enter the standard Linux path format from root.
For example, if you are at a workstation connected to a Windows server where the database engine is running, and you want to create a new database on the C:\ drive of the server in the folder mydata, enter the location as c:\mydata. You would enter it this way even if you have a local network drive (for example, F:\) mapped to the C:\ drive on the server.
Data Directories
The Data Directories list specifies where the data files reside on physical storage. Add locations to the list by clicking New. Remove lets you remove locations from the list. The locations must be on the same server where the database engine is running.
Specify the location in the same manner as for the dictionary locations.
General
General contains the following property settings:
Bound Database
Indicates whether or not the database is bound. Binding a database prevents the DDFs or data files from being used in another database and prevents a data file from having more than one table definition within the same database.
For more information about bound databases, refer to
Bound Database versus Integrity Enforced.
Integrity Enforced
Specifies whether integrity constraints, such as security, RI, and triggers, are enforced on the database. These constraints apply to Btrieve access to the data files as well as ODBC/SQL access.
Long Metadata (V2 Metadata)
This property is read-only and shows whether V2 metadata was set when the database was created. “Long metadata” is another term for V2 metadata.
Relational Constraints
Relational Constraints displays a matrix that lists the relational constraints in effect for the database. See
Interactions Between Btrieve and Relational Constraints.
Security
Security contains property settings (tabbed areas) for Database Security and Btrieve Security. See
PSQL Security for a complete discussion of security.
New Database GUI Reference
The following dialog in PCC is used to create a new database. The accompanying table describes the GUI objects. (See also
To create a new database.)
Click an item in the image for information about its use.
Figure 16 Create New Database Dialog
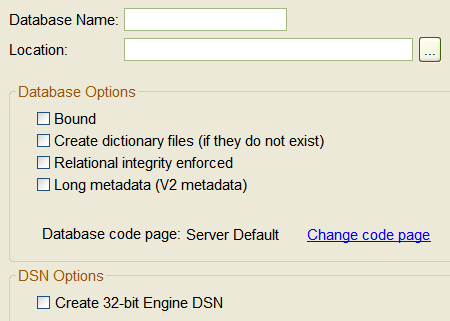
Table 9 Create New Database GUI Elements
Element | Description | Related Material |
Database Name | The name for the database that you want to appear in the database listing in PCC. Note: The database name cannot be the same as an existing DSN. | |
Location | This location must be on the same server to which you are connected (and where the database engine is running). Location must be formatted as though you are working directly at the server machine. | |
Bound | Indicates whether the database is to be bound. Binding a database prevents the DDFs or data files from being used in another database and prevents a data file from having more than one table definition within the same database. For more information about bound databases, refer to
Bound Database versus Integrity Enforced. | |
Create dictionary files (if they do not exist) | Specifies whether you want data dictionary files (DDF) created with the database. Dictionary files are required for relational (SQL) access to your data. By default, the dictionary files and data files are created in the same location. You may specify different locations for these types of files after you create the database. Typically, the only situation for which you would choose not to create DDF files is when you have an unnamed legacy database for which DDFs already exist, and you are now creating a database name for that database. Under these circumstances, the database engine links the new database name with the preexisting DDFs. | |
Relational integrity enforced | Specifies whether integrity constraints (security, RI, and triggers) are enforced on the database. These constraints apply to Btrieve access to the data files as well as ODBC and SQL access. | |
Long Metadata (V2 metadata) | The database engine supports two versions of metadata, referred to as version 1 (V1) and version 2 (V2). V2 metadata is also referred to as long metadata. Metadata version is a property of the database and applies to all tables within that database. A database cannot use some tables with V1 metadata and others with V2 metadata. The DDFs of different metadata versions cannot interact. |
System Tables in SQL Engine Reference |
Database Code Page | Specifies the code page property for the database. The default is Server Default, which refers to the current code page setting for the server operating system. | |
Create 32-bit Engine DSN | For ODBC access, you must set up a data source name (DSN) to refer to the database name. By default, the name of the new DSN is the same as the
Database Name. Multiple DSNs may point to the same named database. The default is to create the DSN with an encoding translation option of “None.” Note: The DSN that you are creating is a 32-bit Engine DSN. PCC cannot create 64-bit DSNs. Use an ODBC Interface utility to create 64-bit DSNs (such as ODBC Administrator on Windows). Note that DSN names must be unique for their bitness. A 32-bit DSN and a 64-bit DSN can have the same name because their bitness differs. | |
Creating, Modifying, Deleting, and Repairing PSQL Databases
The following tasks pertain to databases.
For information on named databases, see
PSQL Database Concepts in
Advanced Operations Guide.
►To create a new database
Note On Linux, macOS, and Raspbian, the owner of the directory where you want to create the database must be
psql. If not, attempting to create a database returns error message
7039: Dictionary path is invalid. Use the chown command to change owner of the directory. For example,
chown psql directoryname.
1 In PCC PSQL Explorer, right-click the database engine for which you want the new database.
2 Click New > Database.
The name cannot be the same as an existing DSN. Also, no two data files in the same directory can share the same file name and differ only by file name extension. For example, invoice.btr and invoice.mkd are not allowed in the same directory. The reason for this restriction is that the database engine ignores the file name extension and sees invoice.btr and invoice.mkd as the same file.
►To modify properties of a database
1 In PCC PSQL Explorer, right-click the database engine to modify and click Properties.
2 In the list of Properties, click the one where you want to manage settings:
3 Set the properties as needed.
►To delete a database
You cannot delete the database to which you are currently logged in. See
To log out from a database engine.
If database security is set to Mixed or Database, you must first remove the security, or it cannot be deleted. See
To turn off security using PSQL Explorer and
To turn off security using SQL.
If when you delete a database you also want to remove its DSN, then in Window > Preferences > PSQL > General, the option Always remove associated DSN entries must be selected.
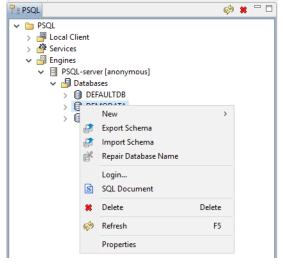
1 In PCC PSQL Explorer, right-click the database that you want to delete.
2 Click Delete.
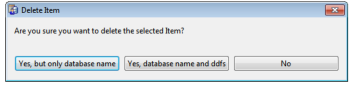
3 In the Delete Item dialog, click one of the following:
•Yes, but only database name – Delete only the database name in dbnames.cfg.
•Yes, database name and ddfs – Delete the database name and associated DDF files.
•No - Cancel without deleting.
Note Deletion of a database does not affect its user data files.
►To repair a database name
Using the tables (data files) from one database for a newly created database with a different name can result in the inability to open the tables for the new database. In certain situations, the tables can have the original database name bound to them. For example, if the original database is set to Bound or if referential integrity is being enforced, the data files are bound to that database name. See also
Bound Database versus Integrity Enforced.
To ensure that such tables can be opened for the new database, you need to repair the database name for the new database. The tables are then associated with the new database.
1 In PCC PSQL Explorer, expand the Databases node and right-click the database name that you want to repair.
2 Click Repair Database Name.
The following table explains additional actions, if any, that are required based on security settings for the database, the tables, or both. See also
Security Tasks.
Security Setting | Action Required |
None | None. Repair Database Name executes without further interaction required. |
Database Security | You must provide the user name Master and its password. See also
Database Security in Advanced Operations Guide. |
Btrieve Security Classic | If the database engine is running on a remote server and your operating system user name and password differ between the local machine and the remote server, you must provide the user name and password for the remote server. See also
Classic Btrieve Security in Advanced Operations Guide. |
Btrieve Security Mixed | The data directories for the tables must be added to the DEFAULTDB database. See
The Default Database and the Current Database in Advanced Operations Guide. In addition, the other aspects of Mixed security are enforced, such as user names defined in the database corresponding exactly with the user names defined in the operating system. See
Mixed Btrieve Security in Advanced Operations Guide. |
Btrieve Security Database | If Database Security is turned on (Master password specified), no further requirements are needed for Database Btrieve Security. The privileges for Master are sufficient. See also
Database Security for Btrieve Files in Advanced Operations Guide. |
Owner Name for a table | If a table has an owner name, Repair Database Name prompts you for the owner name. (An exception to this is if the option “Permit read-only access without an owner name” is specified for the owner name.) See also
Owner Names in Advanced Operations Guide. You can provide the owner name for an individual table, or a list of all owner names associated with the set of tables (separate each owner name with a comma and a space). By default, owner names are displayed as asterisks. If you want to view the owner names as plain text, select Show owner names. You can omit providing an owner name for a specific table with the Skip button. To skip all tables with an owner name, select Do not ask again for owner names. Tables requiring an owner name that is unknown will be skipped, then click Skip.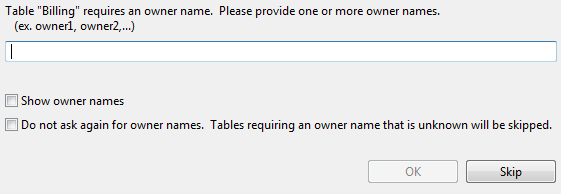 The number of tables skipped is reported at the end of the repair operation in a dialog box. The names of the tables skipped are written to the PCC Log. |
Tables
Tables are the objects in which databases store data. PSQL contains two types of tables: data and system. Data tables are created by users. When you create a table, it is empty until you populate it with data. System tables are created and populated as needed by the PSQL database.
Data Tables
See
Table Editor for a detailed discussion of data tables. That topic also describes the tasks for creating and deleting tables, and working with columns, foreign keys, and so forth.
System Tables
System tables appear in the PSQL Explorer under the System Objects node. You may check their contents as explained in
To view properties of a table.
Table Properties
Table properties provides information about the table. Separate tabs let you view general properties, columns information, and indexes information. The following table describes the parameters listed on the General tab.
Table 10 Table Properties on General Tab
Parameter | Description |
Table Name | Shows the name of the table as it appears in the database definition. |
Table Location | Shows the physical location of the data file associated with the table. |
Dictionary Path | Shows where the database's DDF files are located. |
File Version | Shows the file format version of the data file. |
Record Length | Shows the length of the data file's records. |
Page Size | Shows the page size (in bytes) of the data file. The page size determines the maximum number of index segments that can be defined in a table. |
Number or Records | Shows the number of records currently contained in the data file. |
Number of Indexes | Shows the number of indexes defined for the table. |
Number of Duplicate Pointers (Ptrs) | Shows the number of linked duplicate indexes that can be added. |
Number of Unused Pages | Shows the number of preallocated pages available. If preallocation is enabled, the MicroKernel preallocates a specified number of pages when it creates the data file. Preallocation guarantees that disk space for the data file is available when the MicroKernel needs it. |
Variable Records | Shows whether the data file contains variable-length records. |
Variable Record Blank Truncation | Shows whether blank truncation is enabled. If it is, the MicroKernel truncates the blanks in variable-length records. Blank truncation is applicable only if the Variable Records statistic is Yes and Data Compression is set to No. |
Record Compression | Shows whether record compression is enabled. If it is, the MicroKernel compresses each record it inserts into the data file. See
Record and Page Compression in Advanced Operations Guide. |
Key Only File | Shows the name of the key-only file for the table, if any. A key-only file contains no data records but serves as an index to other Btrieve files. |
Index Balancing | Shows whether balanced indexing is enabled. |
FreeSpace Threshold | Shows a percentage (5, 10, 20, or 30) if the data file has a free space threshold. The database engine stores the variable-length portions of records on their own pages (called variable pages), separate from the fixed-length portions (which are stored on data pages). The database engine uses the threshold to determine whether to add data to an existing variable page or to create a new one. A higher free space threshold reduces fragmentation of variable-length records across several pages but uses more disk space. |
Uses Alternate Collating Sequence | Shows whether the table uses an alternate collating sequence for sorting. |
System Data Key | Shows whether the data file has system data keys enabled. |
Page Compression | Shows whether page compression is enabled. See
Record and Page Compression in Advanced Operations Guide. |
►To view properties of a table
1 In PSQL Explorer, expand the Tables node for a particular database.
If you are interested in system tables, expand the Tables node under System Objects.
2 Right-click the desired table, and click Properties.
Tip You can use the table properties to view a list of the indexed columns for the table.
►To open a table
1 In PSQL Explorer, expand the Tables node for a particular database.
If you are interested in system tables, expand the Tables node under System Objects.
2 Right-click the desired table, and click Open or Open in New Window.
This action performs a SELECT * from the table name that you selected.
►To delete a table
1 In PSQL Explorer, expand the Tables node for a database.
2 Right-click the desired table, and click Delete.
Managing Schemas
Schemas are metadata, or data about data. When you use PSQL as a Btrieve transactional database, no explicit schemas are needed, although a small amount of metadata is stored in the Btrieve files themselves and also within the MicroKernel Engine as it runs. But in a PSQL relational database, schemas contain all of the information used to store and manage data. This relational information is stored in data dictionary files (DDFs). Proper functioning and high performance of the SQL engine depends on valid and accurate DDFs. The information in this topic can help you to identify invalid or incomplete DDFs and determine what you can do to correct them.
DDFs define the structure of tables and their fields, as well as other features:
•Table and column attributes
•Column indexes and index attributes
•Table constraints such as primary and foreign keys
•Stored procedures, triggers, user-defined functions, and views
•Database security settings
You can export a schema to a file for reuse or safekeeping. In PCC, right-clicking a database and selecting Export Schema opens the Export Database Schema wizard. Right-clicking a table and selecting Export Table Schema opens a dialog. In either case, you then create an exported schema file, called a SQL script, with the file extension .sql. The default export location is C:\Users\login, based on your user account.
The exported SQL script can be used in the following ways:
•Right-click a database in PCC and select Import Schema to run the script.
•Use File > Open in PCC to open the script in SQL Editor and run it there.
•Copy all or part of the script from a text editor to enter and run in SQL Editor.
•Use pvddl to run all or part of the script at a command prompt.
The rest of this section covers the following topics:
Database Schema Export Options
The Export Database Schema wizard offers the following settings when you export PSQL metadata:
•Include IN DICTIONARY for CREATE/ALTER statements
When you export a database schema, if you include the IN DICTIONARY keyword for CREATE and ALTER statements, then the exported schema can be used to recreate the schema in a new set of DDFs without creating the original data files. If you do not select this option, then importing the schema creates not only metadata definitions in the DDFs but also an empty data file for each table.
When you use this setting, copy the data files to the new database location before importing the schema so that the SQL script can recreate the metadata in the DDFs for those exact files.
•Include security schema (users/groups/permissions)
The schema can capture security settings such as any defined users, groups, and permissions. This metadata may exist even if the database used security in the past but does not have it enabled now. For another database to use the imported security settings, it must have security enabled before importing the schema. If it is not enabled, then importing can finish but returns error messages.
•Remove internal export tables on completion
The removal of internal export tables is selected by default. This option deletes files generated during schema export. Leaving them in place can be useful for troubleshooting, but in general use their cleanup is recommended. The generated tables are named starting with the string x$Dump.
•Encoding for the script file
Under the field for the export path name, you can select the encoding for the script file from a list of options described in
File Encoding Preferences. You can also change the default encoding.
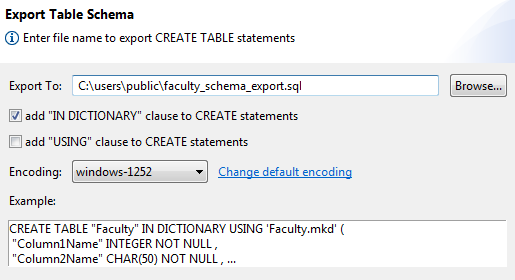
Table Schema Export Options
The Export Table Schema dialog offers the following options to export table metadata:
•Export a CREATE TABLE statement without IN DICTIONARY. This is the default.
•Add an IN DICTIONARY clause in the CREATE TABLE statement.
•Select encoding for the script file from a list of options described under
File Encoding Preferences. The dialog provides an option to open the default encoding preference and change it.
The following example shows the use of the IN DICTIONARY clause.
IN DICTIONARY
If you select this option, be sure to copy any data files to the new database location before running the script file there. The data files must be present for table creation to succeed. For more information, see
IN DICTIONARY in
SQL Engine Reference.
CREATE TABLE "Course" IN DICTIONARY USING 'Course.mkd' (
"Name" CHAR(7) NOT NULL CASE ,
"Description" CHAR(50) CASE ,
"Credit_Hours" USMALLINT,
"Dept_Name" CHAR(20) NOT NULL CASE
);
CREATE UNIQUE INDEX "Course_Name" IN DICTIONARY ON "Course"("Name");
CREATE INDEX "DeptName" IN DICTIONARY ON "Course"("Dept_Name");
Schema Export and Import Tasks
The following steps show how to export and import database schemas in PCC:
►To export a database schema
1 In PCC, right-click a database and select Export Schema.
2 Enter a name for the exported file.
3 Select export options.
4 Click Start Export.
When the export is done, you can use the Export Again button to create additional copies by changing the file name.
5 Click Next.
7 You can open the exported script or the export log by clicking their View buttons.
8 When you are done, click Finish.
►To import a database schema
If you have copied data files for use with a schema, you must place the files in their new location before importing the schema. Also, you must have exported the schema with the IN DICTIONARY option.
1 In PCC, right-click a database and select Import Schema.
2 In the Import Database Schema wizard, use the Browse button to select the script file, or enter the path name in the Import From field.
3 Click Start Import.
4 After the schema is imported, click Next.
5 In the validation step, you have the option of running a check on the new database by comparing it with the one where the schema was exported. You can do one of the following:
•Click Next to skip validation.
•The name of the database included in the exported schema is automatically entered here. To validate against a different database, enter another name or use the Select Database button to choose it from the list of databases known to the server. To proceed, click Start Validation.
7 Click Next.
8 The Import Details summarizes the results. You can open the import log by clicking its View button.
The import log contains the messages shown during import but with additional detail, including the SQL statement that returned the message. Validation results are also logged.
9 When you are done, click Finish.
Note If the schema you import tries to create a table that already exists, the CREATE statement is ignored and the existing table is not affected.
►To export a table schema
1 In PCC, select a table. To select more than one table, press and hold Shift or Ctrl while clicking.
2 Right-click your selection and select Export Table Schema.
3 Enter a name for the exported script file.
4 Select whether you want the IN DICTIONARY clause and confirm the encoding.
5 Click OK.
►To import a table schema
If you have copied the data file for the table, you must place it in its new location before importing its schema. Also, you must have exported the schema with the IN DICTIONARY option.
1 In PCC, right-click a database and select Import Schema.
2 In the Import Database Schema wizard, use the Browse button to select the script file, or enter the path name in the Import From field.
3 Click Start Import.
4 After the schema is imported, click Next.
5 In the validation step, you have the option of running a check on the new database by comparing it with the one where the schema was exported. You can do one of the following:
•Click Next to skip validation.
•The name of the database included in the exported schema is automatically entered here. To validate against a different database, enter another name or use the Select Database button to choose it from the list of databases known to the server. To proceed, click Start Validation.
7 Click Next.
8 The Import Details summarizes the results. You can open the import log by clicking its View button.
The import log contains the messages shown during import but with additional detail, including the SQL statement that returned the message. Validation results are also logged.
9 When you are done, click Finish.
Note If the schema you import tries to create a table that already exists, the CREATE statement is ignored and the existing table is not affected.
Common Uses for Exported Database Schema Files
This topic covers some common ways to use database schemas:
►To copy a complete database
You can import a database schema to create a complete copy of the database from which it was exported. The copy can be used for testing purposes or to generate metadata at run time as part of application deployment.
1 Export the schema at the database level with the IN DICTIONARY option.
2 Create a new database. If you create it on the same server, it must have a different name. See
To create a new database.
3 In the original database, make copies of all data files.
4 Place the data file copies in the new database location. This step must be done before importing.
5 In the new database, import the schema.
6 If both databases are on the same server, you can validate the new database against the original to check for inconsistencies such as invalid table definitions or data file and schema mismatch issues.
►To copy only DDFs and create empty data files
In scenarios such as technical support where confidentiality prevents sharing of data files, you can skip copying data files so that importing the schema creates the DDFs but with empty files.
1 Export the schema at the database level without the IN DICTIONARY option.
2 Create a new database. If you create it on the same server, it must have a different name. See
To create a new database.
3 In the new database, import the schema. The empty data files are created automatically.
4 If both databases are on the same server, you can validate the new database against the original to check for inconsistencies such as invalid table definitions.
►To migrate a database from v1 to v2 format
Migrating a database from v1 to v2 format allows your application and environment to take advantage of v2 metadata features, such as longer identifier names, execution permissions for views and stored procedures, and a higher limit on the maximum number of database objects.
The steps for migrating a database from v1 to v2 format are the same as for copying a database, except that when you create the new database, you must select the Long metadata option.
When you migrate from v1 to v2 format, it is important to use the validation step to compare the v2 database against its v1 source. If validation succeeds, this confirms that you can expect the same behavior in the new database as in the old.
►To validate the integrity of a database schema
Many customers have PSQL databases that have been around for a long time – 20 or even 30 years. The schema may have been created with legacy tools, using third-party utilities or even handwritten. Some of these databases have invalid table definitions or have definitions that do not match their data files. The export and import process can reveal these faulty definitions so that you can correct them and enable the best function and performance of your PSQL engine.
1 Export the schema at the database level with the IN DICTIONARY option. Check the export log for warnings or errors.
2 Create a new database on the same server with a different database name.
3 In the original database, make copies of all data files.
4 Place the data file copies in the new database location.
5 In the new database, import the schema.
6 Run the validation step.
Special Case: Working with Secure Database Schemas
The export action requires a user account in a group that has the CREATE database permission. Before you export the schema, log in under such an account or expect when prompted to enter the user name and password for such an account.
1 Export the schema at the database level. When you export a schema from a secure database, the Include security schema option is selected by default.
2 When you import the schema into a new database, the results depend on whether security is turned on in the target database:
Security On
After you import the schema, the database is ready to use, noting the following:
•Passwords for imported users are blank. In SQL Editor, use SET PASSWORD FOR 'user' = 'password' to reestablish them.
•Importing fails for user and group names that match existing user and group names. The existing users and groups are unchanged. The import log lists these errors.
Security Off
If security is off in the target database, then the following things occur:
•The import log shows failures in creating users, groups, user rights, and table column rights.
•No validation step is offered.
•Everything else in the schema is imported and the database can be used, but it has no security.
If you enable security on the target database and import the schema again, then the log shows errors for trying to import items already imported, while security items that failed to be imported are now successful. The validation step is now available but will be successful only if you are logged in to the new database with a user name and password found in the original database. If validation shows no problems, then the database is ready to use as though security had been on when the first import occurred.
Special Case: Working with Multiple or Variant Record Definitions
PSQL allows multiple table definitions for a single data file. For example, one definition might specify the first column as ID CHAR(12), corresponding to the first key in the data file. Another table definition manages the 12-character ID as a set of smaller columns, such as a SequenceNum CHAR(8), Location CHAR(2), and Zone CHAR(2). PSQL allows multiple table definitions with USING clauses referencing the same data file so long as the definitions are compatible as shown in this example.
PSQL also supports the storing of varying record layouts in the same data file by adding a column to indicate the record type for each entry. Such files are referred to as having variant records, as shown in the following example:
CREATE TABLE Vendor USING 'COMPANY.DAT'
(ID CHAR(12), RecType CHAR(1), V_Name VARCHAR(20), V_City VARCHAR(20), ... )
CREATE TABLE Customer USING 'COMPANY.DAT'
(ID CHAR(12), RecType CHAR(1), Cust_Type INTEGER, Cust_Contract Char(8), ... )
Tables Vendor and Customer both reference company.dat, and the first two columns of their definitions match, but after that the column definitions vary. Their two record layouts must have the same total length and also match the record length in their data file. If needed, a table definition can add extra fields to pad to the full length. Also, while some index definitions may be common to all variant records, other indexes may be used by only one table definition. In this example, applications that access company.dat must submit the correct RecType value to specify the table definition for each record.
The Export Schema feature checks data files for the number of table definitions. If it finds more than one, it exports the schema with CREATE TABLE statements followed by pairs of almost identical CREATE INDEX statements, differing only in that one includes IN DICTIONARY and the other does not.
When these extra CREATE INDEX statements are used to import the schema, they ensure proper creation of both shared and unique indexes for each table. When importing, you can expect certain types of messages to be logged. These messages are marked as errors or warnings, but they usually can be ignored. The following example explains why by continuing with the example data file company.dat shared by the tables Vendor and Customer. When the schema for these tables is imported into a new database, the following things occur:
•The table Vendor is created with a set of indexes that do not include IN DICTIONARY.
•The CREATE INDEX statements with IN DICTIONARY generate with following error message:
[ERROR] [LNA][PSQL][SQL Engine]Duplicate index exists.
The second set of CREATE INDEX statements fails because the earlier statements succeeded.
•The table Customer is created with a warning like the following:
[WARN] [LNA][PSQL][SQL Engine]The data file 'company.dat' in the USING clause already exists and is now associated with table 'Customer'.
As expected, this message indicates that the two table definitions use the same data file.
•The CREATE INDEX statements for table Customer that do not include IN DICTIONARY now fail with the following error, since the creation of table Vendor already created indexes for company.dat:
[ERROR] [LNA][PSQL][SQL Engine][Data Record Manager]The key number parameter is invalid(Btrieve Error 6)
•However, the CREATE INDEX statements with IN DICTIONARY correctly add the indexes to the DDFs without error or warning.
If you know that you are working with variant tables sharing a data file, you can ignore these import log entries. You can formally confirm correct creation of the tables if the validation section of the schema import log lists no additional errors or warnings.
Troubleshooting Schema Export and Import Issues
Exporting and importing a database schema can help identify problems in metadata definitions that can lead to unexpected or incorrect results in SQL applications. These problems often result from DDFs that are not compliant with standard SQL. Using the warning and error messages logged when exporting, importing, and validating a schema, you can evaluate and correct these schema definitions.
The troubleshooting process may take several steps, including reviewing and analyzing any or all of the following:
•Export schema log entries
•Import schema log entries
•Schema validation log entries
•Script generated by exporting the schema
•Metadata definitions in source and target databases
The following topics provide details and give examples of notable log entries, along with actions to take:
Export Schema Log
When you export a schema, PSQL attempts to generate a SQL statement for every object defined in the database. Problematic objects can produce insightful messages and warnings about possible issues to investigate. Messages generated during export are written to the Export Database Schema window. After exporting, these messages are also written to the file schema_export.log along with additional details, including the SQL statement associated with the warning. Warning messages for a particular table or column are also included in the schema.sql script, marked as comments in the format "/* <message> */".
Alternate Collating Sequence
Issue: If any table column includes a COLLATE attribute, schema export returns the following warning:
[WARN] One or more tables use the collation sequence 'UPPER.ALT'. This file must be copied to the import database location before importing.
One of these messages is entered for each unique collating sequence in the database.
Action: Make sure that each collation file exists in the new database location before importing the schema.
Invalid Entries
Issue: If schema export detects invalid size or decimal values, it returns messages like the following:
[WARN] Decimal value ignored for integer column <table>.<column>
[WARN] Column <table>.<column> has an incorrect size of 0
The first message is informative and requires no further action. The second message indicates that the specified table will fail to be created when the schema is imported.
Action: To fix table definitions in the original database with an invalid size, use an ALTER TABLE statement to either correct the column size or remove the column. Then export the schema again to generate a correct CREATE TABLE statement. Alternatively, if you do not want to change the original DDFs, you can edit the schema.sql file produced by exporting to specify the correct column size. If you choose the latter, the new table created by importing the schema will not match the original and will generate validation errors.
Overlapping Columns
Issue: If a table definition has multiple columns with the same offset, and at least one of the columns is not of type BIT, schema export returns a message like the following:
[WARN] Column <table>.<column> has the same offset as another column that is not type BIT
A SQL table cannot have multiple columns located at the same offset in a single table unless they are all of type BIT. If a portion of the data needs to be defined in different ways for different types of queries, you can create multiple table definitions or use views.
Action: Determine the correct columns for the offset and remove the additional columns using an ALTER TABLE statement. Alternatively, if you do not want to change your original DDFs, you can edit the schema.sql file produced by exporting to remove the extra overlapping columns. If you do not correct this, the new table created by importing the schema will have all of the columns created with unique offsets, which will produce validation errors.
Btrieve Null Keys
Issue: Legacy DDFs may have indexes flagged to indicate that they correspond to a Btrieve null key in the data file. The PSQL engine treats this flag as a legacy null and no longer uses or maintains it. Schema export generates a message like the following:
[WARN] Btrieve NULL key flag not supported in SQL index <name> on table <name>
Action: This is an informative message, and no further action is required. For more information about legacy nulls and the newer true nulls, see
Null Value in
Advanced Operations Guide.
Import Schema Log
Messages generated during import are written to the Import Database Schema window. After importing, these messages are also written to the file schema_import.log along with additional details, including the SQL statement associated with the warning.
The following topics provide details and give examples of notable log entries, along with actions to take:
SQL Errors
Issue: When you import a schema.sql script, invalid SQL statements may return errors. These can indicate the following problems in database objects specified in the DDFs of the original database:
•Syntax errors
•Duplicate values in key field of a record (Btrieve error 5)
•Missing table or object
•Invalid column type
•Column or parameter #1: cannot specify column width of zero
•Maximum column length exceeded
•Btrieve key definition does not match index definition
Some of these errors result from invalid entries in the source database, such as invalid data types or column lengths, data file paths that are not relative, and so forth. Other errors can result from a previous error. For example, if a CREATE TABLE fails, subsequent CREATE INDEX statements also fail.
Action: Review the message and details from the import log file to determine the cause of the error. It may be necessary to review the schema.sql file for the complete set of SQL statements associated with the error. For example, an error generated by a CREATE PROCEDURE is logged with only the first line of the procedure, but schema.sql contains the entire statement.
Variant Record Messages
Issue: The following messages usually indicate that you have variant record definitions in your database:
[WARN] [LNA][PSQL][SQL Engine] The data file '<file.ext>' in the USING clause already exists and is now associated with table '<table>'.
[ERROR] [LNA][PSQL][SQL Engine] Duplicate index exists.
[ERROR] [LNA][PSQL][SQL Engine][Data Record Manager] The key number parameter is invalid(Btrieve Error 6).
Action: See also
Special Case: Working with Multiple or Variant Record Definitions for additional information about these messages.
Referential Integrity Constraints
Issue: The following messages usually indicate that you have referential integrity constraints in your database:
[ERROR] [LNA][PSQL][SQL Engine][Data Record Manager] The MicroKernel cannot find the specified file (Btrieve Error 12).
[LNA][PSQL][SQL Engine][Data Record Manager]The RI definition is out of sync (Btrieve Error 73).
Typically, these errors occur when schema export creates foreign key constraints because you selected the Include IN DICTIONARY option. In the case of status 12, the data files do not exist. In the case of status 73, the data files have been copied from a database with different names.
Action: For databases with referential integrity, you must redo the schema export without selecting the Include IN DICTIONARY option, and then import the schema again. Doing so allows the schema import to create the data files and store referential integrity constraint information in them.
Metadata Version Errors
Issue: The following messages usually indicate that you have exported the schema from a v2 metadata database and are trying to import it into a v1 metadata database:
[LNA][PSQL][SQL Engine]Table name too long: longtablenameinv2database.
[LNA][PSQL][SQL Engine][Data Record Manager]This feature is not supported for the current Metadata version.
These errors occur only if your source database uses features specific to v2 metadata, such as long metadata object names, EXECUTE AS in views or stored procedures, and GRANT statements for views or stored procedures. If you export a schema from a v2 metadata database that uses no v2 metadata features, then importing it into a v1 metadata database should return no errors.
Action: If the original database uses v2 metadata, make sure the target database is also created using v2 metadata so that all v2 metadata features can be recreated.
Schema Validation Log
Messages generated during validation are written to the Import Validation window. After validation, these messages are also written to the file schema_import.log, appearing after the import messages.
The validation process runs a series of queries to compare the new database to the original database. It checks for missing, extra, and mismatched entries for each of the following:
•Tables
•Columns and column attributes
•Primary and foreign keys
•Indexes
•Stored procedures
•Views
•Triggers
•Users and groups, if security is enabled
For missing objects, read the import section of the log to find the entry associated with the failed attempt to create it. This entry provides both the SQL statement and the error generated to help determine what caused the failure.
The following topics provide details and give examples of notable log entries, along with actions to take:
Offset Mismatches
Issue: If you have table definitions with overlapping columns in the original database (see
Export Schema Log), the corresponding table in the new database will have all columns created sequentially. This difference returns in offset mismatch errors for that table.
Action: Correct the table definition in the original database or edit the exported schema.sql file to remove the overlapping columns from the table.
Data Type Mismatches
Issue: Legacy databases do not support the unsigned integer data type. Some table columns that were defined as unsigned 1-byte integers were created with a data type of 1 and a bit set in the columns flags. When unsigned integer support was added, these columns could properly be defined with a data type of 14. The validation may detect this data type difference.
Action: No action is necessary. The new column definitions with data type 14 will function exactly the same as the legacy definition.
Missing Attributes
Issue: If you have a column defined in the original database with both case-insensitivity and an alternate collating sequence, it will be recreated in the new database with only the case-insensitivity flag. A column cannot have both of these attributes. Validation detects the missing COLLATE attribute for these columns.
Action: Check the table properties in the original database to confirm that both CASE and COLLATE are set in the column definition. If so, no action is necessary. The new column definition with case-insensitivity will function exactly as the original definition.
Missing Indexes
Issue: An index may fail to be created for several reasons. If your data file location contains a complete path instead of a relative path, and you select the IN DICTIONARY option, importing the schema may fail to create indexes. Also, variant record definitions may result in mismatch of indexes common to multiple table definitions for the same data file.
Action: Read the import log to find the error associated with the CREATE INDEX statement. Make necessary corrections to the source database or the schema.sql file and import the database again.
Creating, Importing, and Exporting Data
The tables that you create with PCC are initially empty. You can add data to them through PCC or by importing data. PCC provides a wizard to export data and one to import data.
Creating Data Through PCC
Importing Data with Bulk Data Utility
Importing Data with Import Data Wizard
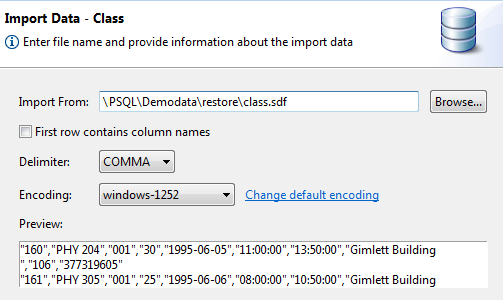
The Import Data Wizard reads delimited data from a text file and adds the data to a table. The wizard allows you to select the following:
•Text file that contains the data to import.
•Field delimiter.
•Whether or not the first line of the exported data contains the column names. If the data was exported with column names as the first line, it be must imported the same way.
Restrictions
The data must use a field delimiter of the comma, colon, or tab character. A combination of carriage return and line feed must delimit records.
►To import data into a database table
1 For a particular database, right-click a table name under the Tables node.
This is the table into which you want to import the data. If you are interested in system tables, expand the Tables node under System Objects.
2 Select Import Data.
3 Provide the import characteristics as discussed above, then click Finish.
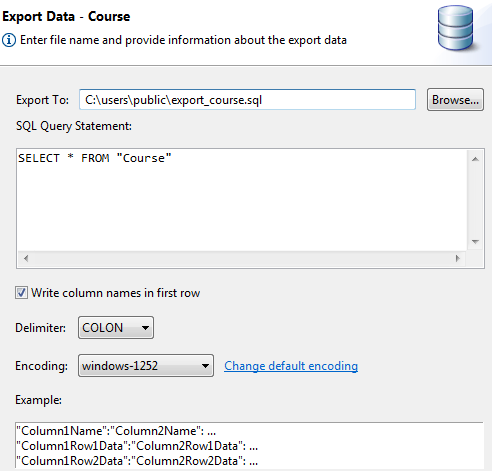
Exporting Data with Export Data Wizard
The Export Data Wizard exports data from a table to a text file. A combination of carriage return and line feed delimits records.
The wizard lets you specify the following:
•Name of the file to which to export data. The directory path must already exist. In this release, the default location is C:\Users\login\filename.ext, the home directory of the currently logged in user and the file name and extension of your choice.
•SQL statement on which the export is based. For example, SELECT * FROM t1 would export all records from table t1.
•Field delimiter (character used to separate data items in each record).
•Encoding of the exported data. For example, if you select ISO-8859-1, the data is exported using that code page. The encoding choices are obtained from the machine on which the utility is running.
•Whether or not to write the names of the columns as the first line of the exported data.
►To export data from a database table
1 For a particular database, right-click a table name under the Tables node.
If you are interested in system tables, expand the Tables node under System Objects.
2 Click Export Data.
3 Provide the export characteristics as discussed above then, click Finish.
statement.
Stored Procedures, Triggers, User-Defined Functions, and Views
PCC helps you to manage CREATE scripts for stored procedures, triggers, user-defined functions, and views. In PSQL Explorer these items appear in folders under each database.
Item | Level of Operation | Description | Related Information |
Stored procedure | Database | A collection of one or more SQL statements that can accept and return user-supplied parameters. |
CREATE PROCEDURE in SQL Engine Reference |
Trigger | Table | A type of stored procedure automatically executed when a table is modified with INSERT, UPDATE, or DELETE. |
CREATE TRIGGER in SQL Engine Reference |
User-defined function | Database | A scalar routine that returns a value. |
CREATE FUNCTION in SQL Engine Reference |
View | Database | A database object created from a query and which behaves like a table. |
ALTER GROUP in SQL Engine Reference |
Use of these features is optional but may be of interest to advanced database users.
Groups, Users, and Security
Security is a database property that requires a user to provide a user name and password to access the database. By default, database security is turned off.
Database security can be turned on in PCC or by executing a SQL statement. Once enabled, you may create groups and users and assign permissions to them. Permissions can specify rights at three levels: database, table, and column.
When you turn security on or off, the Master user must have only one connection open and must be the only user connected at that moment. As soon as you turn security on for the first time, only the Master user can access the database. The Master user password is case sensitive, like all PSQL passwords.
Caution If you turn on security, be sure to specify a password with a significant length. Do not leave the password field blank because doing so creates a major security risk for your database.
For more information about security models, see
PSQL Security in
Advanced Operations Guide.
Security Tasks
This section gives the steps for various PSQL security management tasks. The tasks are divided into categories in the following table.
Category | Description |
| Orienting yourself to the overall use of security |
| Applying security policies for the MicroKernel Engine |
| Creating users and groups |
| Applying permissions to users and groups |
Encryption Tasks | Applying data encryption See
Data Encryption Over Networks in Advanced Operations Guide. |
General Tasks
►To log out from and log in to a database
1 Right-click the database name in PCC PSQL Explorer, then click Logout (name).
Name reflects the name of the user currently logged in to the database. If the database does not have security enabled, name is Master. Name may also be Master if the current user is logged in as Master.
Any nodes expanded for the database are collapsed.
2 Right-click the database name and select Login.
3 Enter the user name and password, then click OK.
Note If you are the Master user, logging in as another user can help in testing the more restrictive permissions that you have assigned this user.
►To turn on security using PSQL Explorer
If the database resides on a remote machine, you must provide a user name and password of an administrator or of a member of the Pervasive_Admin group for the remote machine. The user name and password are not required if the database resides on the local machine to which you are logged in (and the local machine is not running Terminal Services).
Turning on security prevents all users from accessing the database unless they log in to it using a valid database user name and password. User names and passwords cannot be set up until security is turned on, so the database will be inaccessible to each user for the period of time until you have set up a user account for that user.
1 In PSQL Explorer, expand the Engines node, then the Databases node.
2 Right-click the desired database, then click Properties.
3 Click Security.
4 In the Security tab, select the Enable Security check box.
5 Enter a password for Master Password.
6 Click OK.
Database security is now on and you are logged in as the Master user. For instructions on creating database user accounts, see
User and Group Tasks.
►To turn on security using SQL
You must be logged into the computer as an administrator or as a member of the Pervasive_Admin operating system security group.
Turning on security prevents all users from accessing the database unless they log in to it using a valid database user name and password. User names and passwords cannot be set up until security is turned on, so the database will be inaccessible to each user for the period of time until you have set up a user account for that user.
1 Turn security on for the database as explained in
General Tasks.
2 In the
File menu of PCC, click
New >
SQL Document (or click

in the toolbar).
The Select Database dialog box appears.
3 Click the database in the list for which you want to create a group or user.
4 Click OK.
5 In SQL Editor, issue the SQL statement SET SECURITY= ‘password’ where password is the text string you want to use as the password for the Master user.
6 Click
SQL >
Execute in Text (or click

in the toolbar).
See also
SET SECURITY in
SQL Engine Reference.
►To turn off security using PSQL Explorer
You must be logged into the computer as an administrator or as a member of the Pervasive_Admin operating system security group.
Caution Turning off security allows all operating system users to access the database if database security is Mixed or Database mode. Database user names, passwords, and permissions are retained but not used if security is turn off. If security is reenabled, the previous user names, passwords, and permissions take effect again. (An exception is the Master user. The Master password is not retained or reapplied.)
1 In PSQL Explorer, expand the Engines node, then the Databases node.
2 Right-click the desired database then click Properties.
3 Click Security.
4 Click the Security tab.
5 Click Enable Security to clear the option.
6 Click OK.
Database security is now off.
►To turn off security using SQL
Caution Turning off security allows all operating system users to access the database if database security is Mixed or Database mode. Database user names, passwords, and permissions are retained but not used if security is turn off. If security is reenabled, the previous user names, passwords, and permissions take effect again. (An exception is the Master user. The Master password is not retained or reapplied.)
1 Turn security on for the database as explained in
General Tasks.
2 In the PCC
File menu, click
New >
SQL Document (or click

in the toolbar).
The Select Database dialog appears.
3 Click the database in the list for which you want to create a group or user.
4 Click OK.
5 In SQL Editor, issue the SQL statement SET SECURITY= NULL.
6 Click
SQL >
Execute in Text (or click
in the toolbar).
See also
SET SECURITY in
SQL Engine Reference.
Btrieve Security Policy Tasks
►To set or change the security policy for a database
Caution Changing security policy for a database may prevent current users from accessing the database, if security is turned on and the given users do not have equivalent user accounts and rights under the new security policy.
1 Turn security on for the database as explained in
General Tasks.
2 In PSQL Explorer, expand the Engines node, then the Databases node.
3 Right-click the desired database then click Properties.
4 Click Security.
5 Click the Btrieve Security tab.
6 Click the desired policy: Classic, Mixed, or Database.
7 Click OK.
For information about these security policies, see
PSQL Security in
Advanced Operations Guide.
Caution If your database has security turned on and you change from Classic security policy to Mixed or Database, all users are prevented from accessing the database until you create database user accounts and set permissions for them.
►To use an existing database, including the predefined DefaultDB, with your PSQL files
1 In PSQL Explorer, expand the Engines node, then the Databases node.
2 Right-click the desired database then click Properties.
3 Click Directories then click New.
4 Type a path for the PSQL files then click OK.
If your files are spread over many directories, specify a high-level directory that they all have in common. You can specify a root level if necessary, but doing so includes in the database all PSQL files at the root level and its subordinate directories.
You do not need to enter every directory, but rather only the lowest-level directory common to all Btrieve files to be included in the database.
5 Turn security on for the database as explained in
General Tasks.
User and Group Tasks
►To create a new group using PSQL Explorer
Note that you cannot add a group to another group.
1 Turn security on for the database as explained in
General Tasks.
2 Expand the nodes for the database.
3 Right-click Groups and select New > Group.
4 Enter a group name.
5 Click Finish.
►To create a new user using PSQL Explorer
These steps apply only to the use of the local database security model. In the Windows domain security model, network domain accounts are used for logging in to a PSQL database. Group membership is assigned by a network administrator, and PSQL queries the Windows network authentication server to verify user credentials and retrieve and match membership in PSQL groups where permissions are defined.
1 Turn security on for the database as explained in
General Tasks.
2 Expand the nodes for the database.
3 Right-click the Users node, then click New > User.
4 Enter a user name.
5 Enter a password.
Passwords are case sensitive. For a list of database object lengths and invalid characters, see
Identifier Restrictions by Identifier Type in
Advanced Operations Guide.
6 Optionally, assign the user to a group.
Click

for
Group, then click the desired group in the list.
7 Click Finish.
►To assign a user to a group using PSQL Explorer
A user can be a member of only one group. All users in that group have the same permissions defined for that group. Once a user joins a group, any of his or her individual user permissions are ignored and all permissions are a combination of the user’s group and PUBLIC permissions. You cannot grant or revoke individual permissions for a user who is in a group.
1 Turn security on for the database as explained in
General Tasks.
3 Right-click a user name under the Users node, then click Properties.
4 Click General.
5 Click

for
Group, then click the desired group in the list.
6 Click OK.
►To delete a group or user using PSQL Explorer
Note that a group can be deleted only if no users are assigned to it.
1 Expand the nodes for the database.
2 Expand the Groups node or Users node.
3 Right-click the desired group or user name.
4 Click Delete.
5 Click Yes.
►To work with groups and users using SQL
1 Turn security on for the database as explained in
General Tasks.
2 In the
File menu of PCC, click
New >
SQL Document (or click
in the toolbar).
The Select Database dialog box appears.
3 Click the database in the list for which you want to create a group or user, and click OK.
4 In SQL Editor, create the desired statement for the group or user.
For more information about SQL statements, see the following in SQL Engine Reference:
5 To execute the statement, click
SQL >
Execute in Text (or click
in the toolbar).
Note When you are using Windows domain authentication to secure a PSQL database, if you drop a group that contains users in Active Directory, those users become unable to log in to the database. To restore their login ability, recreate the PSQL group using the same name used in Active Directory.
Assigning Permissions Tasks
As a general note for all of the tasks described here, if you wish to assign permissions to an object where the underlying Btrieve file has an owner name, then you must specify that owner name first either by using a GRANT or SET OWNER statement. For more information, see SQL Engine Reference.
►To assign permissions for a group using PSQL Explorer
Note Permissions on the Database tab override permissions on the Table tab.
1 Expand the nodes for the desired database.
2 Right-click the group name under the Groups node, then click Properties.
3 Click Permissions.
5 In the tab, set the desired permissions.
A check mark indicates that the permission applies.
6 Click OK.
►To assign permissions for a user using PSQL Explorer
Note You cannot assign specific permissions to a user if the user is a member of a group. The permissions of the group apply to the user, combined with PUBLIC group permissions. Permissions on the Database tab override permissions on the Table tab.
1 Expand the nodes for the desired database.
2 Right-click the user name under the Users node, then click Properties.
3 Click Permissions.
5 In the tab, set the desired permissions.
A check mark indicates that the permission applies.
6 Click OK.
►To assign permissions to all users using PSQL Explorer
Note Permissions on the Database tab override permissions on the Table tab.
1 Expand the nodes for the desired database.
2 Right-click PUBLIC under the Groups node, then click Properties.
3 Click Permissions.
5 In the tab, click the option for the desired permission.
A check mark indicates that the permission applies.
6 Click OK.
►To assign permissions for a group or user using SQL
1 In the
PCC File menu, click
New >
SQL Document (or click
in the toolbar).
The Select Database dialog box appears.
2 Expand the nodes for the desired database, and click OK.
3 In SQL Editor, create the desired statement for the group or user.
In SQL Engine Reference, see the following:
4 Click
SQL >
Execute in Text (or click
in the toolbar).
Configuring Database Engines and Clients
For most users, the configuration of a PSQL server or its client set by default during installation can satisfy ordinary needs. However, for certain purposes, such as debugging, memory usage, or performance tuning, you may need to change the configuration settings. In PSQL these settings are called properties. You can manage them in PCC or from the command line.
The following topics in Advanced Operations Guide tell where to find the engine and client properties.
For more information on configuring servers and clients, see the following topics in Advanced Operations Guide:
Dialogs for File Open and File Save
By default, PCC uses its own dialogs for File Open and File Save (and File Save As). The two dialogs are titled Open SQL Document and Save SQL Document, respectively, because the files that PCC deals with are SQL documents. Accordingly, File > New creates a SQL document.
The dialogs allow you to work with files containing character encodings different from the system encoding more easily than with the standard dialogs for open and save. For example, if you create a SQL script that contains wide character data, saving the file without the proper encoding could result in lost data. For example, the system code page in use may not support wide character data.
This section covers the following topics:
Encoding Choices
The dialogs allow you to change the file encoding during the open or save action. In addition, the File Open dialog shows a preview of the data based on the selected file encoding. The following table explains the encoding choices.
Table 11 Encoding Choices for File Open and File Save Dialogs
Encoding | Discussion |
(system code page) | The default is the system code page currently in use. For example, on Windows platforms in English you commonly see “windows-1252.” |
Big5 | Big5 is a Chinese character encoding method used for traditional Chinese characters. |
EUC_JP | Extended Unix Code (EUC)_JP is a variable-width encoding used to represent the elements of three Japanese character set standards: JIS X 0208, JIS X 0212, and JIS X 0201. |
Shift_JIS | Shift_JIS (Japanese Industrial Standards) is a character encoding for the Japanese language. |
UTF-8 | UTF (Universal Character Set Transformation Format)-8 is an 8-bit variable-width encoding that can represent every character in the Unicode character set. It was designed for backward compatibility with ASCII and to avoid the complications of endianness and byte order marks (BOM). |
UTF-8 with BOM | Same as UTF-8 except with a byte order mark (BOM)—which is a Unicode character used to signal the endianness (byte order)—written to the file during the save action. |
UTF-16BE (big endian) | A UTF encoding in 16-bit with byte order of big endian. |
UTF-16BE with BOM | Same as UTF-16BE except with a BOM written to the file during the save action. |
UTF-16LE (little endian) | A UTF encoding in 16-bit with byte order of little endian. |
UTF-16LE with BOM | Same as UTF-16LE except with a BOM written to the file during the save action. |
Notes: By default, PCC remembers the encoding of a file that has been opened. If you modify the file and save your changes, the changes are saved in the original encoding. However, if you use the alternate File Save dialog to save your changes, the changes are saved to the encoding specified on the dialog. PCC automatically detects the encoding of a file if the file contains a BOM and displays that encoding in the alternate File Open dialog. If the file does not contain a BOM and byte order is important, you need to select the proper encoding for the save action. |
Default Encoding
In addition to changing the file encoding during the open or save action, you can set the default encoding to use for opens and saves. This same default is used for importing and exporting data and exporting schemas. See
Importing Data with Import Data Wizard,
Exporting Data with Export Data Wizard, and
Managing Schemas. You cannot set different defaults for the open and save actions, for example.
►To set a default encoding for File Open and File Save
1 In PCC, select Window > Preferences > PSQL > File Encoding.
2 Select an encoding from the default encoding list.
3 Click OK.
Note You can also access the File Encoding preferences from the dialogs for File Open, Save File, Import Data, Export Data, and Export Schema, and Export Table Schema. Click Change default encoding in the dialog.
Invalid File Name Characters
The alternate dialogs check for valid characters in a file name before allowing the open or save action. The following set of characters are invalid and cannot be used: / : * ? \ " < > |
To allow a file to be moved between Windows and Linux or macOS, the set of invalid characters is the same for all operating systems supported by PSQL.
File Open Dialog (Open SQL Document)
The following illustration shows the File Open dialog selecting the demodata.sql sample file provided with PSQL. The preview displays the first few lines of the file.
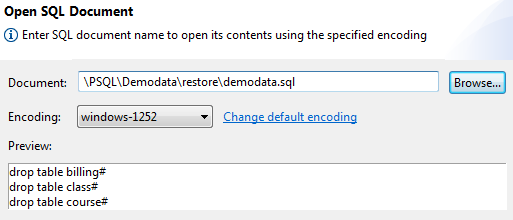
The Document field defaults to the directory of the last file opened or saved. You can use the Browse button to select other files and locations.
File Save Dialog (Save SQL Document)
The following illustration shows the File Save dialog. Preview does not apply. The Document field defaults to the location used for the previous File Save or File Open.
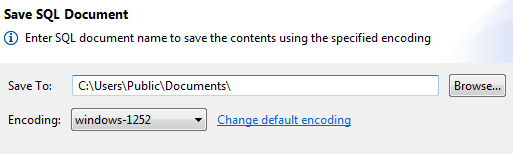
A full path and file name is required to save a SQL document. You can access the standard operating system file dialog by clicking Browse.
Using the Standard Operating System Dialogs
If you prefer, you can use the standard operating system dialogs for File Open and File Save. For example, you may have no need to work with encodings outside the system code page, in which case you may want to use the standard dialogs.
►To use the standard operating system dialogs for File Open and File Save
1 In PCC, select Window > Preferences > PSQL > File Encoding.
2 Select the option Do not prompt for encoding during File Open and File Save.
3 Click OK.
Note You can also access the File Encoding preferences from the dialogs for File Open, Save File, Import Data, Export Data, and Export Schema. Click Change default encoding on the dialog.
Wide Character Data Support for Import Data, Export Data, and Export Schema
Import Data, Export Data, and Export Schema now allow you to work with files containing wide character data. You can change the file encoding during the import or export action, similar to File Open and File Save. See
Encoding Choices.
The dialog field in which you specify a file path and name defaults to the path location used for the previous data import or export or schema export. (Import Data, Export Data, and Export Schema use the same persistence setting). A full path name is required to enable the import and export actions.
Import Data Dialog
Import Data allows you to change file encoding and to set a default encoding. In addition, the Preview inset shows a preview of the data based on the file name, file encoding and the options selected. For example, the following illustration shows the class.sdf table provided with PSQL about to be imported. Encoding is set to windows-1252 and Preview shows what the file data looks like based on that encoding with a COMMA delimiter and no column names in the first row.
If you import a file with a BOM, the BOM is recognized and stripped off during the import. In addition, the file is imported with the encoding specified by the BOM regardless of what encoding you specify on the dialog. That is, a file BOM overrides the Encoding selection.
Note that you can access the standard operating system dialog for file selection by clicking Browse.
Export Data Dialog
Export Data allows you to change file encoding and to set a default encoding. Note that the Example field does not provide a preview but rather a sample given the selected options.
For example, in the following illustration, the dialog is set to export the data for the Course table provided with the Demodata sample database. The option Write column names in first row is selected and that Delimiter is set to COLON.
Note that the export action trims trailing spaces from the values of the CHAR and NCHAR data types. You can access the standard operating system dialog for file selection by clicking Browse.
Export Schema Dialog
Export table Schema now allows you to change file encoding and to change the default encoding. Note that the Example field does not provide a preview but rather a sample given the selected options.
For example, in the following illustration, the dialog is set to export the schema for the Faculty table provided with the Demodata sample database. Note that the option add ‘IN DICTIONARY’ clause to CREATE statements is selected and that the Example inset contains an IN DICTIONARY clause.
The Export Database Schema wizard has similar settings but no Example field, since all tables are to be exported. For more information, see
Managing Schemas.