DataExchange Basics
The following topics explain the core concepts and routine tasks of using DataExchange. Information on working with the engine, logins and DSNs related to DataExchange is included.
Starting and Stopping Replication
Depending on the Zen product, the DataExchange replication engine runs as a service or a console application. It can be accessed from Control Center (ZenCC). This topic covers starting and stopping the engine in all three cases.
As a Service
The DataExchange executable replserv.exe runs as a service on the system where Zen Enterprise Server is installed. It is a single executable that runs under the Windows Service Control Manager. It is configured by default to run when the system starts under the LocalSystem account, which should be adequate in most cases. If needed, you can change the account in the Log On tab of the Properties dialog for the service in the Services Control Panel.
To start the Replication service
1. Open the Services Control Panel.
2. Select Actian DX Replication.
3. Do one of the following:
• Select the service and then on the left, click Start.
• Open the service and under Service Status, click Start.
• Right-click the service and select Start.
To stop the Replication service
1. Open the Services Control Panel.
2. Select Actian DX Replication.
3. Do one of the following:
• Select the service and then on the left, click Stop.
• Open the service and under Service Status, click Stop.
• Right-click the service and select Stop.
From Zen Control Center
To start the Replication service
1. Start ZenCC if it is not already running.
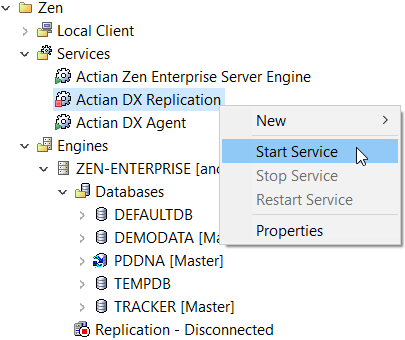
In Zen Explorer under Engines, the Replication icon  shows a red dot to show the replication engine is stopped.
2. Expand the Services branch.
3. Right-click Actian DX Replication and select Start Service. 

Under Engines, the Replication icon  shows a green arrow to show the replication engine is running.
To stop the Replication service
1. Start ZenCC if it is not already running.
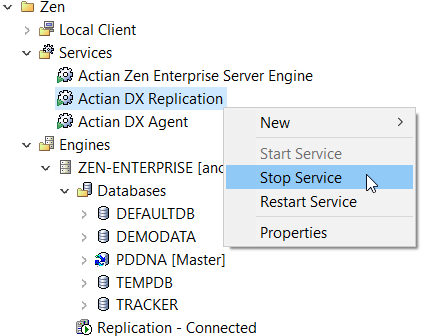
In the Replication icon  the green arrow shows the replication engine is running.
2. Expand the Services branch.
3. Right-click Actian DX Replication and select Stop Service. 

In the Replication icon  the red dot shows the replication engine is stopped.
Starting and Stopping the DX Agent Service
DataExchange Agent runs as a service. It can be accessed from ZenCC. This topic covers stopping and starting the agent as a service and from ZenCC.
As a Service
The DataExchange executable dxagent.exe runs as a service on the system where Zen Enterprise Server is installed. It is configured by default to run when the system starts under the Local System account, which should be adequate in most cases. If needed, you can change the account in the Log On tab of the Properties dialog for the service in the Services Control Panel.
To start the DX Agent service
1. Open the Services Control Panel.
2. Select Actian DX Agent.
3. Do one of the following:
• Select the service and then on the left, click Start.
• Open the service and under Service Status, click Start.
• Right-click the service and select Start.
To stop the DX Agent service
1. Open the Services Control Panel.
2. Select Actian DX Agent.
3. Do one of the following:
• Select the service and then on the left, click Stop.
• Open the service and under Service Status, click Stop.
• Right-click the service and select Stop.
From Zen Control Center
To start the DX Agent service
1. Start ZenCC if it is not already running.
2. In Zen Explorer, expand the Services branch.
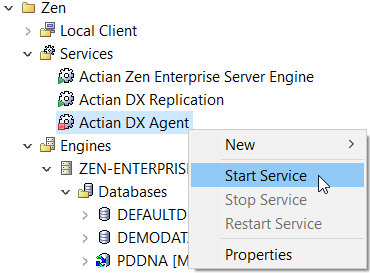
3. Right-click Actian DX Agent and select Start Service. 

In the Services branch, the service icon  is now green to show DX Agent is running.
To stop the DX Agent service
1. Start ZenCC if it is not already running. (Select Zen Control Center & Documentation from the Start menu.)
2. Expand the Services branch.
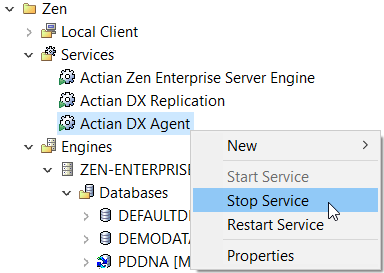
3. Right-click Actian DX Agent and select Stop Service. 

In the Services branch, the service icon  is now red to show DX Agent is stopped.
ODBC Basic Concepts
Zen follows the Microsoft standard for ODBC database connections. According to the standard, applications must connect to databases through Data Source Names (DSNs) defined in the operating system.
Every Zen database that you expect to access using ODBC must have a Data Source Name (DSN) available on the same computer as the database engine, and (if applicable) another DSN on the client computer. The only exceptions are Zen tools, which can access remote databases without using DSNs on the client computer. A DSN created on the same machine as the database engine is called an Engine DSN. A DSN created on the client machine is called a Client DSN.
Note: Zen databases that are accessed only through Btrieve do not need DSNs. However, in this case, the database is not visible in ZenCC nor can it be manipulated using ZenCC. Zen recommends using Data Dictionary Files (DDFs) and DSNs with all databases, including ones accessed only through Btrieve, to make them easier to manipulate.
Servers and Clients
Every Zen server engine includes a client installation. So you can use your server machine to connect to other servers as a client.
Zen clients can connect to remote machines where a Zen server engine is installed.
Data Source Names
In a client-server architecture, each data set must have a well-known name. A DSN is a well-known name for a data set. There are generally three ways to create DSNs:
• Create an Engine DSN from the server console.
• Create an Engine DSN remotely from a client machine.
• Create a Client DSN on each client machine.
Components of a Database Name
There are two components of a database name. Zen uses an internal Database Name (DBNAME) to identify the location of the Data Dictionary Files (DDFs) and the data files for each database. An ODBC Data Source Name (DSN) entry refers to one DBNAME.
You may set up more than one DSN that refers to the same DBNAME. If the physical location of the data files on the server is changed, only the DBNAME needs to be updated. All DSNs remain unchanged.
Replicating a Database with Zen Security
Zen provides security models for Btrieve applications. However, an activated database created by DXdeploy does not automatically use security, even if its source database does. You can add security in one of two ways:
• Enable security in ZenCC before designing a new template for replication.
• For an already activated database, first deactivate the database at all sites. Once Zen security has been configured, you can then reactivate the database.
For more information about security in Zen, see Advanced Operations Guide.
The following example uses Demodata to show the use of Zen security with DataExchange.
Deploying Demodata Under Zen Security
The topic Replication Deployment Using DXdeploy with an XML Descriptor File explains how to deploy the sample database Demodata under the Classic security model. However, if you are using either Database or Mixed security, you must first ensure that Demodata can be deployed successfully.
The following table lists actions required to deploy Demodata. Perform these on both the First Site and the Partner Site before attempting the DXdeploy example deployment.
Replication Site | Database Security Model | Mixed Security Model |
|---|---|---|
First | • Add C:\ProgramData\Actian\Zen\Demodata as a data file location for DefaultDB • Add the templates directory as a data file location for DefaultDB. For example, on a 64-bit system this location is C:\Program Files (x86) \Actian\Zen\Replication\Templates. • In ZenCC under Configuration for Server Access, turn on Prompt for Client Credentials. You can also do this using the Zen pvnetpass utility. • During the example deployment, a login dialog prompts you to log in to DefaultDB. When you enter the user name and password, select the option Save User Name and Password to avoid having to log in for each table replicated. • After the example deployment finishes, we recommend that you use pvnetpass to remove the saved user name and password. If you choose not to do this, note that any Btrieve application on the secured site has access to all databases associated with DefaultDB. | • Add C:\ProgramData\Actian\Zen\Demodata as a data file location for DefaultDB • Add the templates directory as a data file location for DefaultDB. For example, on a 64-bit system this location is C:\Program Files (x86) \Actian\Zen\Replication\Templates. • In ZenCC, click Users for DefaultDB. Right-click the Public group, then click Properties. • Click the Permissions tab. Grant all permissions for Public, then click OK. • After the example deployment finishes, reset the permissions for user Public as suits your business requirements. |
Partner | • Add C:\ProgramData\Actian\Zen\Demodata as a data file location for DefaultDB | • Add C:\ProgramData\Actian\Zen\Demodata as a data file location for DefaultDB |
Once you have finished these actions, you can return to the example under Replication Deployment Using DXdeploy with an XML Descriptor File or to your own replication database deployment.
Last modified date: 05/31/2024