Using Zen Data Providers in Visual Studio
Zen data providers support integration into Visual Studio. This means that developers can use the graphical user interface of Microsoft Visual Studio to perform a variety of tasks.
The following topics describe how the features of the Zen data providers are integrated into Visual Studio:
Adding Connections
You can add connections in several ways in Visual Studio:
Adding Connections in Server Explorer
To add a connection
1. Right-click the Data Connections node in the Server Explorer and select Add Connection. 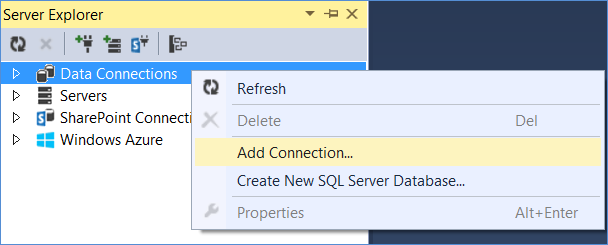
The Add Connection window appears. 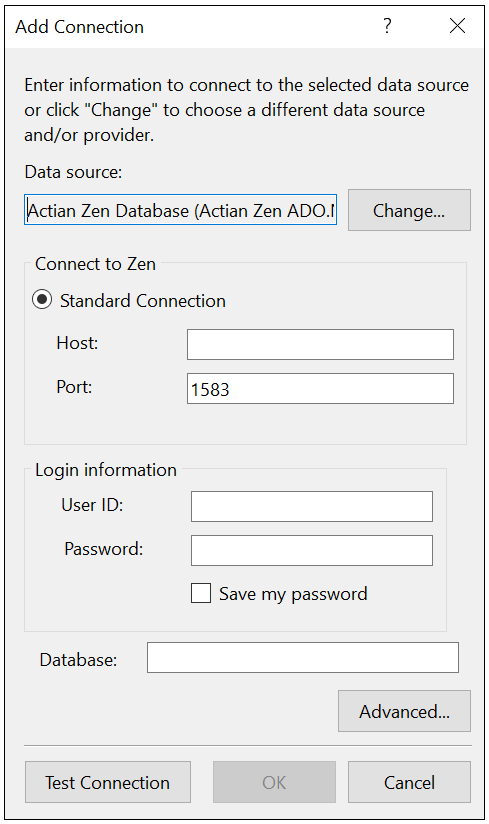
2. If the Zen data provider is displayed in the Data source field, skip to Step 4. Otherwise, click Change.
3. The Change Data Source window appears. 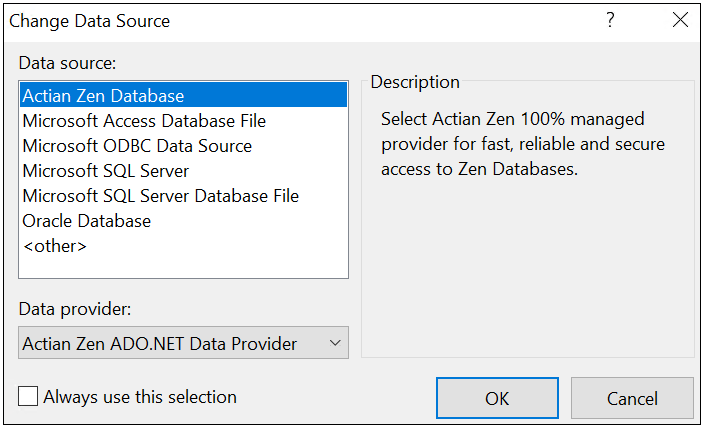
a. In the Data source list box, select Actian Zen Database.
b. In the Data provider list, select Actian Zen ADO.NET Data Provider.
c. If you want to use these selections for other connections, select the Always use this selection check box.
d. Click OK to return to the Add Connection window.
4. In the Add Connection window, do the following steps:
a. Enter the Host name.
b. Enter the User ID and password. These values are required for authentication.
c. (Optional) If you want to save the password for the lifetime of connection instance defined in Server Explorer, select the Save my password check box.
d. (Optional) In the Database entry field, enter the name of the database to which you want to connect.
5. Click the Advanced button to specify additional provider-specific property values. 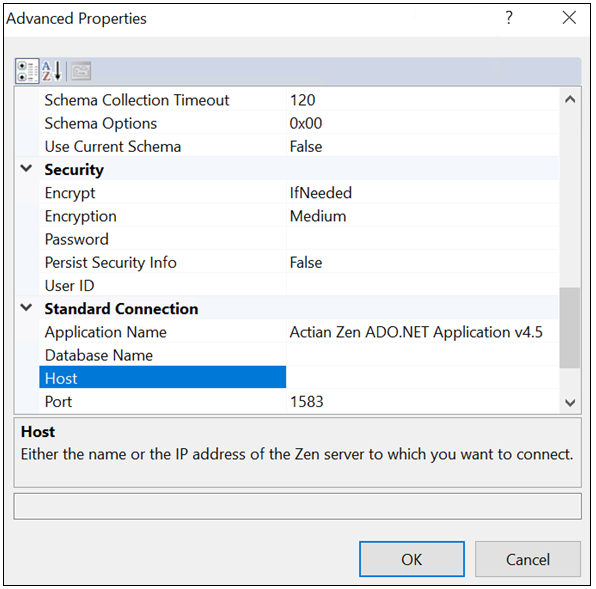
To change a value in the Advanced Properties dialog box, select or type the new value into the field and press ENTER. The value is added to the connection string that appears in the field below the description of the property. If you accept the default values, the connection string field remains unchanged. When you have made the necessary changes, click OK to return to the Add Connection window.
Advanced
EnableIPv6: Provides backward compatibility for connecting to a Zen server using an IPv4 address.
If set to True, a client with IPv6 protocol installed can connect to the server using either an IPv4 address or an IPv6 address.
If set to False, the clients run in the backward compatibility mode. The client always connects to the server using an IPv4 address.
The default value for 4.0 is set to True.
For more information about IPv6 formats, see IPv6 in Getting Started with Zen.
Encoding: Type the ANSI name or Windows code page to be used for translating string data stored in the database. By default, the Windows code page is used.
Initial Command Timeout: Specifies the default wait time (timeout in seconds) before the data provider terminates the attempt to execute the command and generates an error. This option provides the same functionality as the PsqlCommand object’s CommandTimeout property without the need to make changes to the application code. Subsequently, an application can use the CommandTimeout property to override the Initial Command Timeout connection string option.
The initial default value is 30 seconds.
Note: Set the Initial Command Timeout option to a value that is greater than the largest default deadlock detection and timeout value on the server. This ensures that the application receives a more meaningful reply in case of a timeout.
Initialization String: Type one statement that will be issued immediately after connecting to the database to manage session settings.
Example: To handle CHAR columns that are padded with NULLs, set the value to:
Initialization String=SET ANSI_PADDING ON
Note: If the statement fails to execute for any reason, the connection to the server fails. The data provider throws an exception that contains the errors returned from the server.
Parameter Mode: Select the behavior of native parameter markers and binding. This allows applications to reuse provider-specific SQL code and simplifies migration to Zen data providers. Note that this option does not apply to Zen ADO.NET Entity Framework data providers.
If set to ANSI (the default), the ? character is processed as a parameter marker and bound as ordinal.
If set to BindByOrdinal, native parameter markers are used and are bound as ordinal.
If set to BindByName, native parameter markers are used and are bound by name.
PVTranslate: Select whether the client should negotiate a compatible encoding with the server.
If set to Auto, then the data provider will set the Encoding connection property to the database code page. In addition, SQL query text will be sent to the engine using UTF-8 encoding instead of the data encoding. This preserves NCHAR string literals in the query text.
If set to Nothing (the default), the setting for the Encoding connection property is used.
Timestamp: Select whether Zen time stamps are stored and retrieved as strings.
If set to DateTime (the initial default), the data provider maps time stamps to DateTime. This setting may be appropriate when native precision is required, for example, when using the CommandBuilder with a time stamp.
If set to String, the data provider maps Zen time stamps as strings.
TimeType: Select whether Zen times are retrieved as Timespan or DateTime in Zen ADO.NET data providers.
If set to As DateTime, the data provider maps the SQL type TIME to the .NET type System.DateTime.
If set to As TimeSpan, the data provider maps the SQL type TIME to the .NET type System.DateTimespan.
Connection Pooling
Connection Reset: Select whether a connection that is removed from the connection pool for reuse by an application will have its state reset to the initial configuration settings of the connection.
If set to False (the initial default), the data provider does not reset the state of the connection.
Connection Pool Behavior: Select the order in which a connection is removed from the connection pool for reuse, based on how frequently or how recently the connection has been used.
If set to MostRecentlyUsed, the data provider uses a Last In First Out (LIFO) approach to return the connection that was returned to the pool most recently.
If set to LeastRecentlyUsed, the data provider uses a First In First Out (FIFO) approach to return the connection with the lowest use count. This value ensures a balanced use of connections in the pool.
If set to MostFrequentlyUsed, the data provider returns the connection with the highest use count. This value enables applications to give preference to the most seasoned connection.
If set to LeastFrequentlyUsed, the data provider returns the connection with the lowest use count. This value ensures a balanced use of connections in the pool.
Connection Timeout: Type the number of seconds after which the attempted connection to the server will fail if not yet connected. If connection failover is enabled, this option applies to each connection attempt.
If set to 0, the data provider never times out on a connection attempt.
The initial default is 15 seconds.
Load Balance Timeout: Type the number of seconds to keep connections in a connection pool. The pool manager periodically checks all pools, and closes and removes any connection that exceeds this value. The Min Pool Size option can cause some connections to ignore the value specified for the Load Balance Timeout option.
The value can be any integer from 0 to 65535.
If set to 0 (the initial default), the connections have the maximum timeout.
See Removing Connections from a Pool for a discussion of connection lifetimes.
Max Pool Size: Type the maximum number of connections within a single pool. When the maximum number is reached, no additional connections can be added to the connection pool.
The value can be any integer from 1 to 65535.
The initial default is 100.
Max Pool Size Behavior: Select whether the data provider can exceed the number of connections specified by the Max Pool Size option when all connections in the connection pool are in use.
If set to SoftCap, when all connections are in use and another connection is requested, a new connection is created, even when the connection pool exceeds the number set by the MaxPoolSize option. If a connection is returned and the pool is full of idle connections, the pooling mechanism selects a connection to be discarded so the connection pool never exceeds the Max Pool Size.
If set to HardCap, when the maximum number of connections allowed in the pool are in use, any new connection requests wait for an available connection until the Connection Timeout is reached.
Min Pool Size: Type the minimum number of connections that are opened and placed in a connection pool when it is created. The connection pool retains this number of connections, even when some connections exceed their Load Balance Timeout value.
The value can be any integer from 0 to 65535.
If set to 0 (the initial default), no additional connections are placed in the connection pool when it is created.
Pooling: Select True (the initial default) to enable connection pooling.
Failover
Alternate Servers: Type a list of alternate database servers to which the data provider will try to connect if the primary database server is unavailable. Specifying a value for this property enables connection failover for the data provider.
For example, the following Alternate Servers value defines two alternate servers for connection failover:
Alternate Servers="Host=AcctServer;Port=1584,
Host=123.456.78.90;Port=1584"
Host=123.456.78.90;Port=1584"
Connection Retry Count: Type the number of times the data provider tries to connect to the primary server, and, if specified, the alternate servers after the initial unsuccessful attempt.
The value can be any integer from 0 to 65535.
If set to 0 (the initial default), there is no limit to the number of attempts to reconnect.
Connection Retry Delay: Type the number of seconds the data provider waits after the initial unsuccessful connection attempt before retrying a connection to the primary server, and, if specified, the alternate servers.
The initial default is 3.
This property has no effect unless the Connection Retry Count property is set to an integer value greater than 0.
Load Balancing: Select True or False to determine whether the data provider uses client load balancing in its attempts to connect to primary and alternate database servers.
If set to False (the initial default), the data provider does not use client load balancing.
Performance
Enlist: Select True or False to determine whether the data provider automatically attempts to enlist the connection in creating the thread’s current transaction context.
Note: Because Zen does not support distributed transactions, any attempt to enlist the connection in the thread’s current transaction context will fail.
If set to False (the initial default), the data provider does not automatically attempt to enlist the connection.
If set to True, the data provider returns an error on the connection if a current transaction context exists. If a current transaction context does not exist, the data provider raises a warning.
Max Statement Cache Size: Type the maximum number of statements generated by the application that can be held in the statement cache for this connection.
The value can be 0, or any integer greater than 1.
If set to 0, statement caching is disabled.
If set to an integer greater than 1, the value determines the number of statements that can be held in the statement cache.
The initial default is 10.
Statement Cache Mode: Select the statement caching mode for the lifetime of the connection. See Using Statement Caching for more information.
If set to Auto, statement caching is enabled. Statements marked as Implicit by the Command property StatementCacheBehavior are cached. These commands have a lower priority than that of explicitly marked commands, that is, if the statement pool reaches its maximum number of statements, the statements marked implicit are removed from the statement pool first to make room for statements marked Cache.
If set to ExplicitOnly (the initial default), only commands that are marked Cache by the StatementCacheBehavior property are cached. Note that this is the only valid value for Zen ADO.NET Entity Framework data providers.
Schema Information
Schema Collection Timeout: Type the number of seconds after which an attempted schema collection operation fails if it is not yet completed.
The initial default is 120.
Schema Options: Specifies additional database metadata that can be returned. By default, the data provider prevents the return of some performance-expensive database metadata to optimize performance. If your application needs this database metadata, specify the name or hexadecimal value of the metadata.
This option can affect performance.
If set to ShowColumnDefaults or 0x04, column defaults are returned.
If set to ShowParameterDefaults or 0x08, column defaults are returned.
If set to FixProcedureParamDirection or 0x10, procedure definitions are returned.
If set to ShowProcedureDefinitions or 0x20, procedure definitions are returned.
If set to ShowViewDefinitions or 0x40, view definitions are returned.
If set to ShowAll or 0xFFFFFFFF, all database metadata is returned.
For example, to return descriptions of procedure definitions, specify Schema Options=ShowProcedureDefinitions or Schema Options=0x20.
To show more than one piece of the omitted database metadata, specify either a comma-separated list of the names, or the sum of the hexadecimal values of the column collections that you want to restrict.
See Date and Time Canonical Functions for the name and hexadecimal value of the database metadata that the data provider can add.
Use Current Schema: This connection string option is not supported. Setting it will cause the data provider to throw an exception.
Security
Encrypt: Select whether the data provider uses Encrypted Network Communications, also known as wire encryption.
If set to IfNeeded (the initial default), the data provider reflects the server's setting.
If set to Always, the data provider uses encryption, or, if the server does not allow wire encryption, returns an error.
If set to Never, the data provider does not use encryption and returns an error if wire encryption is required by the server.
Encryption: Select the minimum level of encryption allowed by the data provider. The meaning of these values depends on the encryption module used. With the default encryption module, the values Low, Medium, and High correspond to 40-, 56-, and 128-bit encryption, respectively.
The initial default is Medium.
Password: Type a case-insensitive password used to connect to your Zen database. A password is required only if security is enabled on your database. If so, contact your system administrator to get your password.
Persist Security Info: Select whether to display secure information in clear text in the ConnectionString property.
If set to True, the value of the password connection string option is displayed in clear text.
If set to False (the initial default), the data provider does not display secure information in clear text.
User ID: Type the default Zen user name used to connect to your Zen database.
Standard Connection
Database Name: Type a string that identifies the internal name of the database to which you want to connect.
If you enter a value for this field, the Server DSN field is not available.
Host: Type the name or the IP address of the Zen server to which you want to connect. For example, you can specify a server name such as accountingserver. Or, you can specify an IPv4 address such as 199.262.22.34 or an IPv6 address such as 2001:DB8:0000:0000:8:800:200C:417A.
Port: Type the TCP port number of the listener running on the Zen database.
The default port number is 1583.
Server DSN: The name of the data source on the server, such as DEMODATA.
If you enter a value for this field, the Database Name field is not available.
Tracing
Enable Trace: Type a value of 1 or higher to enable tracing. If set to 0 (the default), tracing is not enabled.
Trace File: Type the path and name of the trace file. If the specified trace file does not exist, the data provider creates it. The default is an empty string.
1. Click Test Connection. At any point during the configuration process, you can click Test Connection to attempt to connect to the data source using the connection properties specified in the Add Connection window.
• If the data provider can connect, it releases the connection and displays a Connection Established message. Click OK.
• If the data provider cannot connect because of an incorrect environment or incorrect connection value, it displays an appropriate error message.
2. Click OK.
Note: If you are configuring alternate servers for use with the connection failover feature, be aware that the Test Connection button tests only the primary server, not the alternate servers.
3. Click OK or Cancel. If you click OK, the values you have specified become the defaults when you connect to the data source. You can change these defaults by using this procedure to reconfigure your data source. You can override these defaults by connecting to the data source using a connection string with alternate values.
Adding Connections with the Data Source Configuration Wizard
You can add a new connection to your application using the Data Configuration Wizard.
To add a connection
1. In the Data Sources window in Visual Studio, select Add New Data Source. To open the Data Sources window, select View from the main menu and then select Other Windows > Data Sources. 
The Data Source Configuration Wizard appears. 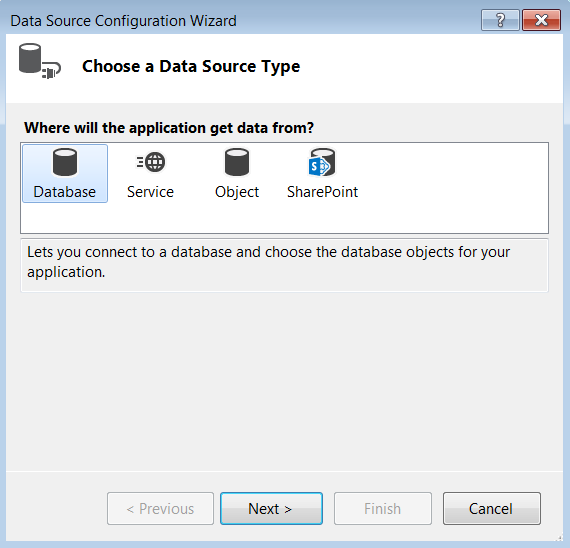
2. Select Database and then click Next. The Choose Your Data Connection window appears. 
3. Click New Connection The Add Connection window is displayed. Continue from Step in Adding Connections in Server Explorer. 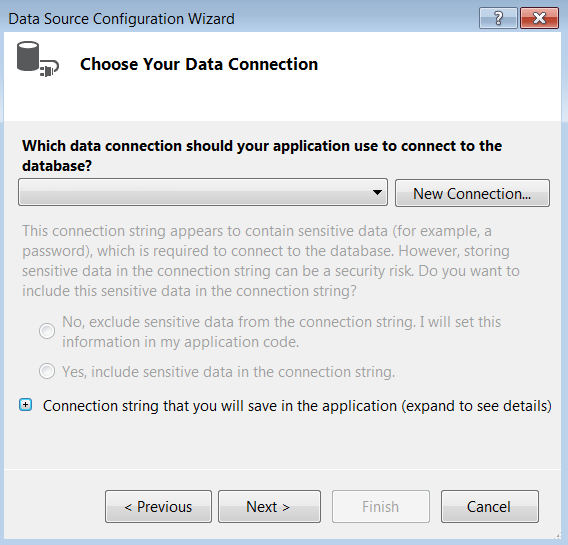
Using the Zen Performance Tuning Wizard
The Zen Performance Tuning Wizard leads you step-by-step through a series of questions about your application. Based on your answers, the wizard provides the optimal settings for performance-related connection string options for your Zen data provider.
When you launch the Zen Performance Tuning Wizard from Visual Studio, you can:
• Generate the values for connection string options that are related to performance. These values can be copied into a connection string.
• Modify an existing connection.
• Generate a new application preconfigured with a connection string optimized for your environment. The Performance Tuning Wizard provides options to select the type of application and the version of ADO.NET code that you want to use.
To use the Zen Performance Tuning Wizard in Visual Studio
1. Do one of the following steps to start the Performance Tuning Wizard:
• To create a new connection, select Tools > Actian Zen > Run Zen Performance Tuning Wizard. When the Performance Tuning Wizard Welcome dialog appears, click Next. Continue at Step 2.
• To modify an existing connection, in Server Explorer, right-click a data connection, and then select Run Zen Performance Tuning Wizard. When the Performance Tuning Wizard Welcome dialog appears, click Next. Continue at Step 2.
2. The wizard presents a series of questions about your environment. Accept the default or change the answers as required and then, click Next to proceed, until you reach the Result page.
The following screen shot shows an example of one of the questions you may be asked. 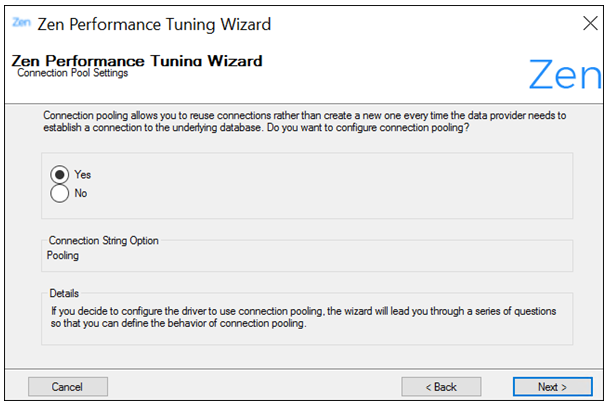
3. When you have answered all questions for a data provider, the Result dialog appears, and a connection string is displayed.
The following screen shot shows the connection string options related to performance that the Zen Performance Tuning Wizard generated. 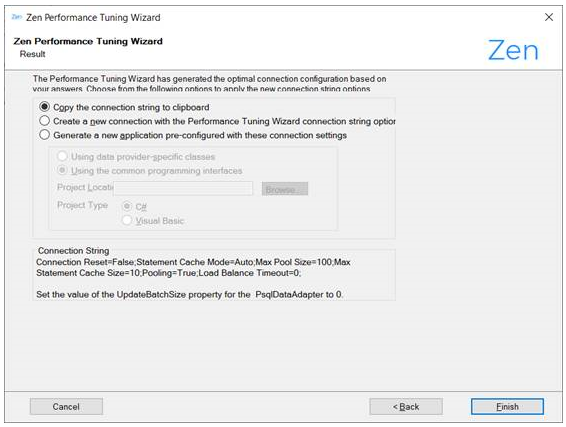
4. Select one of the following:
• To make the connection string available to other applications (the initial default), select Copy the connection string to clipboard. You can use the connection string in other applications.
• Based on whether you have used a new connection or an existing connection to launch the wizard, select one of the following options:
• Create a new connection with the Performance Tuning Wizard connection string options
When you select this option and click Finish, the Modify Connection dialog box appears, where you must specify the connection information, such as a host, password, user ID, and other information.
• Reconfigure the connection with the additional Performance Tuning Wizard connection string options.
• To create a new application, select Generate a new application preconfigured with these connection settings.
When you select this option and click Finish, a Zen application is generated using the Zen Project template. See Creating a New Project for more information about the provider-specific templates.
5. Define additional information for the new application:
• Select Using data provider-specific interfaces to create an application compatible with the ADO.NET 2.0 specification.
• Select Using common programming interfaces to create an application that uses the ADO.NET common programming model.
• Type the location for the project, or click Browse to select the location.
• Select the project type. By default, the Wizard creates a C# application.
6. Click Finish to exit the Zen Performance Tuning Wizard.
Using Provider-Specific Templates
Visual Studio offers a set of templates to help you build applications that automatically include features such as SQL leveling.
Creating a New Project
When you create a new project in Visual Studio, you can use a template specific to the Zen data provider, or a template that creates an application with generic code.
In the following example, we create a new project in Visual Studio using the template for the Zen data provider.
1. Select File > New > Project The New Project dialog appears.
2. In the Installed List, select Visual C# > Actian Zen.
3. Select Zen Project in the middle pane. 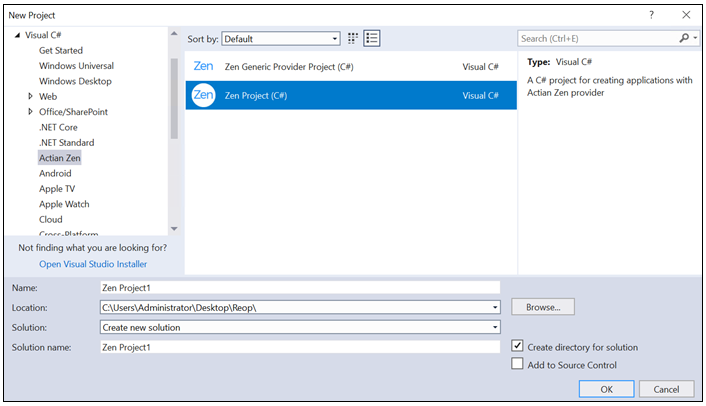
4. Make changes to the other fields if required, and click OK.
5. The new project appears in the Solution Explorer. The namespace for the Zen ADO.NET data provider is automatically added to the project. 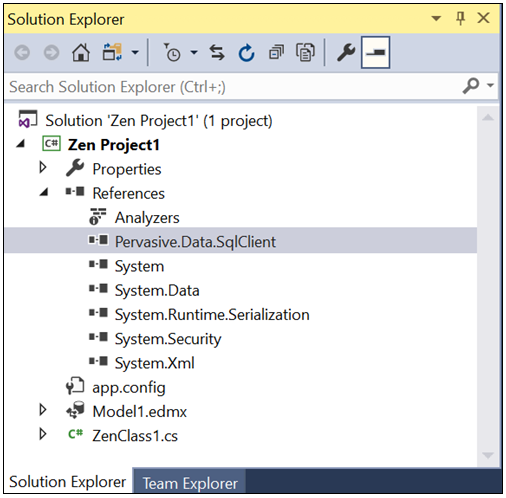
Note: If you are using the ADO.NET 2.0 common programming model, select the Zen Generic Provider Project template. In this case, the project does not require a specific reference to an assembly.
Adding a Template to an Existing Project
To add a Zen template to an existing project
1. In Solution Explorer, right-click the project and select Add > New Item.
2. In the Add New Item dialog, select the Zen class. 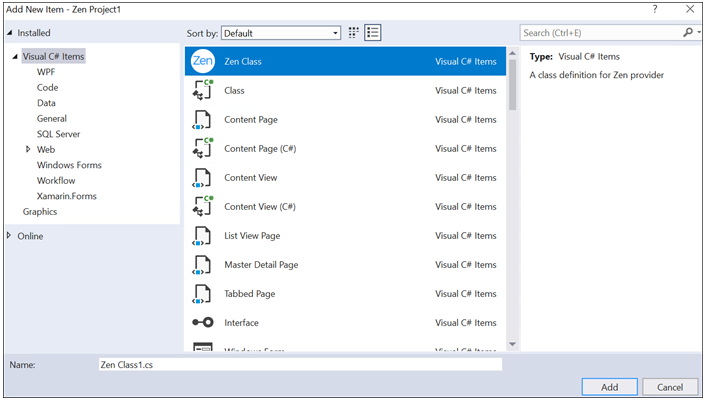
3. Click Add. The class for the Zen data provider is added to the project. 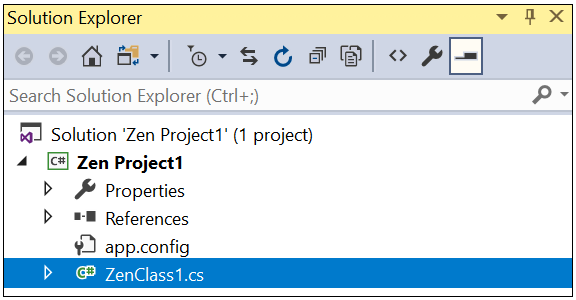
Using the Zen Visual Studio Wizards
Wizards simplify typical tasks that you perform when you create an application:
Before beginning this procedure, create a project using a Zen template, as described in Creating a New Project, and add a data connection.
Creating Tables with the Add Table Wizard
You can quickly and easily define new tables in Visual Studio using the Zen ADO.NET Add Table Wizard.
1. Select View > Server Explorer.
2. Double-click a data source connection to expose the nodes below it.
3. Right-click the Tables node, and select Add New Table. The Zen ADO.NET Add Table Wizard appears.
4. Click Next. The Specify Table Name dialog appears.
5. In the Table Name field, type a name for the table. 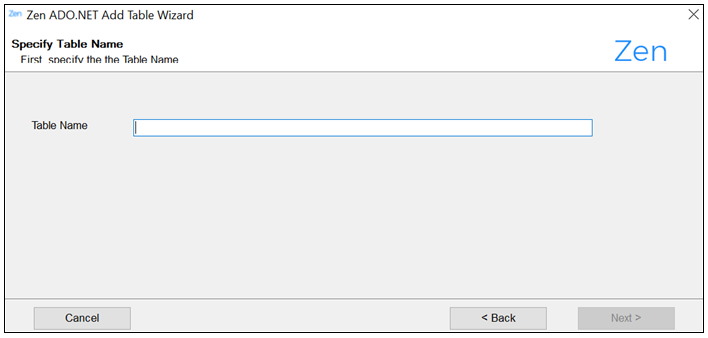
6. Click Next. The Specify Column(s) dialog appears. 
7. Define the columns for the new table. Your choices may cause additional fields to appear in the Data Type Options pane.
• Click Add to add a column to the table. The Column Name and Data Type fields become editable.
• Type a name in the Column Name field.
• Select the data type for the column, and, if required, supply any additional information:
• If you select a character data type, the Length field appears in the Data Type Options pane. Type the maximum size of the column (in bytes).
• If you select Number, the Precision and Scale fields appear in the Data Type Options pane.
• If the column can have a Null value, select the Allow Null check box.
• To remove a column from the table, select the column name and then click Remove.
8. Click Next. The Specify Primary Key dialog appears. 
9. Do one of the following:
• If you do not want to specify a primary key for the table, select No Primary Key, and then click Next. The Specify Unique Key(s) dialog appears. Continue at Step 12.
• If you want to specify a primary key for the table, select Create Primary Key, and then continue at Step 10.
10. Complete the fields on the Specify Primary Key dialog:
• In the Primary Key Name field, type the name for the primary key, or accept the default name.
• Select a column from the Available Columns field and move it to the Selected Columns field.
11. Click Next. The Specify Unique Key(s) dialog appears. 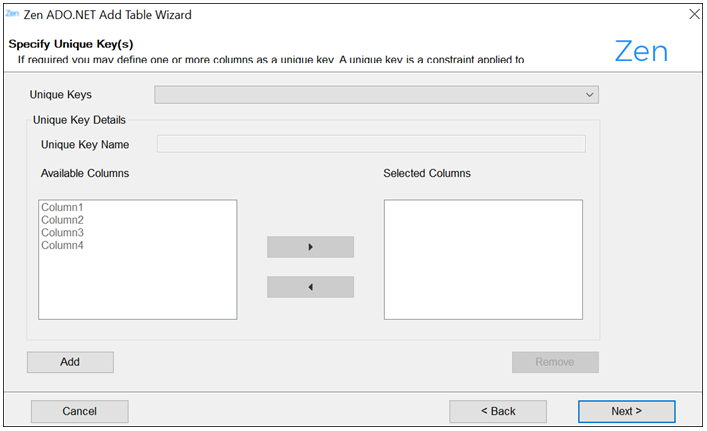
12. Do one of the following:
• If you do not want to specify unique keys for the table, click Next. The Specify Foreign Key(s) dialog appears. Continue at Step 15.
• If you want to specify one or more unique keys for the table, continue at Step 13.
13. Click Add. The fields on the dialog become selectable:
• In the Unique Keys drop-down list, select a unique key.
• In the Unique Key Name field, edit the name or accept the default name.
• In the Available Columns list box, select one or more columns to be used to specify the unique key, and move them to the Selected Columns list box.
14. Click Next. The Specify Foreign Key(s) dialog appears. 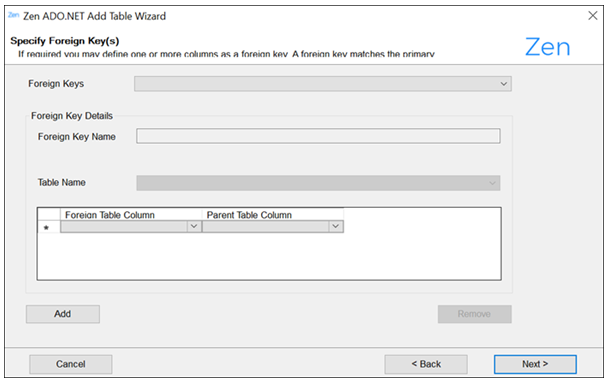
15. Do one of the following:
• If you do not want to specify foreign keys for the table, click Next. The Review SQL dialog appears. Continue at Step 18.
• If you want to specify one or more foreign keys for the table, continue at Step 16.
16. Click Add. The fields on the dialog become selectable:
• In the Foreign Keys drop-down list, select a foreign key.
• In the Foreign Key Name field, edit the name or accept the default name.
• In the Table Schema list, select a table schema.
• In the Table Name list, select a table schema.
• In the Foreign Key Column list, select one or more columns to be used to specify the foreign key.
• In the Parent Table Column list, select the corresponding column from the parent table.
17. Click Next. The Review SQL dialog appears. 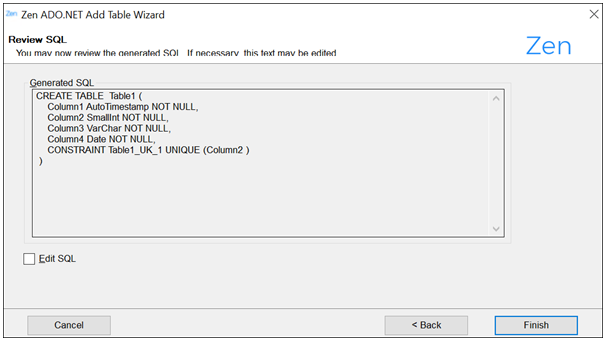
18. Review the SQL statement that has been generated by your choices.
• If you are satisfied with the SQL statement, click Finish. The table that you created appears in Server Explorer under the Tables node for the connection.
• If you want to supplement the SQL statement, for example, add a view or specific keywords, continue at Step 19.
19. Select the Edit SQL check box. The text in the Generated SQL field becomes editable.
Note: When you select the Edit SQL check box, the Back button is disabled.
20. When you are satisfied with your changes to the SQL statement, click Finish. The table that you created appears in Server Explorer under the Tables node for the connection.
Creating Views with the Add View Wizard
You can quickly and easily define new views in Visual Studio using the Zen Add View Wizard.
1. Select View > Server Explorer if it is not already open.
2. Double-click a data source connection to expose the nodes under it.
3. Right-click the Views node, and select Add New View. The Zen Add View Wizard welcome dialog appears.
4. Click Next. The Specify View Name dialog appears.
5. Type a name for the view in the View Name field. 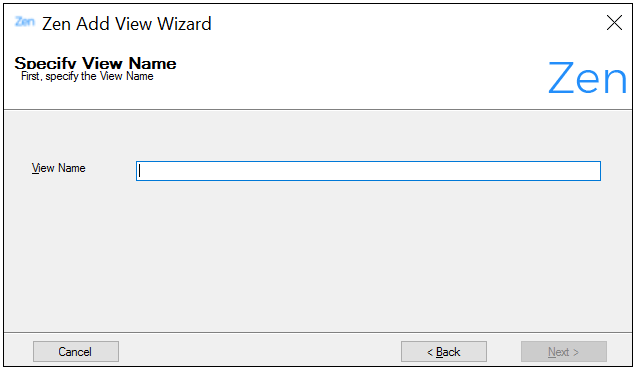
6. Click Next. The Select Table(s) and/or Column(s) dialog appears. 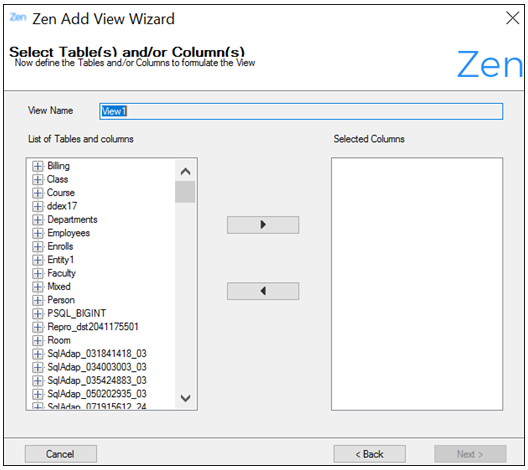
7. In the List of Tables and columns list box, select the tables or columns that will make up the view, and move them to the Selected Columns column.
8. Click Next. The Review SQL dialog appears. 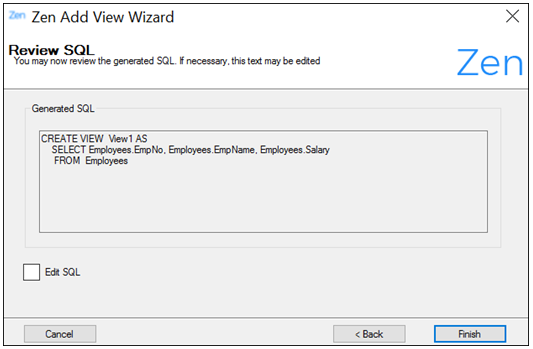
9. Review the SQL statement that has been generated by your choices.
• If you are satisfied with the SQL statement, click Finish. The view that you created appears in Server Explorer under the Views node for the connection.
• If you want to supplement the SQL statement, for example, add a view or specific keywords, continue at Step 11.
10. Select the Edit SQL check box. The text in the Generated SQL field becomes editable.
Note: When you select the Edit SQL check box, the Back button is disabled.
11. When you are satisfied with your changes to the SQL statement, click Finish. The view that you created appears in Server Explorer under the Views node for the connection.
Adding Components from the Toolbox
You can add components from the Visual Studio Toolbox to a Windows Forms application. For information about creating Windows Forms applications, refer to the Visual Studio online Help.
Before beginning this procedure, create a Windows Forms application and add a data connection.
To add Zen data provider components to a Windows Forms application
1. Select View > Toolbox. Scroll down the Toolbox until the Zen ADO.NET Provider section appears.
2. Select the PsqlCommand widget and drag it onto the Windows Forms application.
3. Continue adding widgets to the application as needed.
Data Provider Integration Scenario
Because the Zen data provider is integrated into Visual Studio, many typical data access tasks can be simplified. For example, after making the connection to the database, you can create queries using Query Builder.
The Query Builder can help you graphically design database queries.
To create a simple query
1. Establish a data source connection (see Using the Zen Visual Studio Wizards).
2. Select the data source in Server Explorer.
3. Right-click Tables and select New Query. 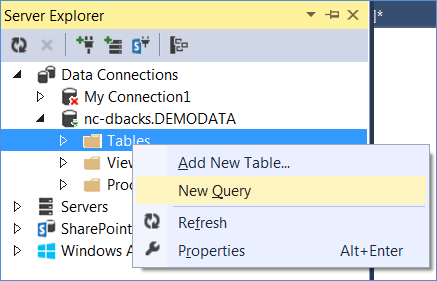
4. The Add Table window appears. Select the table that contains the data that you want to use; then, click Add. 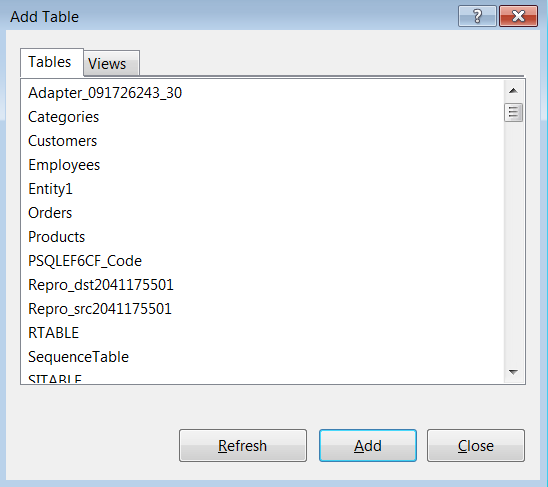
5. Click Close to close the Add Table window.
6. Select the columns that you want returned. In this example, we select the id, name, and salary columns of the employee table. 
7. Click the Execute SQL button on the toolbar. 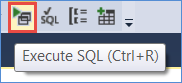
8. Examine the results displayed.
Last modified date: 10/31/2023