Remediation Rules
Remediation rules can help you to identify and correct errors, inconsistencies, and inaccuracies in source data. This can include tasks such as removing duplicate records, standardizing format and data types, and filling in missing values.
During profile execution, the Remediation rules are processed first followed by the Profiling Rules. The processing order ensures that the changes specified in the Remediation rules are applied to your data before the Profiling rules are evaluated.
Rules can be configured in any order. While you can reorder the Remediation rules by moving them up or down, the Profiling rules cannot be reordered.
The Remediation rules are executed in the order you create them or reorder them on the Rules tab and the results may vary as per their order, however, the RemoveDuplicates and RemoveDuplicatesFuzzyMatching rules will always be processed last.
See Add New Rule for information about adding rules.
The following is a list of remediation rules:
Rule Name | Description |
|---|---|
Changes the format of a string field from one format to another (applies to string fields which can be parsed as numbers/boolean types). | |
Changes the case of a string field to specified case (for example upper, lower, title). | |
Masks or encrypts data so that it cannot be linked to an individual, but can still be shared without risk of exposing sensitive personal information. | |
Calculates and modifies a Date or Timestamp field. | |
Removes specified characters or words from a string field. | |
Writes unique records to pass target and duplicate records to fail target using exact match. | |
Writes unique records to pass target and duplicate records to fail target based on fuzzy matching rules and match score filter. | |
Replaces a field value with a new value. | |
Changes numeric values by applying a rounding mode and decimal precision. | |
Converts one or more monetary formats in the source to a single specified format. | |
Converts values from one or more source date formats into a single specified date format. | |
Converts values from one or more source time formats into a single specified time format. | |
Converts one or more phone number formats in the source to a single specified format. | |
Converts one or more postal code formats in the source to a single specified format. | |
Converts US state values into a consistent format. | |
Trims whitespace from a String field. |
ChangeFormat
This rule changes the format of a source string field from one format to another (applies to string fields which can be parsed as string/numbers/boolean types).
Rule Properties
This rule has the following properties.
Rule Name | A default rule name (<FieldName>ChangeFormat) is provided and displayed here. However, you can edit or overwrite it. Click Reset to restore the default rule name. Note: The underscore (_) character is the only special character allowed in the name. Rule names cannot begin with a digit. If a field or column in the source data starts with a digit, 'r_' will be prepended to any rules created based on that field. |
Field Name | The field name to which the rule applies is displayed here, along with the data type in parentheses. For example, Group (String). |
Rule Type | The type of rule that is applied to the field. That is ChangeFormat (Function rule). Tip... A Red Cross in a rule icon (for example |
Rule Parameters
Format Type | Select the format type of the source data (this selection populates the options available in the From Format and To Format parameters): • Boolean • Double • Float • Integer • Long • Numeric • String |
From Format | Select source field format(s) to change from, or type into the field, then press Enter or click Add to apply it. Multiple formats can be added. To remove an added format click the Depending on the Format Type you have selected, you can perform the following operations: • Boolean: Replaces the different combinations of source values like yes.no, true.false, True.False, 1.0, etc., into a consistent set of values like True.False. • Double: Converts source values with a format like #.##, .00, .#, etc., into a consistent format like ###. For example, set From Format to #.# and To Format to #.00 to change the format from 50 to 50.00. See Class DecimalFormat. • Float: Converts source values with a format like #.##, .00, .#, etc., into a consistently formatted float value like ###. See Class DecimalFormat. • Integer: Converts source values with a format like #, -#, etc., into a consistently formatted integer value like #. See Class DecimalFormat. • Long: Converts source values with a format like #, -#, etc., into a consistently formatted long value like #. See Class DecimalFormat. • Numeric: Converts source values with a format like #.##, .00, .#, etc., into a consistently formatted numeric value like ###. See Class DecimalFormat. • String: Accepts a list of regex expressions like .+?(\d{4})$, (.*)@(.*) etc., and a replacement expression like $0. Use this option, for example, to retrieve only the last four digits of a value (such as a credit card, phone number or social security number) by setting From Format to .+?(\d{4})$ and To format to $1. Similarly, to change the order of first and last names (for example John Doe) set From Format to ([a-zA-Z]+)\s+([a-zA-Z]+) and To Format to $2 $1 (so that the output becomes Doe John). See Java Regular Expressions. |
To Format | Select the format to change the source to from the drop-down menu, or type into the field. Unlike the From Format, only one format is permitted in the To Format parameter. |
Locale | The language or country-based preferences for a user interface. Among other things, locales represent currency, date format, and numbers according to the protocols in the given region. You can choose from the available options. |
Supported Data Types
String (input)
String (output)
Examples:
• Boolean: This is useful if a source column contains different combinations of values like yes.no, true.false, True.False, 1.0, etc., and you want to convert it to a consistent set of values like True.False.
• String: For example, the regular expression "(.+?)\s(.+?)?\s*(.+?)" can be used to identify the first name, middle name (if present), and last name in your input (which can be a column in your source data). You can then reorganize the names using the format "$3 $1 ($2|-NA-)", where -NA- will appear when there is no group 2.
Thus, a name like "John V Doe" is reformatted as "Doe, John V", and a name like "Peter Parker" (with no middle name) is reformatted as "Parker, Peter -NA-", where -NA- is inserted when the middle name is missing.
Thus, a name like "John V Doe" is reformatted as "Doe, John V", and a name like "Peter Parker" (with no middle name) is reformatted as "Parker, Peter -NA-", where -NA- is inserted when the middle name is missing.
Remarks
• This rule replaces the format and not the values.
• When replacing values in the target field, you may encounter a truncation error, often due to a mismatch in field sizes between the target field and the replacement value. To resolve this issue, adjust the field size of target field according to the replaced/overwritten value size. See Class DecimalFormat
ChangeStringCase
This rule changes the case of a string field to specified case (for example upper, lower, and title).
Rule Properties
This rule has the following properties.
Rule Name | A default rule name (<FieldName>ChangeStringCase) is provided and displayed here. However, you can edit or overwrite it. Click Reset to restore the default rule name. Note: The underscore (_) character is the only special character allowed in the name. Rule names cannot begin with a digit. If a field or column in the source data starts with a digit, 'r_' will be prepended to any rules created based on that field. |
Field Name | The field name to which the rule applies is displayed here, along with the data type in parentheses. For example, Name (String). |
Rule Type | The type of rule that is applied to the field. That is ChangeStringCase (Function rule). |
Rule Parameters
Change To Case | The side from which to remove white spaces: • Camel Case - Converts string to camel case which is a programming naming convention. In this all words of a phrase are combined together to form one continuous word and each word except the first word is capitalized. • Kebab Case - Converts string to kebab case which is a way of writing phrases without spaces, where spaces are replaced with hyphens -, and the words are typically all lower case. This is a programming naming convention often used for variable names. This is a programming naming convention. • Lower Case - Converts all characters in the string to lowercase. • Pascal Case - Converts string to pascal case which is a programming naming convention. In this all words of a phrase are combined together to form one continuous word and each word is capitalized. • Snake Case - Converts string to snake case which is a way of writing phrases without spaces, where spaces are replaced with underscores _, and the words are typically all lower case. This is a programming naming convention. • Tile Case - Converts string to title case. The first letter of each word is capitalized except for certain small words like “a,” “the,” and “of.” • Upper Case - (default) Converts all characters in the string to uppercase. |
Supported Data Types
String (input)
String (output)
Remarks
None
DeidentifyValue
This rule changes data via masking or encryption so that it cannot be linked to an individual. The masked or encrypted data can then be shared without risk of exposing sensitive personal information.
Rule Properties
This rule has the following properties.
Rule Name | A default rule name (<FieldName>DeidentifyValue) is provided and displayed here. However, you can edit or overwrite it. Click Reset to restore the default rule name. Note: The underscore (_) character is the only special character allowed in the name. Rule names cannot begin with a digit. If a field or column in the source data starts with a digit, 'r_' will be prepended to any rules created based on that field. |
Field Name | The field name to which the rule applies is displayed here, along with the data type in parentheses. For example, Name (String). |
Rule Type | The type of rule that is applied to the field. That is DeidentifyValue (Function rule). |
Rule Parameters
Operation | Select how the data will change: • Mask - Select this option to replace the value irreversibly, then specify values for the Method, Location, N Value and Replacement Value parameters. • Encrypt - Select this option to encrypt the value. This option requires you to supply a 16-digit encryption key. The same key will be required in order to subsequently decrypt the value (if decryption is necessary). |
Method | This parameter is available when Mask is selected for the Operation. Select the action to perform on the data: • Replace N Characters: Replaces the number of characters specified in N Value. • Keep N Characters: Retains the number of characters specified in N Value. • Replace All: Replaces all characters in the field. When this option is selected, the Location and N Value fields are disabled and disregarded. |
Location | This parameter is available when Mask is selected for the Operation. Select which portion of the field to perform the selected Method on: • Start: Performs the selected Method on the beginning portion of the value. • Middle: Performs the selected Method on the center portion of the value. • End: Performs the selected Method on the end portion of the value. |
N Value | This parameter is available when Mask is selected for the Operation. Specify the number of characters to perform the selected Method on. The maximum value is 9. The default is 4. |
Replacement Value | This parameter is available when Mask is selected for the Operation. Select a replacement character, or enter a character of your choice. Predefined options are: • Asterisk • Lowercase x • Uppercase X • Hyphen (-) • Pound Sign (#) • At Sign (@) • Underscore (_) |
Key | This parameter is available when Encrypt is selected for the Operation. Enter a 16-digit encryption key. This is also the key to use to subsequently decrypt the value (if decryption is necessary). Right-click in the text box to access these options for macros: • Paste Macro: Allows you to copy/paste a macro from the Paste Macro dialog. See Pasting Macro in Map, Profile or Process. • Create Macro: Allows you to create a macro from the Create New Macro dialog. See Creating Macro using Create Macro Menu Option. Note: It is highly recommended that an encrypted macro be used for the key. An encrypted macro is more secure and can be shared with others without transmitting the key in plain text. |
Supported Data Types
String (input)
String (output)
Remarks
To decrypt values encrypted with this operation, you will need the following parameters. Please ensure these details are stored securely, as they are crucial for data retrieval.
• Encryption Algorithm: AES/CBC/PKCS5Padding
• Key Algorithm: AES
• Key Format: Plain Text
• Key Length: 16 bytes (128 bits)
• Initialization Vector (IV): An IV is used.
• IV Length: 16 bytes (128 bits)
• Base64 Encoding: The final encrypted output is Base64 encoded.
Note: Both the Key and the Initialization Vector (IV) used during the encryption process are required for decryption. The IV is typically prepended to or returned alongside the encrypted data.
ModifyDate
This rule calculates and modifies Date and Timestamp data types. It is useful for tasks such as:
• Adjusting time to a specific time zone. See Example: Time Zone Adjustment.
• Timestamping transactions.
• Calculating future due dates, times or expiration dates. See Example: Due Date Calculation.
• Tracking Service Level Agreement (SLA) response times. See Example: SLA Tracking.
This rule only appears in the Add New Rule menu for Date and Timestamp fields.
Tip... If the data type is String, you can use the StringToConversion rule for conversion to the Date or Timestamp data type.
Rule Properties
This rule has the following properties.
Rule Name | A default rule name (<FieldName>ModifyDate) is provided and displayed here. However, you can edit or overwrite it. Click Reset to restore the default rule name. Note: The underscore (_) character is the only special character allowed in the name. Rule names cannot begin with a digit. If a field or column in the source data starts with a digit, 'r_' will be prepended to any rules created based on that field. |
Field Name | The field name to which the rule applies is displayed here, along with the data type in parentheses. For example, Expiration (Date). |
Rule Type | The type of rule that is applied to the field. That is ModifyDate (Function rule). Tip... A Red Cross in a rule icon (for example |
Rule Parameters
Time Unit | Select the unit of time for the calculation (only for the Timestamp data type): • Years • Months • Days • Hours • Minutes • Seconds • Milliseconds |
Amount to add/subtract | Enter the amount to add (positive number, for example, 3) or subtract (negative number, for example, -3). |
Supported Data Types
Input: Date, Timestamp
Output: Date, Timestamp
Example: Time Zone Adjustment
Use Case: Display times and timestamp transactions in the local time zone.
To change a value from Pacific Standard Time (2026-01-07 05:00:00) to Eastern Standard Time, add 3 hours to get the output 2026-01-07 08:00:00.
• Time Unit: Hours
• Amount to add/subtract: 3
Example: Due Date Calculation
Use Case: Monitor invoices and track accounts receivable.
To calculate a due date, add 30 days to the order date (2026-01-07). The output is 2026-02-06.
• Time Unit: Days
• Amount to add/subtract: 30
Example: SLA Tracking
Use Case: Monitor customer service response times, track SLA compliance, escalate tickets approaching breach time.
To set a response deadline, add 4 hours (the required response time) to the ticket's open time (2026-01-07 09:00:00). The output is 2026-01-07 13:00:00 (SLA deadline).
• Time Unit: Hours
• Amount to add/subtract: 4
RemoveChars
This rule removes specified characters or words from a string field.
Rule Properties
This rule has the following properties.
Rule Name | A default rule name (<FieldName>RemoveChars) is provided and displayed here. However, you can edit or overwrite it. Click Reset to restore the default rule name. Note: The underscore (_) character is the only special character allowed in the name. Rule names cannot begin with a digit. If a field or column in the source data starts with a digit, 'r_' will be prepended to any rules created based on that field. |
Field Name | The field name to which the rule applies is displayed here, along with the data type in parentheses. For example, Name (String). |
Rule Type | The type of rule that is applied to the field. That is RemoveChars (Function rule). Tip... A Red Cross in a rule icon (for example |
Rule Parameters
Select the character classes to remove | Tells what to remove from the source field value. You can choose one or multiple options. The options are: • Whitespace - Removes spaces. • Digits - Removes numeric characters. • Non Printable Characters - Removes non printable characters. Non printable characters are symbols that do not visibly appear when printed or displayed. Examples include newline (\n) for line breaks and tab (\t) for spacing. • Special Characters - Removes any special characters. Special characters are the punctuation characters on your keyboard, such as: ! @ # $ % ^ & * ( ) - _ = + \ | [ ] { } ; : / ? . > |
Remove Other | Choose from one of the following options: • <None> - Choose this when you want to skip specifying the Remove Other option. • Literal - Allows you to specify literal values to search for and remove. • Regular Expressions - Allows you to specify your own regular expression (regex pattern) to search for and remove. See Remarks. • Words - Allows you to specify a comma separated list of word numbers or a range of word numbers to remove. For example “1, 2-4,” will remove 1st, 2nd through 4th word. |
Supported Data Types
String (input)
String (output)
Remarks
RemoveDuplicates
This rule writes unique records to pass target and duplicate records to fail target, using exact match.
This rule supports all data types.
This rule involves the use of clustering. Clustering refers to grouping similar records together, into clusters, based on the comparison of key fields. When the profile is executed, the values in the specified key fields are compared to each other to identify duplicates. If a duplicate value is found, then a cluster containing the duplicate records is created. The cluster contains duplicate records based on the key fields and the cluster is assigned a cluster ID.
After a cluster is created, users can configure a Cluster Matching Rule and a Record Matching Rule to specify criteria for finding unique records within a cluster. For information about creating clusters, see Cluster Data Tab.
Only one Remove Duplicates rule is permitted within a profile. However, multiple fields can be designated as key fields. Once the Remove Duplicates rule has been added to a profile, it will be categorized under MultipleFields on the Rules tab, instead of by the name of the key field.
Note: The cluster file that is used for configuring the Cluster Matching Rules and Record Matching Rules is stored as a separate csv file. In the Project Navigator view, expand the project folder and double-click the <ProfileName>_RemoveDuplicates.csv file to view the cluster file.
See Also: RemoveDuplicatesFuzzyMatching.
Rule Properties
This rule has the following properties.
Rule Name | A default rule name (RemoveDuplicates) is provided and displayed here. However, you can edit or overwrite it. Click Reset to restore the default rule name. Note: The underscore (_) character is the only special character allowed in the name. Rule names cannot begin with a digit. If a field or column in the source data starts with a digit, 'r_' will be prepended to any rules created based on that field. |
Field Name | The field name to which the rule applies is displayed here, along with the data type in parentheses. For example, ZIP (String). |
Rule Type | The type of rule that is applied to the field. That is RemoveDuplicates (Test rule). Tip... A Red Cross in a rule icon (for example |
Rule Parameters
Dimension | (Optional) Select a dimension to associate the rule with. There is no limit to the number of rules a dimension can be associated with. A rule can be associated with a single dimension. A dimension represents a characteristic of data quality: • Accuracy - The data is correct. • Completeness - The data is present. • Consistency - The data uses the same format or pattern across different sources. • Timeliness - The data is recent and available. • Uniqueness - The data is not duplicated. • Validity - The data conforms to business rules and is within an acceptable range. Each dimension generates a Dimension Score for its associated rules. The score indicates the degree to which the data meets the characteristic. Scores can be viewed in the Statistics tab post profile execution. See Viewing Statistics. For more information about dimensions, see Add New Rule. For information about managing dimensions, see Managing Data Quality Dimensions. |
Weight | (Optional) Select the importance level of the rule. Values are 1-5, where 5 is the most important. The default value is 1. This value is reflected in the Data Quality Index (DQI) score and the Dimension Score (if the rule is associated with a dimension). For more information, see Add New Rule. |
Additional properties for this rule are available in the following tabs:
Grouping Tab
Select a field from the list of Input Fields as a key field. The values in the key field will be evaluated to identify duplicates or exact matches. If a duplicate value is found, a cluster is created. The cluster will contain the duplicate records based on the key fields and will be assigned a Cluster ID (visible when browsing the cluster file).
Input Fields | List of available fields that can be used as key fields. |
Key Fields | You can move fields from Input Fields to Key Fields to define a key field. You can specify a combination of Fields to define a key field. Note: Key Fields cannot be selected as Sorting Fields and vice versa. |
Results File | Browse and select a csv file (only csv files are supported) or specify the path and name of a csv file that will be used as the cluster file. You can use macros for filenames. When the profile is executed, you can browse the cluster file in the Cluster Data tab by selecting the Remove Duplicates rule and clicking |
Sorting Tab
The Sorting tab allows you to arrange the records within each cluster in a specific order. You can sort on multiple fields. Click  to add a row and
  to delete it. After adding a row, specify the following values:
Field | Click the Field box and select a sorting field from the drop-down. |
Sort Order | Click the Sort Order box and select Ascending or Descending for each sorting field. |
Note: Use the up and down icons ( ) to reorder the sorting fields.
Unique Record Rules Tab
The Unique Record Rules tab provides a way to specify one or more clusters via cluster matching rules, then identify one or more records as unique via the record matching rules.
You can perform the following actions:
Click | |
Select a rule and click | |
Select a rule and click | |
Select a disabled rule and click | |
Select an enabled rule and click | |
Click the up and down icons ( |
The Add Unique Record Rule dialog allows you to add rules of the following type:
• Cluster Matching Rules - You can define one or more Cluster Matching Rules to select one or more clusters. Multiple rules can be defined and combined using the AND/OR logical operators. Follow these steps:
1. Click  to add a row (you can click
  to delete it).
2. Select from AND/OR. You cannot specify the logical operators for the first row.
3. Click the Field Name box and then click the down arrow that appears and select a field.
4. Click the Function box and then click the down arrow that appears and select a function from the list (CompareToConstant, CompareToField, IsBlank, IsNotBlank, IsNull, MatchesRegex).
5. Click the Operator box and then click the down arrow that appears and select an operator from the list (Equal, Greater, Greater or Equal, Lesser, Lesser or Equal, Not Equal). No operator is required for the IsBlank, IsNotBlank, IsNull, and MatchesRegex functions.
6. Click the Value box and specify a value to compare. No value is required for the IsBlank, IsNotBlank, IsNull, and MatchesRegex functions.
Note: If you do not add a rule, all clusters are considered.
• Record Matching Rules - You can define a Record Matching criteria or rule to identify one or more records as unique. You can choose from one of the following Criteria options:
• None - All records (from the cluster) will qualify.
• Completeness - Picks the record (from the cluster) which has least number of null/blank values.
• Accuracy - Picks the record (from the cluster) which has the highest number of accurate fields. Accuracy is based on the number of test rule failures for a record. The fewer the failures, the higher the accuracy.
• Custom Conditions- Picks all qualifying records (from the cluster) based on custom rules that you add by clicking  .
.
To define a custom Record Matching rule to identify one or more records as unique, follow these steps:
1. Click  to add a row (you can click
  to delete it).
2. Select from AND/OR. You cannot specify the logical operators for the first row.
3. Click the Field Name box and then click the down arrow that appears and select a field.
4. Click the Function box and then click the down arrow that appears and select a function from the list (CompareToConstant, CompareToField, IsBlank, IsNotBlank, IsNull, MatchesRegex).
5. Click the Operator box and then click the down arrow that appears and select an operator from the list (Equal, Greater, Greater or Equal, Lesser, Lesser or Equal, Not Equal). No operator is required for the IsBlank, IsNotBlank, IsNull, and MatchesRegex functions.
6. Click the Value box and specify a value to compare. No value is required for the IsBlank, IsNotBlank, IsNull, and MatchesRegex functions.
• Record Selection - The record selection option provides a way to select records after applying the Unique Record Rules. These options include:
• First - Picks the first from all qualifying records.
• Last - Picks the last from all qualifying records.
• Any - Picks any from all qualifying records. Usually the first record is picked.
• All - Picks all of the qualifying records.
• None - Picks none of the qualifying records.
• Range - Picks from the specified range of records. You can specify comma separated list of ranges. For example “1, 2-4,” will pick 1st, 2nd through 4th record from the cluster.
Note: Completeness and Accuracy pick the best record, except when multiple records have the same score. In such cases, the Record Selection option (First, Last) will determine which one gets picked. If multiple records have the same score, the record selector will define which records are selected. Note that if the score is 0 (that is, all records have a score of 0), then none will be selected. An exceptional case is when you use Record Selection as a Range and provide an out-of-bounds value, which may result in no unique record being selected.
When the profile is executed, the focus is shifted to the Statistics tab from which you can view the graphical representation of the pass/fail data. On the Results Summary pane, click on the required field name:
• ***Counts - Total*** - Click this to view the total pass and fail data in the pie chart representation. You can click on parts of the graph to view the data in the Drill Down Data tab.
• **Rule - BarCharts** - Click this to view all the pass and fail rule in the bar chart representation. You can click on parts of the graph to view the data in the Drill Down Data tab.
• -MultipleFields- - Click this to view the following information about the Remove Duplicates rule:
• Keys - The Key Fields.
• Sort Keys - The keys which sort the records within each cluster.
• Number of Unique Record Rules - The number of Unique Record Rules defined.
• Cluster File - The path and name of the cluster file.
• Number of clusters - The number of duplicate clusters (groups) that were found.
• Number of duplicates found - Duplicate row count that was found in the source data.
• Number of Unique records - The number of unique records that were found.
• Browse Clusters File - Click this to open the clusters file in the Drill Down Data tab.
See Also: Viewing Pass, Fail, and Drill Down Output.
Cluster Data Tab
The Cluster Data tab is only visible after generating clusters.
On the Rules tab, select the Remove Duplicates rule and click  from the Rule Definition pane to generate clusters and browse the cluster file in the Cluster Data tab.
The following additional fields are displayed:
Select | This checkbox allows you to select records manually. By selecting the desired records and clicking the Generate Rules button, you will create Unique Record Rules. This feature is particularly helpful if you have few duplicates in your source data or prefer to have Data Profiler generate the rules for you. |
$$ClusterId | The unique ID that is assigned to each cluster. Using this, you can identify and understand how many clusters exist and how many records are in each cluster. The cluster IDs are not retained, so every time the profile is executed or the cluster file is generated, the order of the clusters and the associated IDs will change. |
$$pass | $$Pass gives you information about pass records, if it is blank then the record passed the rule, if marked as “X” then the record failed the rule. |
$$rule_id | This is an ID allocated to each Unique Record Rule. The rule_id is only displayed for the unique records identified from the Unique Record Rules. |
Note: The Generate Clusters icon ( ) is available only for Duplicate Rules.
Supported Data Types
All data types.
Remarks
• Provides pass and fail statistics and generates a cluster file. Duplicate records are sent to the fail target and unique records are written to the pass target.
• Only one Remove Duplicates rule is permitted within a profile. However, multiple fields can be designated as key fields. Once the Remove Duplicates rule has been added to a profile, it will be categorized under MultipleFields on the Rules tab, instead of by the name of the key field.
RemoveDuplicatesFuzzyMatching
This rule writes unique records to pass target and duplicate records to fail target based on fuzzy matching rules and match score filter.
This rule supports all data types.
Finding “duplicate” data in this case does not mean finding an exact match but means finding an approximately similar record. Fuzzy Matching (also called Approximate String Matching) is a technique that can be used to filter these similar looking fuzzy duplicates by finding an approximate match.
There are many situations where fuzzy matching techniques can be used. For instance, using fuzzy matching, you can find multiple variations of a word, term, or phrase. For example, if your word is “DataConnect,” fuzzy matching returns DataConnect, Data Connect, D Connect, Data C, DattaConecct, and so on.
This rule uses clusters. Let us now understand how the cluster technique works. The main idea in clustering is to group similar records together, into clusters, based on comparison using key fields. When the profile is executed, the values in the specified key field are compared to each other to identify duplicates. If a duplicate value is found, then a cluster is created. The cluster contains the duplicate records, based on the key field and is assigned a cluster ID.
After a cluster is created, you can configure a Match Score Filter, a Cluster Matching Rule, and a Record Matching Rule to specify criteria for finding approximately similar records within a cluster.
Note: The duplicate records are written to the fail target and unique records are written to the pass target. The cluster file is stored as a separate csv file. In the Project Navigator view, expand the project folder and double-click the <ProfileName>_RemoveDuplicates.csv file to view the cluster file.
Rule Properties
This rule has the following properties.
Rule Name | A default rule name (RemoveDuplicatesFuzzyMatching) is provided and displayed here. However, you can edit or overwrite it. Click Reset to restore the default rule name. Note: The underscore (_) character is the only special character allowed in the name. Rule names cannot begin with a digit. If a field or column in the source data starts with a digit, 'r_' will be prepended to any rules created based on that field. |
Field Name | The field name to which the rule applies is displayed here, along with the data type in parentheses. For example, ZIP (String). |
Rule Type | The type of rule that is applied to the field. That is RemoveDuplicatesFuzzyMatching (Test rule). Tip... A Red Cross in a rule icon (for example |
Rule Parameters
Dimension | (Optional) Select a dimension to associate the rule with. There is no limit to the number of rules a dimension can be associated with. A rule can be associated with a single dimension. A dimension represents a characteristic of data quality: • Accuracy - The data is correct. • Completeness - The data is present. • Consistency - The data uses the same format or pattern across different sources. • Timeliness - The data is recent and available. • Uniqueness - The data is not duplicated. • Validity - The data conforms to business rules and is within an acceptable range. Each dimension generates a Dimension Score for its associated rules. The score indicates the degree to which the data meets the characteristic. Scores can be viewed in the Statistics tab post profile execution. See Viewing Statistics. For more information about dimensions, see Add New Rule. For information about managing dimensions, see Managing Data Quality Dimensions. |
Weight | (Optional) Select the importance level of the rule. Values are 1-5, where 5 is the most important. The default value is 1. This value is reflected in the Data Quality Index (DQI) score and the Dimension Score (if the rule is associated with a dimension). For more information, see Add New Rule. |
Additional properties for this rule are available in the following tabs:
Grouping Tab
Select a field from the list of Input Fields as a key field. The values in the key field will be evaluated to identify duplicates or exact matches. If a duplicate value is found, a cluster is created. The cluster will contain the duplicate records based on the key fields and will be assigned a Cluster ID (visible when browsing the cluster file).
Input Fields | List of available fields that can be used as key fields. |
Key Fields | You can move fields from Input Fields to Key Fields to define a key field. You can specify a combination of Fields to define a key field. Note: Key Fields cannot be selected as Sorting Fields and vice versa. |
Results File | Browse and select a csv file (only csv files are supported) or specify the path and name of a csv file that will be used as the cluster file. You can use macros for filenames. When the profile is executed, you can browse the cluster file in the Cluster Data tab by selecting the Remove Duplicates rule and clicking |
Matching Tab
Allows you to configure string comparison rules and set the match score cutoff. Click  to add a comparison rule and
  to delete it. Specify the following rule details:
Field Name | Select a field whose values are compared with each other using the algorithm specified in Comparison Type. You can specify multiple matching fields and each matching field can be configured to use any of the provided algorithms. This list includes only string fields and those which are not used as Key Fields on the Grouping tab. Only fields within the cluster are compared with each other. |
Comparison Type | A list of supported string matching algorithms/functions. For more information, see Remarks. |
Weight | Weightage given to the rule which helps to calculate the final score. The default is 1 (same weightage). Allowed range is 1 to 100. If same value is assigned to all rules, they will have same weightage. For example, rule1 - 30, rule2 - 30, rule3 - 30 will have same weightage. |
Match Score Filter | Select a decimal values between 0.01 to 1. Comparison score is between 0 to 1. Records with comparison score less than this value are not considered a match for probable duplicates and are discarded. The higher the value you select, more strict is the matching. |
Sorting Tab
The Sorting tab allows you to arrange the records within each cluster in a specific order. You can sort on multiple fields. Click  to add a row and
  to delete it. After adding a row, specify the following values:
Field | Click the Field box and select a sorting field from the drop-down. |
Sort Order | Click the Sort Order box and select Ascending or Descending for each sorting field. |
Note: Use the up and down icons ( ) to reorder the sorting fields.
Unique Record Rules Tab
The Unique Record Rules tab provides a way to specify one or more clusters via cluster matching rules, then identify one or more records as unique via the record matching rules. You can perform the following actions:
Click | |
Select a rule and click | |
Select a rule and click | |
Select a disabled rule and click | |
Select an enabled rule and click | |
Click the up and down icons ( |
The Add Unique Record Rule dialog allows you to add a rules of the following type:
• Cluster Matching Rules - You can define one or more Cluster Matching Rules to select one or more clusters. Multiple rules can be defined and combined using the AND/OR logical operators. Follow these steps:
1. Click  to add a row (you can click
  to delete it).
2. Select from AND/OR. You cannot specify the logical operators for the first row.
3. Click the Field Name box and then click the down arrow that appears and select a field.
4. Click the Function box and then click the down arrow that appears and select a function from the list (CompareToConstant, CompareToField, IsBlank, IsNotBlank, IsNull, MatchesRegex).
5. Click the Operator box and then click the down arrow that appears and select an operator from the list (Equal, Greater, Greater or Equal, Lesser, Lesser or Equal, Not Equal). No operator is required for the IsBlank, IsNotBlank, IsNull, and MatchesRegex functions.
6. Click the Value box and specify a value to compare. No value is required for the IsBlank, IsNotBlank, IsNull, and MatchesRegex functions.
Note: If you do not add a rule, all clusters are considered.
• Record Matching Rules - You can define a Record Matching criteria or rule to identify one or more records as unique. You can choose from one of the following Criteria options:
– None - All records (from the cluster) will qualify.
– Completeness - Picks the record (from the cluster) which has least number of null/blank values.
– Accuracy - Picks the record (from the cluster) which has the highest number of accurate fields. Accuracy is based on the number of test rule failures for a record. The fewer the failures, the higher the accuracy.
– Custom Conditions- Picks all qualifying records (from the cluster) based on custom rules that you add by clicking  .
.
To define a custom Record Matching rule to identify one or more records as unique, follow these steps:
1. Click  to add a row (you can click
  to delete it).
2. Select from AND/OR. You cannot specify the logical operators for the first row.
3. Click the Field Name box and then click the down arrow that appears and select a field.
4. Click the Function box and then click the down arrow that appears and select a function from the list (CompareToConstant, CompareToField, IsBlank, IsNotBlank, IsNull, MatchesRegex).
5. Click the Operator box and then click the down arrow that appears and select an operator from the list (Equal, Greater, Greater or Equal, Lesser, Lesser or Equal, Not Equal). No operator is required for the IsBlank, IsNotBlank, IsNull, and MatchesRegex functions.
6. Click the Value box and specify a value to compare. No value is required for the IsBlank, IsNotBlank, IsNull, and MatchesRegex functions.
• Record Selection - The record selection option provides a way to select records after applying the Unique Record Rules. These options include:
– First - Picks the first from all qualifying records.
– Last - Picks the last from all qualifying records.
– Any - Picks any from all qualifying records. Usually the first record is picked.
– All - Picks all of the qualifying records.
– None - Picks none of the qualifying records.
– Range - Picks from the specified range of records. You can specify comma separated list of ranges. For example “1, 2-4,” will pick 1st, 2nd through 4th record from the cluster.
Note: Completeness and Accuracy pick the best record, except when multiple records have the same score. In such cases, the Record Selection option (First, Last) will determine which one gets picked. If multiple records have the same score, the record selector will define which records are selected. Note that if the score is 0 (that is, all records have a score of 0), then none will be selected. An exceptional case is when you use Record Selection as a Range and provide an out-of-bounds value, which may result in no unique record being selected.
When the profile is executed, the focus is shifted to the Statistics tab from which you can view the graphical representation of the pass/fail data. On the Results Summary pane, click on the required field name:
• ***Counts - Total*** - Click this to view the total pass and fail data in the pie chart representation. You can click on parts of the graph to view the data in the Drill Down Data tab.
• **Rule - BarCharts** - Click this to view all the pass and fail rule in the bar chart representation. You can click on parts of the graph to view the data in the Drill Down Data tab.
• -MultipleFields- - Click this to view the following information about the Remove Duplicates rule:
– Keys - The Key Fields.
– Sort Keys - The keys which sort the records within each cluster.
– Number of Unique Record Rules - The number of Unique Record Rules defined.
– Cluster File - The path and name of the cluster file.
– Number of clusters - The number of duplicate clusters (groups) that were found.
– Number of duplicates found - Duplicate row count that was found in the source data.
– Number of Unique records - The number of unique records that were found.
– Browse Clusters File - Click this to open the clusters file in the Drill Down Data tab.
See Also: Viewing Pass, Fail, and Drill Down Output.
Cluster Data Tab
On the Rules tab, select the Remove Duplicates rule and click  from the Rule Definition pane to generate clusters and browse the cluster file in the Cluster Data tab. The following additional fields are displayed:
Select | This checkbox allows you to select records manually. By selecting the desired records and clicking the Generate Rules button, you will create Unique Record Rules. This feature is particularly helpful if you have few duplicates in your source data or prefer to have Data Profiler generate the rules for you. |
$$ClusterId | The unique ID that is assigned to each cluster. Using this, you can identify and understand how many clusters exist and how many records are in each cluster. The cluster IDs are not retained, so every time the profile is executed or the cluster file is generated, the order of the clusters and the associated IDs will change. |
$$pass | $$Pass gives you information about pass records, if it is blank then the record passed the rule, if marked as “X” then the record failed the rule. |
$$rule_id | This is an ID allocated to each Unique Record Rule. The rule_id is only displayed for the unique records identified from the Unique Record Rules. |
Note: The Generate Clusters icon ( ) is available only for Duplicate Rules.
Supported Data Types
All data types.
Remarks
• Provides pass and fail statistics and generates a cluster file. Duplicate records are sent to the fail target and unique records are written to the pass target.
• Only one Remove Duplicates Fuzzy Matching rule is permitted within a profile. However, multiple fields can be designated as key fields. Once the Remove Duplicates Fuzzy Matching rule has been added to a profile, it will be categorized under MultipleFields on the Rules tab, instead of by the name of the key field.
• Supported Fuzzy Matching algorithms:
– CONTAINS: Checks the small string in the long string.
– DAMERAU_LEVENSHTEIN: This distance between two strings is the minimum number of operations (insertions, deletions or substitutions of a single character, or transposition of two adjacent characters) required to change one string into another. For more information, see Damerau–Levenshtein distance.
– EXACT_MATCH: Checks two strings for exact match.
– JARO: A measure of characters in common, being no more than half the length of the longer string in distance with consideration for transpositions.
– JARO_WINKLER: This algorithm extends Jaro algorithm and uses a prefix scale “p” which gives more favorable ratings to strings that match from the beginning for a set prefix length “l”. The prefix length is set to 4 characters (the maximum possible prefix length). For more information, see Jaro–Winkler distance.
– LEVENSHTEIN: This distance between two strings is the minimum number of single-character edits (insertions, deletions or substitutions) required to change one string into other. For more information, see Levenshtein distance.
– POSITIONAL_QGRAM: Positional q-grams is an extension to q-grams with an additional property called maxDistance used in calculating the string similarity. For example, ‘peter’ contains the positional bigrams (‘pe’,0), (‘et’,1), (‘te’,2) and (‘er’,3). If maxDistance is set to 1, then (‘et’,1) will only be matched to bi-grams in the other string with positions 0 to 2
– QGRAM: q-grams (also called as n-grams) is the process of breaking up a string into multiple strings each with length n (q). For example, apply q-grams on abcde with q = 3 would yield abc, bcd, cde. For example, the word ‘peter’ with q=2 would yield following bigrams - ‘pe’, ‘et’, ‘te’ and ‘er’. A q-gram similarity measure between two strings is calculated by counting the number of q-grams in common.
– SHORTHAND: Determine if the shorter string is a “shorthand” of the longer. That is, if it can be produced only by deletions. If the first character of a word in the longer string is deleted, the entire word is considered deleted. For for example IBM is a shorthand of International Business Machines.
Example demonstrating the use of RemoveDuplicatesFuzzyMatching rule
This example demonstrates how to configure and execute the RemoveDuplicatesFuzzyMatching rule to identify and remove potential duplicate records based on exact and fuzzy matching logic.
Scenario
Assume your dataset contains customer records with the following fields:
• first_name
• last_name
• company
• zip
• id
You suspect there may be duplicate records where:
• The first name matches exactly, and
• The last name and company fields are similar (but not necessarily exact matches)
We will consider the following sample data in this example: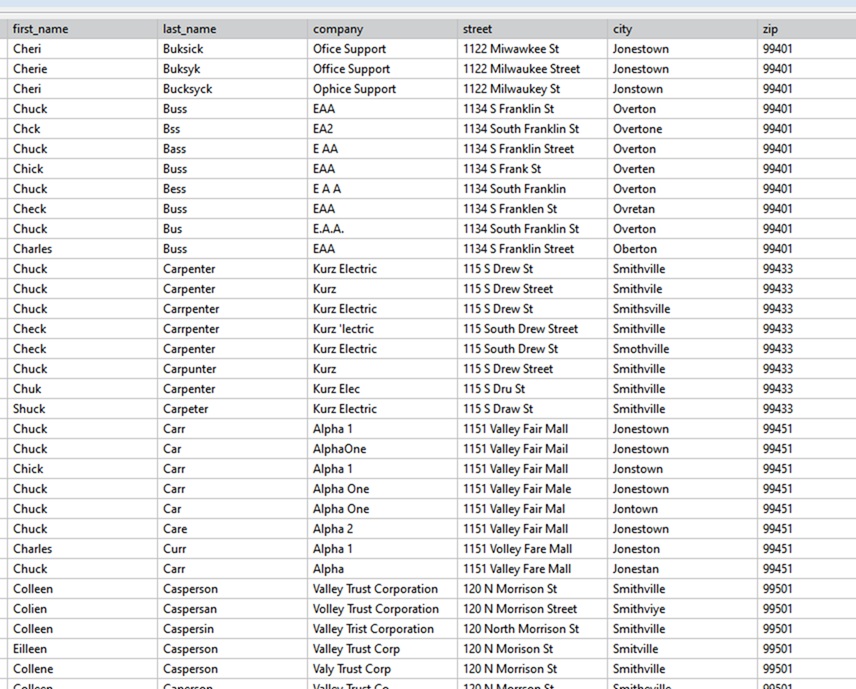
Step 1: Define the Key Field (Cluster Creation)
Create a rule that uses first_name as the matching key. This means a separate cluster will be generated for each exact match of the first name.
On the Rule Configuration screen, select first_name as the Key Field.
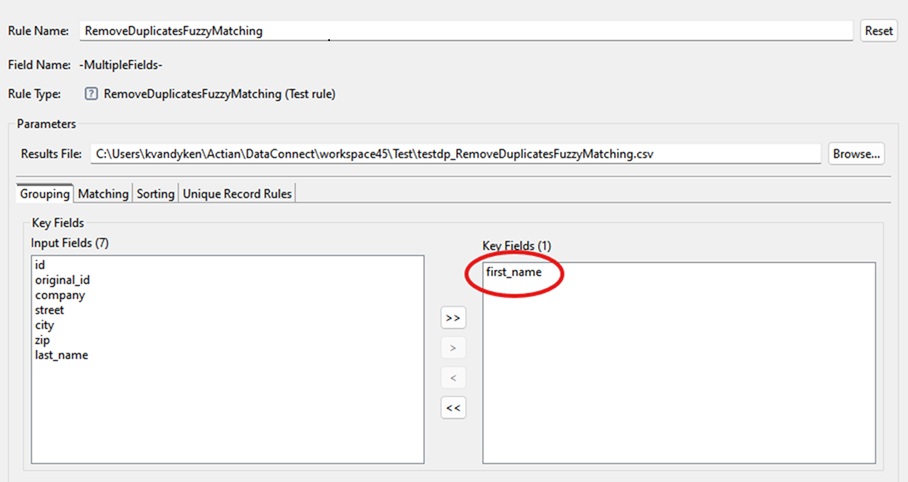
This means, a cluster will be created for each exact first_name. For example, all records with first_name = "Chuck" will be grouped into the same cluster. Clusters are evaluated independently for possible duplicates.
Step 2: Configure Fuzzy Matching Fields
Within each cluster, the last_name and company fields need to be evaluated to determine whether they are sufficiently similar to indicate potential full-record duplicates that should be removed.
On the Matching tab, these fields need to be selected and a matching algorithm assigned to each one. Navigate to the Matching tab. Within each cluster (for example, all “Chuck” records), configure fuzzy matching on the last_name and company fields:
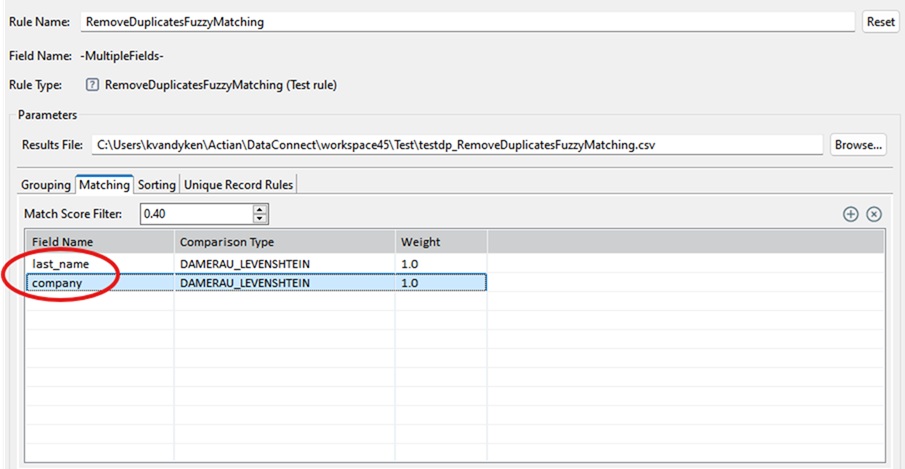
Select an appropriate fuzzy matching algorithm for each field based on the available options (e.g., DAMERAU_LEVENSHTEIN algorithm).
This allows the rule to, identify records where last_name values are similar (e.g., “Smith” vs. “Smyth”) and identify records where company values are close matches (e.g., “ABC Corp” vs. “ABC Corporation”)
Note: Key Fields cannot be selected as Matching Fields or Sorting Fields and vice versa.
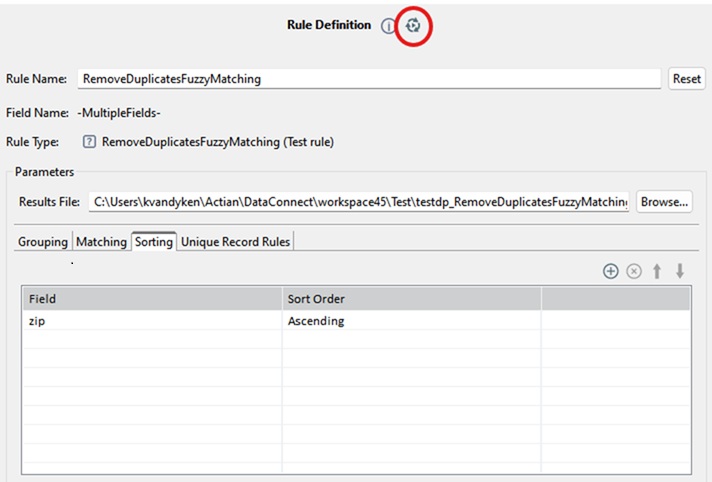
Step 3: Configure Sorting
Go to the Sorting tab. Choose zip as the sort field within each cluster. Sorting helps organize records logically when reviewing potential duplicates.

Step 4: Run the Rule
Click Run to execute the profile. When processing is complete, you are navigated to the Results page. Click on RemoveDuplicatesFuzzyMatching rule. On the right side of the screen, you’ll see a pass/fail pie chart summarizing the results.
Note: Key Fields cannot be selected as Matching Fields or Sorting Fields and vice versa.
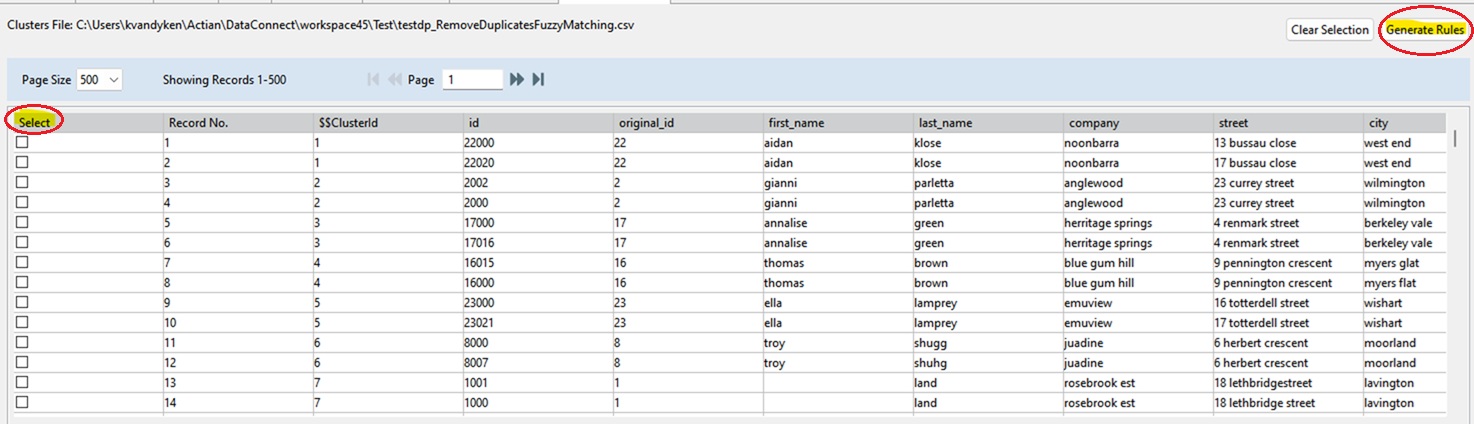
Step 5: Review Clusters
Below the pie chart, click Browse Cluster File to view the generated clusters. You will now see grouped clusters.

For example: Cluster 30 contains all records where first_name = "Chuck". Within that cluster, you will observe, similar last_name values and similar company values. This indicates likely duplicate records.
You may determine that the record with Id: 569000 appears to be the most accurate or complete version and therefore is the best candidate to keep.
Step 6: Select the Record to Keep
To retain specific records:
1. Go back to the Rules tab.
2. Click the Run button on the right side of the Rule Definition.
This opens the Cluster Data Browser in editable mode.
3. Select the record(s) you want to keep.
4. Click Generate Rules.
The system generates the necessary rules to preserve the selected record(s) and remove the others.
Step 7: Repeat the Process
The process can be repeated. This allows controlled and precise duplicate resolution.
1. Review a cluster.
2. Select one or more records to keep.
3. Generate rules.
4. Move to the next cluster.
Important Note: Handling First Name Variations
This configuration only handles exact matches on first_name. If your data includes variations such as, “Chuck”, “Chuk”, “Chuc”, you should, first clean up exact first_name duplicates using the rule described above. Then create a new RemoveDuplicatesFuzzyMatching rule where:
• last_name is used as the key field
• first_name is configured for fuzzy matching
This staged approach improves matching accuracy and reduces false positives.
ReplaceValue
This rule replaces field values based on a specified constant, field, function result, regular expression result, or a lookup result. This rule also enables users the option to replace values only if a specified condition is met. The field data being replaced is the field this rule is written for.
Note: When writing replaced values to a target field, you may encounter a truncation error, often due to a mismatch in field sizes between the target field and the replacement value. To resolve this issue, adjust the field size of target field according to the replaced/overwritten value size.
Rule Properties
This rule has the following properties.
Rule Name | A default rule name (<FieldName><ReplaceValue>) is provided and displayed here. However, you can edit or overwrite it. Click Reset to restore the default rule name. Note: The underscore (_) character is the only special character allowed in the name. Rule names cannot begin with a digit. If a field or column in the source data starts with a digit, 'r_' will be prepended to any rules created based on that field. |
Field Name | The field name to which the rule applies is displayed here, along with the data type in parentheses. For example, ZIP (String). |
Rule Type | The type of rule that is applied to the field. That is ReplaceValue (Function rule). Tip... A Red Cross in a rule icon (for example |
Rule Parameters
This rule has the following parameters.
Select an option from the Replace Function Choices drop-down list.
Option | Description |
Replace with Constant | Replaces the field value with the specified Constant. • Constant - Enter the constant value with which to replace. |
Replace with Field | Replaces the field value with the specified alternate source Field value. • Field - Select the field from which to replace. |
Replace with Function Results | (Available for string fields) Replaces the field value with the selected function results. You can select one or both functions: • ChangeStringCase - Changes the case of a string field to specified case (for example upper, lower, title) before writing to target field. See ChangeStringCase for more information. • StringTrim - Trims whitespace from a String field. See StringTrim for more information. |
Replace with Lookup | Replaces a source field value with a value from an incore lookup which is stored in memory (RAM). See Replace with Lookup for more information. |
Replace with Regex | (Available for string fields) Replaces what matches the specified regex expression with the replacement value. See Replace with Regex for more information. |
Select Condition | (Optional) Select the condition that must be met for replacing a value. Options are: • CompareToConstant (see CompareToConstant) • CompareToField (see CompareToField) • FuzzyMatch (see IsNotBlank) • IsBlank - (available for string fields) - Replaces if the field value is blank. • MatchesRegex (see MatchesRegex) |
Replace with Lookup
This option allows you to perform a lookup (search and retrieve values from another dataset). The lookup data is stored in memory (RAM).
This rule is useful when your data contains a field that is related to another field in another dataset and you want to replace it’s value with a value out from that other dataset.
Users select or add a lookup, specify a Lookup Key Field from the lookup list of fields in the lookup dataset, specify a Matching Key Field from the source data or derived field, and the lookup Replacement Field from the lookup dataset. During execution, when the Lookup Key Field and the Matching Key Field values match, the lookup Replacement Field value replaces the data field value before writing to the target.
This rule option supports all data types. However, the Lookup Key Field and Matching Key Field values must be the same data type.
This option requires a lookup source definition. You can add a lookup source in the Source tab (see Managing Lookups in Profile Editor), or in the Rules tab when configuring this rule or the LookupValue rule.
Note: If the lookup is already added, select it from the Lookup Name drop-down list, and select the Matching Key Field and the Replacement Field.
This topic includes the following:
Option Parameters
Parameter | Description |
Lookup Name | Click Add Tip... In the Lookup Configuration Wizard, connect to the lookup as with a source connector. When prompted to select the Lookup Key Field, select the lookup column for comparing against the Matching Key Field in the source or derived field. Click |
Lookup Key Field | The lookup field previously selected in the Lookup Configuration Wizard. This field contains the lookup values to compare against the Matching Key Field values. When the Lookup Key Field and the Matching Key Field values match, the Replacement Field value (from the lookup) is used. If no match is found, the field is replaced with a null or blank. |
Matching Key Field | Select the field in the source (or derived field) to match against the Lookup Key Field. When the Lookup Key Field and the Matching Key Field values match, the Replacement Field value is returned. |
Replacement Field | Select the field in the lookup that contains the replacement value. |
Select Condition | (Optional) Select the condition that must be met for replacing a value. Options are: • CompareToConstant (see CompareToConstant) • CompareToField (see CompareToField) • FuzzyMatch (see IsNotBlank) • IsBlank - (available for string fields) - Replaces if the field value is blank. • MatchesRegex (see MatchesRegex) |
Configuring a ReplaceValue rule
1. In the Rules tab, select the field to which the lookup will be applied, then click  >Add New Rule.
The Add Rules dialog opens.
The Add Rules dialog opens.
2. In the Remediation tab, select ReplaceValue, and Finish.
The Rule Definition pane opens.
The Rule Definition pane opens.
The Rule Name field displays the rule name which can be edited.
3. In the Rule Definition pane:
• Select Replace with Lookup from the Replace Function Choices drop-down list.
• Click  (on the right of the Lookup Name drop-down list) to open the Lookup Configuration Wizard.
4. In the Lookup Configuration Wizard:
• Enter a name for the lookup and add a description (if required).
• Configure the lookup data connection properties, click Connect and Next.
• Verify that you are connected to the correct lookup data, note the name of the column to be used for the Lookup Key Field (the column that contains content that matches the source or derived content), then click Next.
• In the Field Name column, select the Lookup Key Field (the field to match against the Matching Key Field) and click Finish.
The lookup you created is now available in the Lookup Name drop-down list and the Source tab Source drop-down list.
5. In the Rule Definition pane:
• Matching Key Field: Select the source or derived field to match against the Lookup Key Field.
• Replacement Field: Select the lookup field that contains the values to retrieve.
6. Save the profile, then click  to execute the profile.
The Total pass/fail data pie chart is displayed.
The Total pass/fail data pie chart is displayed.
7. Click the pie chart to open the Drill Down data tab.
View the replaced values in the relevant data column.
View the replaced values in the relevant data column.
Editing a lookup source
1. In the Rules tab, click  >Add New Rule.
The Add Rules dialog opens.
The Add Rules dialog opens.
2. In the Remediation tab, select ReplaceValue, and Finish.
The Rule Definition displays the rule you created in the Rule Name field. The rule name is the source field name + the rule name (which can be edited).
The Rule Definition displays the rule you created in the Rule Name field. The rule name is the source field name + the rule name (which can be edited).
3. Select Replace with Lookup from the Replace Function Choices drop-down list.
4. Select the lookup you want to edit from the Lookup Name drop-down list.
5. Click  to edit (on the right of the Lookup Name drop-down list) in the Configuration Wizard.
6. Edit fields and properties as needed, click Connect and Next.
7. Verify that you are connected to the correct lookup data, note the column to be used for the Lookup Key Field (the field that contains the replacement value), then click Next.
8. In the Field Name column, select the field to use as the Lookup Key Field and click Finish.
Note: When users change the lookup name, connection, key field or replacement field, all related elements and metrics using the lookup file reflect the changes (for example, the rule name).
Deleting a lookup source
1. In the Rules tab, click  >Add New Rule.
The Add Rules dialog opens.
The Add Rules dialog opens.
2. In the Remediation tab, select ReplaceValue, and Finish.
The Rule Definition displays the rule you created in the Rule Name field. The rule name is the source field name + the rule name (which can be edited).
The Rule Definition displays the rule you created in the Rule Name field. The rule name is the source field name + the rule name (which can be edited).
3. Select Replace with Lookup from the Replace Function Choices drop-down list.
4. Select the lookup you want to edit from the Lookup Name drop-down list.
5. Click  to delete (on the right of the Lookup Name drop-down list).
The lookup is removed from the Lookup Name drop-down list and the Source tab Source drop-down list.
The lookup is removed from the Lookup Name drop-down list and the Source tab Source drop-down list.
Example: Replacing StateCode values with StateName values
The following use case examples describe a user with a source State column that contains state codes (for example CA and TX). The user wants the values to be state names (for example California and Texas). These examples use the following “States.txt” data file as the lookup file, which contains a StateCode column and a StateName column:
StateCode, StateName
"AL","Alabama"
"AK","Alaska"
"AZ","Arizona"
"AR","Arkansas"
"CA","California"
"CO","Colorado"
"CT","Connecticut"
<etc.>
Note: If multiple matches of the StateCode are found, the first instance of the StateName is used.
To configure the rule we set the following:
• Set the ReplaceValue rule on the source field that contains incorrect values. In this example, the State column field which contains state codes.
• Define a new lookup named state_lookup and connect it to “States.txt”.
• Set the following parameters:
• Replace Function Choices - Replace with Lookup
• Lookup Name - Choose state_lookup if it is not already selected.
• Lookup Key Field - StateCode (This is the lookup field to match against the Matching Key Field that you selected when creating the lookup.)
• Matching Key Field - State (This is the source field to match against the Lookup Key Field.)
• Replacement Field - StateName (This is lookup field with values that will replace the state code.)
Replace with Regex
This option replaces what matches the specified regex expression with the replacement value, before writing to target field.
Option Parameters
The following parameters are available.
Parameter | Description | |
Pattern | The regex pattern to search for. See Java Regular Expressions. | |
Replacement | The replacement value. | |
Occurrences | The field occurrences that you want to replace. For example “1, 3-4, 7”. The “3-4” (from 3rd through 4th) is a range. You can also specify “all”. If left blank, all instances are replaced. | |
Select Condition | (Optional) Select the condition that must be met for replacing a value. Options are: • CompareToConstant (see CompareToConstant) • CompareToField (see CompareToField) • FuzzyMatch (see IsNotBlank) • IsBlank - (available for string fields) - Replaces if the field value is blank. • MatchesRegex (see MatchesRegex) | |
Supported Data Types
All data types.
Remarks
When replacing values in the target field, you may encounter a truncation error, often due to a mismatch in field sizes between the target field and the replacement value. To resolve this issue, adjust the field size of target field according to the replaced/overwritten value size.
Rounding
This rule standardizes numeric values (including numeric strings) to a defined decimal precision using a specified rounding method, such as Half Up, Down, or Ceiling.
It provides the following benefits:
• Consistency and Accuracy: Ensures uniform data representation across reports, dashboards, and financial documents.
• Regulatory Compliance: Supports adherence to standards that require fixed decimal precision, particularly in financial and currency-related contexts.
Rule Properties
Rule Name | A default rule name (<FieldName>Rounding) is provided and displayed here. However, you can edit or overwrite it. Click Reset to restore the default rule name. Note: The underscore (_) character is the only special character allowed in the name. Rule names cannot begin with a digit. If a field or column in the source data starts with a digit, 'r_' will be prepended to any rules created based on that field. |
Field Name | The field name to which the rule applies is displayed here, along with the data type in parentheses. For example, Balance (Numeric). |
Rule Type | The type of rule that is applied to the field. That is Rounding (Function rule). |
Rule Parameters
Decimal Precision | An integer value (0 or greater) indicating the total number of digits that will exist to the right of the decimal point in the final, rounded result. Note that Decimal Precision dictates the final number of decimal places, regardless of the input's original precision: • If the input has fewer decimal places than specified, the output will typically pad with zeros if the system handles the result as a fixed-point number (for example, Input 1.2 with DECIMAL_PRECISION = 4 might output 1.2000). • If the input is an integer and DECIMAL_PRECISION = 0 (for example, rounding to the nearest whole number), the output will also be an integer (for example, Input 49.8 with DECIMAL_PRECISION = 0 outputs 50). |
Rounding Mode | Specifies the method used for rounding numeric values. Tip... If negative values are used for input, see Negative Values and Rounding Behavior. • Half Up: Rounds to the nearest value. If exactly halfway, rounds away from zero. Examples (1 decimal place): 2.25 → 2.3, -2.25 → -2.3. See also: Example Financial Calculations (Currency Rounding), Example: Data Standardization (Reporting) • Half Down: Rounds to the nearest value. If exactly halfway, rounds toward zero. Examples (1 decimal place): 2.25 → 2.2, -2.25 → -2.2. • Up: Always rounds away from zero, regardless of the discarded digits. Examples (1 decimal place): 2.21 → 2.3, -2.21 → -2.3 • Down: Always rounds toward zero at the specified precision, truncating any extra digits without increasing the value. Examples (1 decimal place): 2.29 → 2.2, -2.29 → -2.2 • Ceiling: Rounds toward positive infinity. Examples (1 decimal place): 2.21 → 2.3, -2.21 → -2.2 • Floor: Round towards negative infinity. Examples (1 decimal place): 2.29 → 2.2, -2.21 → -2.3 • Half Even (Banker’s): Rounds to the nearest value. If exactly halfway, rounds to the nearest even digit. Examples (1 decimal place): 2.25 → 2.2 (since 2.2 is even in the last retained digit), 2.35 → 2.4, -2.25 → -2.2. • Unnecessary: No rounding is applied if the value conforms to the specified decimal precision. An error occurs if the value has more decimal places than the specified precision. Examples (1 decimal place): 2.20 → 2.2 (valid), 2.25 → error |
Supported Data Types
Numeric (input)
Numeric (output)
Example Financial Calculations (Currency Rounding)
Use Case: Standardize the output to two decimal places and round the value up. Typically used to ensure consistent and accurate currency values for billing, reporting, and regulatory compliance.
To change the input value 123.4567 to the output value 123.46, parameters can be set as follows:
• Rounding Mode - Half Up
• Decimal Precision - 2
Example: Data Standardization (Reporting)
Use Case: Standardize measurement data to one decimal place and round the value down. Typically used to present clean, uniform data in dashboards and analytics for better readability and consistent reporting standards.
To change the input value 98.765 to the output value 98.7, parameters can be set as follows:
• Rounding Mode - Half Up
• Decimal Precision - 1
Example: Threshold Enforcement (Quality Control)
Use Case: Round sensor readings to nearest integer for threshold checks. Typically used to enforce quality standards and trigger alerts based on rounded values to maintain operational thresholds and compliance requirements.
To change the input value 49.8 to the output value 50, parameters can be set as follows:
• Rounding Mode - Up
• Decimal Precision - 0
Example: Scientific Data Processing (Statistical Rounding)
Use Case: Standardize scientific instrument readings to two decimal places, using a method that minimizes rounding bias (Banker's Rounding). Typically used to ensure statistical neutrality in large data sets by rounding to the nearest even number when equidistant (for example, 5.725 rounds to 5.72, while 5.735 would round to 5.74), which is critical for accurate research and analysis.
To change the input value 5.725 to the output value 5.72, parameters can be set as follows:
• Rounding Mode - Half Even
• Decimal Precision - 2
Example: Capacity and Inventory Management (Guaranteed Upper Bound)
Use Case: Calculate the number of pallets needed to ship an order, ensuring that any fraction of a pallet is counted as a full pallet to prevent shortages. Guarantees sufficient capacity or stock by always rounding a number toward positive infinity (up), ensuring that a calculated need is never underestimated.
To change the input value 12.01 (representing 12.01 pallets) to the output value 13, parameters can be set as follows:
Rounding Mode - Ceiling
Decimal Precision - 0
Example: Tax and Discount Calculations (Guaranteed Lower Bound)
Use Case: Calculate a safe, conservative estimate for an allowable cost or discount amount, ensuring the value is never inflated. This can also be used to prevent over-invoicing, over-allocating funds, or over-reporting on a conservative metric.
To change the input value 45.999 to the output value 45.99, parameters can be set as follows:
Rounding Mode - Floor
Decimal Precision - 2
Negative Values and Rounding Behavior
Rounding modes behave differently for negative numbers. This can be important in calculations (especially those related to temperature, finance, or measurement tolerances). The following table describes how each rounding mode calculates negative input numbers.
Negative Numbers & Rounding Modes
Mode | Behavior for Positive Input (e.g., 1.5) | Behavior for Negative Input (e.g., -1.5) | Key Principle |
Up | Rounds away from zero (2) | Rounds away from zero (-2) | Towards Infinity (Magnitude) |
Down | Rounds towards zero (1) | Rounds towards zero (-1) | Towards Zero |
Ceiling | Rounds towards positive infinity (2) | Rounds towards positive infinity (-1) | Towards Positive |
Floor | Rounds towards negative infinity (1) | Rounds towards negative infinity (-2) | Towards Negative Infinity |
Half Up | Rounds to nearest neighbor (2) | Rounds to nearest neighbor (-2) | Nearest Neighbor (Symmetrical) |
Half Down | Rounds to nearest neighbor (2) | Rounds to nearest neighbor (-1) | Nearest Neighbor (Symmetrical) |
StandardizeCurrency
This rule standardizes the format of monetary values by converting one or more source field formats into a single specified format. You can either specify the source currency formats to convert (in Currency Identifiers), or automatically detect all currency formats (by selecting Convert all currency formats). Recognized values are converted to the specified format (in To Format), while any unrecognized values are output unchanged.
Rule Properties
This rule has the following properties.
Rule Name | A default rule name (<FieldName>StandardizeCurrency) is provided and displayed here. However, you can edit or overwrite it. Click Reset to restore the default rule name. Note: The underscore (_) character is the only special character allowed in the name. Rule names cannot begin with a digit. If a field or column in the source data starts with a digit, 'r_' will be prepended to any rules created based on that field. |
Field Name | The field name to which the rule applies is displayed here, along with the data type in parentheses. For example, Balance (String). |
Rule Type | The type of rule that is applied to the field. That is StandardizeCurrency (Function rule). Tip... A Red Cross in a rule icon (for example |
Rule Parameters
Convert all currency formats | Enable this option to automatically detect and attempt parsing of source values using all supported currency formats. Recognized values are output with the format specified in To Format. Unrecognized values are output unchanged. Selecting this option hides the Currency Identifiers option—allowing you to either auto-detect formats or specify the Currency Identifiers, but not both. |
Currency Identifiers | Select the currency formats to detect in the source from a region-based list of formats. Recognized values are output with the format specified in To Format. Unrecognized values are output unchanged. This option is hidden when Convert all currency formats is selected. A default value may be displayed. This default value is coming from the Data Profile preference settings and can be customized (see Setting Data Profile Preferences). If you do not wish to use the default, type a custom pattern or select one from the available list, and then press Enter or click Add to apply it. Multiple identifiers can be added. To remove an identifier click the Note: Currency format allows '$', '€', '£', '¥', '₹', '₽', '₺', '₴', '₦', '₩', '₪', '₡', '₵', '₸', '₾', '₿', '¢', '₫', '₭', '₮', '₱', '₲', '₶', '₷', '₻', '₼' and [A-Z]. Note: A currency identifier is a standardized code, symbol used to recognize, classify, and verify money, commonly known as ISO 4217 codes (e.g., USD, EUR, INR) for international exchange. |
To Format | Specify a format to apply to the currency in the output. Default is Symbol Prefix ($1,234.56). If you do not wish to use the default, type a custom pattern or select one from the available list, and then press Enter or click Add to apply it. A single format can be added. To remove an identifier click the Options are: • ISO Code Prefix (USD 1,234.56) • Numeric Only (1234.56) • Symbol Prefix ($1,234.56) • Symbol Suffix (1,234.56$) Note: Currency format allows '$', '€', '£', '¥', '₹', '₽', '₺', '₴', '₦', '₩', '₪', '₡', '₵', '₸', '₾', '₿', '¢', '₫', '₭', '₮', '₱', '₲', '₶', '₷', '₻', '₼' and [A-Z]. |
Decimal Places (0-4) | Specifies the number of decimal places for the output value. Enter a value from 0 to 4. The default is none (which preserves the original precision). |
Supported Data Types
String
Remarks
This rule replaces formats in the output field, it does not change the value. It also does not generate pass/fail statistics based on whether the conversion succeeds or fails.
StandardizeDateFormat
This rule standardizes date values by converting values from one or more source date formats into a single specified date format. You can specify one or more source “from formats” to identify which values should be converted. Matching values are converted into the specified “to format”, while any unrecognized values are returned unchanged. It supports automatic detection of source date formats.
Rule Properties
This rule has the following properties.
Rule Name | The default rule name (<FieldName>_StandardizeDateFormat) is provided and displayed here. However, you can edit or overwrite it. Click Reset to restore the default rule name. Note: The underscore (_) character is the only special character allowed in the name. Rule names cannot begin with a digit. If a field or column in the source data starts with a digit, 'r_' will be prepended to any rules created based on that field. |
Field Name | The field name to which the rule applies is displayed here, along with the data type in parentheses. For example, PurchaseDate (Date). |
Rule Type | The type of rule that is applied to the field. That is StandardizeDateFormat (Function rule). |
Rule Parameters
This rule has the following parameters.
Convert all date formats | When enabled, automatically attempts to parse source values using all supported date formats. Any unrecognized values are returned unchanged. Selecting this option hides the From Date Format option—allowing you to either auto-detect formats or specify the From Date Formats, but not both. |
From Date Formats | Allows to specify one or more date formats that your source data uses. Values matching any selected format will be converted. This option is hidden when Convert all date formats is selected. A default value may be displayed. This default value is coming from the Data Profile preference settings and can be customized (see Setting Data Profile Preferences). If you do not wish to use the default, type a From Date Format or select one from the available list, and then press Enter or click Add to apply it. Only one format can be added. To remove an added format click the Select the format to apply: • MM/dd/yyyy | strict (e.g., 01/15/2025) • M/d/yyyy | lenient (e.g., 1/5/2025 or 01/15/2025) • dd/MM/yyyy | strict (e.g., 15/01/2025) • d/M/yyyy | lenient (e.g., 5/1/2025 or 15/01/2025) • yyyy-MM-dd | ISO strict (e.g., 2025-01-15) • dd-MMM-yyyy | strict day (e.g., 15-Jan-2025) • d-MMM-yyyy | lenient day (e.g., 5-Jan-2025) • MMM dd, yyyy | strict day (e.g., Jan 15, 2025) • MMM d, yyyy | lenient day (e.g., Jan 5, 2025) • MMMM dd, yyyy | strict day (e.g., January 15, 2025) • MMMM d, yyyy | lenient day (e.g., January 5, 2025) • dd.MM.yyyy | strict (e.g., 15.01.2025) • yyyy/MM/dd | strict (e.g., 2025/01/15) • dd-MM-yyyy | strict (e.g., 15-01-2025) • d-M-yyyy | lenient (e.g., 5-1-2025) Note: Date format allows 'D', 'd', 'w', 'W', 'u', 'E', 'F','M', 'y', '-', '/', ' ', '.' |
To Date Format | Specifies the date format for converted date values, determining how parsed source data should be displayed or stored after transformation. If you do not wish to use the default, type a To Date Format or select one from the available list, and then press Enter or click Add to apply it. Multiple formats can not be added. To remove an added format click the Select the format to apply: • MM/dd/yyyy | (e.g., 01/15/2025) • dd/MM/yyyy | (e.g., 15/01/2025) • yyyy-MM-dd | ISO (e.g., 2025-01-15) • dd-MMM-yyyy | (e.g., 15-Jan-2025) • MMM dd, yyyy | (e.g., Jan 15, 2025) • MMMM dd, yyyy | (e.g., January 15, 2025) • dd.MM.yyyy | (e.g., 15.01.2025) • yyyy/MM/dd | (e.g., 2025/01/15) • M/d/yyyy | (e.g., 1/15/2025) • dd-MM-yyyy | (e.g., 15-01-2025) Note: Date format allows 'D', 'd', 'w', 'W', 'u', 'E', 'F','M', 'y', '-', '/', ' ', '.' |
Supported Data Types
String
Remarks
This rule replaces formats in the output field, it does not change the value. It also does not generate pass/fail statistics based on whether the conversion succeeds or fails.
StandardizeTimeFormat
This rule standardizes time values by converting values from one or more source time formats into a single specified time format. You can specify one or more source “from formats” to identify which values should be converted. Matching values are converted into the specified “to format”, while any unrecognized values are returned unchanged. Automatic detection of source time formats including 12-hour, 24-hour, and dot-separated styles is supported.
Rule Properties
This rule has the following properties.
Rule Name | The default rule name (<FieldName>_StandardizeTimeFormat) is provided and displayed here. However, you can edit or overwrite it. Click Reset to restore the default rule name. Note: The underscore (_) character is the only special character allowed in the name. Rule names cannot begin with a digit. If a field or column in the source data starts with a digit, 'r_' will be prepended to any rules created based on that field. |
Field Name | The field name to which the rule applies is displayed here, along with the data type in parentheses. For example, PurchaseTime (Time). |
Rule Type | The type of rule that is applied to the field. That is StandardizeTimeFormat (Function rule). |
Rule Parameters
This rule has the following properties.
Convert all time formats | When enabled, automatically attempts to parse source values using all supported time formats. Any unrecognized values are returned unchanged. Selecting this option hides the From Time Format option—allowing you to either auto-detect formats or specify the From Time Formats, but not both. |
From Time Formats | Allows to specify one or more time formats that your source data uses. Values matching any selected format will be converted. This option is hidden when Convert all time formats is selected. A default value may be displayed. This default value is coming from the Data Profile preference settings and can be customized (see Setting Data Profile Preferences). If you do not wish to use the default, type a From Time Format or select one from the available list, and then press Enter or click Add to apply it. Multiple formats can be added. To remove an added format click the Select the format to apply: • HH:mm:ss | 24hr strict (e.g., 14:30:45) • H:mm:ss | 24hr lenient (e.g., 9:30:45 or 14:30:45) • hh:mm:ssa | 12hr strict (e.g., 02:30:45 PM) • h:mm:ss a | 12hr lenient (e.g., 2:30:45 PM) • HH:mm | 24hr short strict (e.g., 14:30) • H:mm | 24hr short lenient (e.g., 9:30) • hh:mm a | 12hr short strict (e.g., 02:30 PM) • h:mm a | 12hr short lenient (e.g., 2:30 PM) • HH:mm:ss.SSS | millis strict (e.g., 14:30:45.123) • hh:mm:ss.SSS a | 12hr millis strict (e.g., 02:30:45.123 PM) • h:mm:ss.SSS a | 12hr millis lenient (e.g., 9:30:45.123 AM) • HH.mm.ss | Nordic strict (e.g., 14.30.45) Note: Time format allows 'H', 'h', 'm', 's', 'S', 'a', 'k', 'K', ':', '.', ' ' |
To Time Format | Specifies the time format for converted time values, determining how parsed source data should be displayed or stored after transformation. If you do not wish to use the default, type a To Time Format or select one from the available list, and then press Enter or click Add to apply it. Only one format can be added. To remove an added format click the Select the format to apply: • HH:mm:ss | 24hr (eg. 14:30:45) • hh:mm:ss a | 12hr (eg. 02:30:45 PM) • HH:mm | 24hr (eg. 14:30) • hh:mm a | 12hr (eg. 02:30 PM) • HH:mm:ss.SSS | millis (eg. 14:30:45.123) • HH.mm.ss | Nordic (eg. 14.30.45) Note: Time format allows 'H', 'h', 'm', 's', 'S', 'a', 'k', 'K', ':', '.', ' ' |
Supported Data Types
String
Remarks
This rule replaces formats in the output field, it does not change the value. It also does not generate pass/fail statistics based on whether the conversion succeeds or fails.
StandardizePhoneNumberFormat
This rule standardizes the format of phone number values by converting one or more formats in the source into a single specified format. You can either specify the source phone number formats to convert (in From Phone Formats), or automatically detect and convert all source phone number formats (by selecting Convert all phone formats). Recognized values are converted to the specified format (in To Format), while any unrecognized values are output unchanged. Match criteria is based on the length of the value.
You can also specify whether to include a country code, add one if it’s missing from the source data, and whether to include phone number extensions. This can be useful, for example, for ensuring data consistency for systems like call centers or SMS messaging, which require specific number formats to function properly.
Rule Properties
This rule has the following properties.
Rule Name | A default rule name (<FieldName>StandardizePhoneNumberFormat) is provided and displayed here. However, you can edit or overwrite it. Click Reset to restore the default rule name. Note: The underscore (_) character is the only special character allowed in the name. Rule names cannot begin with a digit. If a field or column in the source data starts with a digit, 'r_' will be prepended to any rules created based on that field. |
Field Name | The field name to which the rule applies is displayed here, along with the data type in parentheses. For example, Phone (String). |
Rule Type | The type of rule that is applied to the field. That is StandardizePhoneNumberFormat (Function rule). Tip... A Red Cross in a rule icon (for example |
Rule Parameters
Convert all phone formats | Enable this option to automatically detect and attempt parsing of source values using all supported phone number formats. Recognized values are output with the format specified in To Format. Unrecognized values are output unchanged. Selecting this option hides the From Phone Format option—allowing you to either auto-detect formats or specify the From Phone Formats, but not both. |
From Phone Formats | Select the phone number formats to detect in the source from a region-based list of formats. Recognized values are output with the format specified in To Format. Unrecognized values are output unchanged. This option is hidden when the Convert all phone formats option is selected. Default is United States - Fixed Line/ Mobile - (NNN) NNN-NNNN. If you do not wish to use the default, type a custom pattern or select one from the available list, and then press Enter or click Add to apply it. Multiple formats can be added. To remove an added format click the Note: Phone number format allows ‘N’, ‘+’, space, ‘-’, comma, ‘(’, and ‘)’. |
To Format | Specify a format to apply to the output. Default is National (e.g., (202) 555-1234). If you do not wish to use the default, type a custom pattern or select one from the available list, and then press Enter or click Add to apply it. Only one format can be added. To remove an added format click the Note: Phone number format allows ‘N’, ‘+’, space, ‘-’, comma, ‘(’, and ‘)’. Options are: • E.164 (e.g., +12025551234) - Applies the E164 International format often required by international communication platforms and APIs. • RFC 3966 (e.g., tel:+1-202-555-1234) - Applies the RFC3966 format. • National (e.g., (202) 555-1234) - Applies the national formatting standard, which does not include a country code in the results unless the country code is explicitly included in the custom format. • International (e.g., +1 202-555-1234) - Includes country code (if present in the input). • Plain National (e.g., 2025551234) - Excludes country code, used within a specific country. • Plain E.164 (Country code prepended e.g., 12025551234) - A globally unique phone number including country code, written as digits only |
Handle Extensions | Select what to do with phone extensions: • Preserve: Retains extension with the phone number (for example, 234-567-8900 x123 remains the same). • Remove: Removes extension from the phone number (for example, 234-567-8900 x123 is changed to 234-567-8900). • Separate: Encloses the extension with brackets (for example, 234-567-8900 x123 is changed to 234-567-8900 [ext:123]). |
Supported Data Types
String
Remarks
This rule replaces formats in the output field, it does not change the value. It also does not generate pass/fail statistics based on whether the conversion succeeds or fails.
StandardizePostalCodeFormat
This rule standardizes the format of postal code values by converting one or more formats in the source into a single specified format. You can either specify the source postal code formats to convert (in From Postal Formats), or automatically detect and convert all formats (by selecting Convert all postal code formats). Recognized values are converted to the specified format (in To Postal Format), while any unrecognized values are output unchanged. Match criteria is based on the length of the value and the order of placeholders. Accepted placeholders are A, C and N. The length and number of placeholders in the target format must exactly match the length and order of placeholders in the source format. For example, if the source format is "NNA CA", the target must also have the same number of characters. For example, "NNA-CA" is a match (and "NNAA-CA" and "NNAACA" are not matches).
You can also replace missing leading zeros that may have been removed by external systems.
Rule Properties
This rule has the following properties.
Rule Name | A default rule name (<FieldName>StandardizePostalCodeFormat) is provided and displayed here. However, you can edit or overwrite it. Click Reset to restore the default rule name. Note: The underscore (_) character is the only special character allowed in the name. Rule names cannot begin with a digit. If a field or column in the source data starts with a digit, 'r_' will be prepended to any rules created based on that field. |
Field Name | The field name to which the rule applies is displayed here, along with the data type in parentheses. For example, Zip (String). |
Rule Type | The type of rule that is applied to the field. That is StandardizePostalCodeFormat (Function rule). Tip... A Red Cross in a rule icon (for example |
Rule Parameters
Convert all postal formats | Enable this option to automatically detect and attempt parsing of source values using all supported postal code formats. Recognized values are output with the format specified in To Postal Format. Unrecognized values are output unchanged. Selecting this option hides the From Postal Format option—allowing you to either auto-detect formats or specify the From Postal Formats, but not both. |
From Postal Formats | Select the postal code formats to detect in the source from a region-based list of formats. Detected values are output with the format specified in To Postal Format. Unrecognized values are output unchanged. This option is hidden when the Convert all postal formats option is selected. Default is NNNNN. If you do not wish to use the default, type or select one from the available list, and then press Enter or click Add to apply it. Multiple formats can be added. To remove an added format click the Note: Postal code format allows 'N', 'A', 'C', space, and '-'. |
To Postal Format | Specify a format to apply to the output. Select the postal code format to convert to from a region-based list of formats. Default is (AS) NNNNN. If you do not wish to use the default, type a postal code format or select one from the available list, and then press Enter or click Add to apply it. A single format can be added. To remove an added identifier click the Note: Postal code format allows 'N', 'A', 'C', space, and '-'. |
Add Leading Zeros | Select to insert leading zeros (0). The default is selected. This option is useful if an external system removed leading zeros from the source data, allowing replacement to conform to the standard 5-digit format. For example, if the input is "1234", the output will be changed to "01234". |
Supported Data Types
String
Remarks
This rule replaces formats in the output field, it does not change the value. It also does not generate pass/fail statistics based on whether the conversion succeeds or fails.
StandardizeUSState
This rule converts US state values into a consistent format—full name (e.g., California), abbreviation (e.g., CA), or ISO code (e.g., US-CA). Accepts any of these formats as input and matches values case-insensitively. Unrecognized values are returned unchanged.
Rule Properties
This rule has the following properties.
Rule Name | A default rule name (<FieldName>StandardizeState) is provided and displayed here. However, you can edit or overwrite it. Click Reset to restore the default rule name. Note: The underscore (_) character is the only special character allowed in the name. Rule names cannot begin with a digit. If a field or column in the source data starts with a digit, 'r_' will be prepended to any rules created based on that field. |
Field Name | The field name to which the rule applies is displayed here, along with the data type in parentheses. For example, State (String). |
Rule Type | The type of rule that is applied to the field. That is StandardizeState (Function rule). Tip... A Red Cross in a rule icon (for example |
Rule Parameters
To Format | Default is Abbreviation (e.g., CA) If you do not wish to use the default, select from the available list, and then press Enter or click Add to apply it. Only one format can be added. To remove an added format click the Select the format to apply: • Full Name (e.g., California) • Abbreviation (e.g., CA) • ISO Code (e.g., US-CA) |
Supported Data Types
String
StringTrim
This rule trims whitespace from a String field.
Rule Properties
Rule Name | A default rule name (<FieldName>_StringTrim) is provided and displayed here. However, you can edit or overwrite it. Click Reset to restore the default rule name. Note: The underscore (_) character is the only special character allowed in the name. Rule names cannot begin with a digit. If a field or column in the source data starts with a digit, 'r_' will be prepended to any rules created based on that field. |
Field Name | The field name to which the rule applies is displayed here, along with the data type in parentheses. For example, Address (String). |
Rule Type | The type of rule that is applied to the field. That is StringTrim (Function rule). |
Rule Parameters
Trim Side | The side from which to remove white spaces: • Both (default) • Left • Right |
Supported Data Types
String (input)
String (output)
Example
To convert a string field to another data type and to ignore extra whitespace:
Apply the StringTrim rule to a string field, and then apply StringToConversion rule to the output. Without String Trim, extra white space in the field value causes the conversion rule to fail.
To determine distinct values in a string field and ignore whitespace:
Apply the StringTrim rule to a string field, then apply the CompareToConstant rule to the output. Without String Trim, varying amounts of extra whitespace are considered distinct values.
Last modified date: 05/27/2026